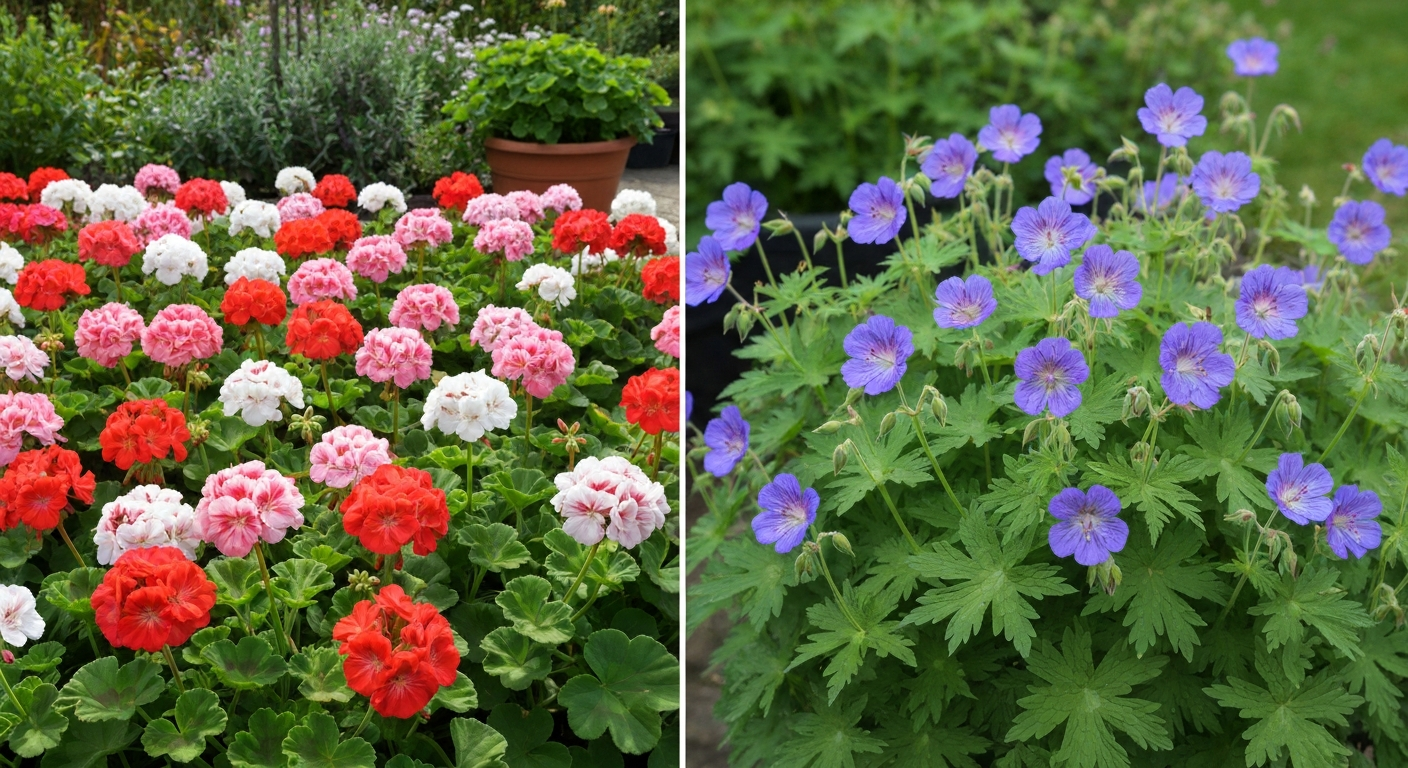
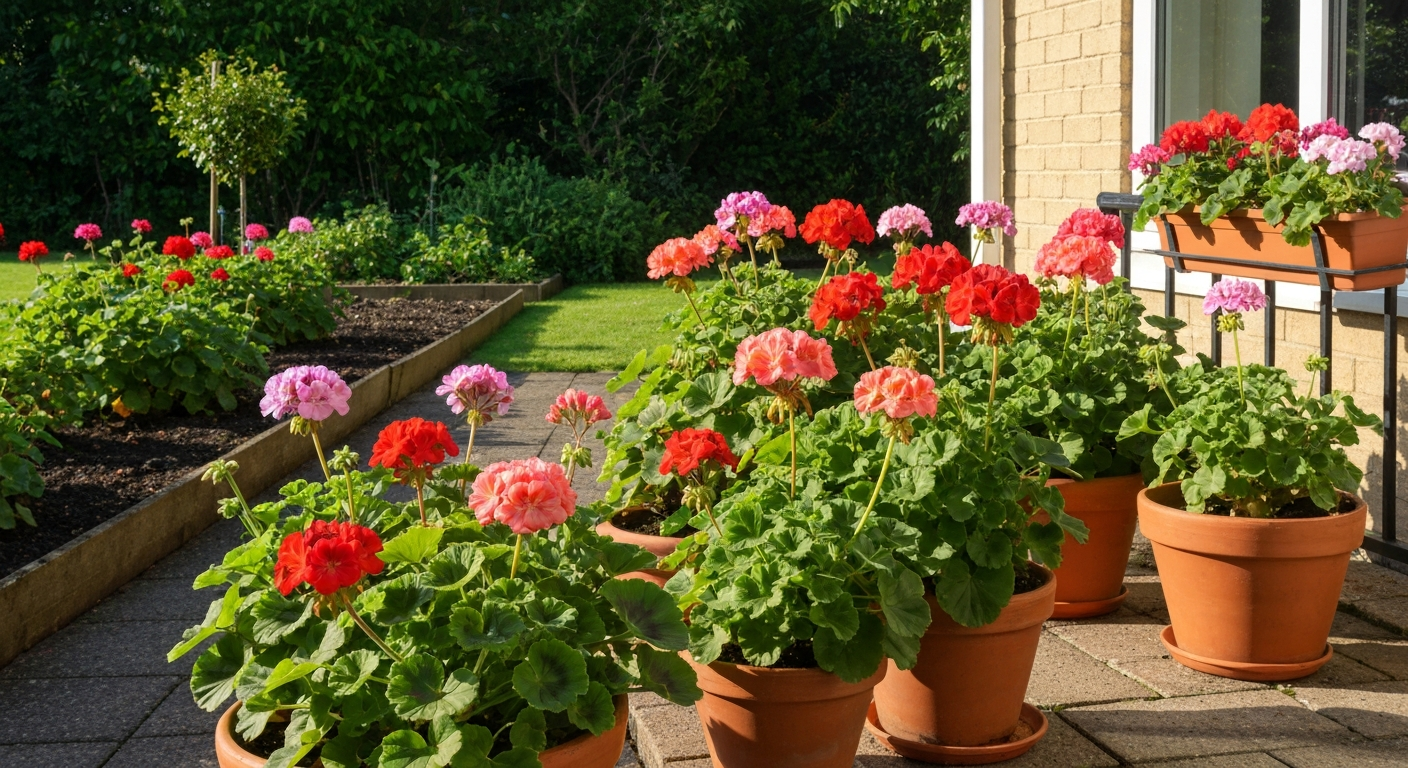
Zonal geraniums (Pelargonium × hortorum) are among the most rewarding flowering plants you can grow, they bloom prolifically from late spring through hard frost, tolerate a fair bit of neglect once established, and look equally at home in a garden bed, a terracotta pot, or a window box. Start seeds indoors about 12 weeks before your last frost date, or root stem cuttings in a peat-perlite mix and transplant after nights are consistently above 50°F (10°C). Give them at least 6 hours of sun, well-draining soil at pH 5.8–6.5, and a low-nitrogen fertilizer like 5-10-15 every 4–6 weeks, and they'll reward you with continuous color all season long.
How to Grow Zonal Geraniums: Complete Care Guide from Seed to Bloom

Harriet Whitmore
27 Jul 2026
What exactly is a zonal geranium (and how to spot one)
The name 'geranium' gets applied loosely in garden centers, so it's worth pinning down exactly what you're dealing with. Zonal geraniums are Pelargonium × hortorum, a hybrid group bred specifically for bedding and container use. They have a bushy, mounded growth habit and rounded leaves, the key identifying feature is a darker, horseshoe-shaped band (the 'zone') across the leaf surface, though not every cultivar shows it strongly. Flower heads are globe-like clusters (called umbels) held above the foliage on stiff stems, typically in reds, pinks, salmons, whites, and bicolors.
The three types you'll most often encounter alongside zonals are ivy-leaf (P. peltatum, also called trailing geraniums), scented-leaf geraniums, and what some people call 'true' hardy geraniums (Geranium spp. Authoritative extension identification guides (covering zonal = Pelargonium × hortorum, ivy = Pelargonium peltatum, and scented Pelargonium types) are available in the blank" rel="noopener noreferrer">Geranium or Pelargonium (UC ANR fact sheet). ), which are actually an entirely different genus. Ivy-leaf types have waxy, shield-shaped leaves with pointed lobes and a trailing or cascading habit, making them the go-to for hanging baskets. Scented-leaf types have deeply lobed, highly aromatic foliage and are grown more for fragrance than floral display. If you're deciding between a mounded bed plant and a cascading basket plant, the trailing/ivy geranium guide is worth reading alongside this one, because their care differs in a few meaningful ways.
| Type | Botanical name | Growth habit | Leaf shape | Primary use |
|---|---|---|---|---|
| Zonal geranium | Pelargonium × hortorum | Bushy, mounded | Rounded, often zoned band | Beds, pots, borders |
| Ivy/trailing geranium | Pelargonium peltatum | Trailing, cascading | Waxy, ivy-like lobes | Hanging baskets, walls |
| Scented-leaf geranium | Various Pelargonium spp. | Bushy to sprawling | Deeply lobed, aromatic | Fragrance, herb gardens |
| Hardy geranium (cranesbill) | Geranium spp. | Spreading, low | Divided/palmate | Ground cover, borders |
Picking the right variety for your space and climate
There are hundreds of zonal geranium cultivars, which can feel overwhelming at first. I've found it easiest to think in three categories: compact seed-grown series for mass planting, larger vegetatively propagated cultivars for statement containers, and heat-tolerant selections for warm-summer climates.
For garden beds and large borders, compact seed-grown series like Pinto Premium, Maverick, and Multibloom produce uniform plants at 12–18 inches (30–45 cm) wide and are easy to grow from seed at home. They're bred for earliness and heat tolerance. For patio containers and statement planters, vegetatively propagated cultivars like 'Caliente' (deep orange-red, outstanding heat tolerance) and the Boldly series hold up better during hot, humid summers. In mild-winter climates (USDA zones 9–11), where zonals behave as perennials, larger 'zonal standards' grown on tall single stems make impressive year-round specimens. For hanging baskets, most true zonals are too upright, that's when you'd look at ivy-leaf or trailing types instead, though a few compact zonals work in mixed baskets as the upright center plant.
| Use / Climate | Recommended cultivars/series | Key traits |
|---|---|---|
| Beds, cold-winter climates | Pinto Premium, Maverick, Multibloom | Seed-grown, compact 12–18", early flowering |
| Patio containers | Caliente, Boldly series, Savannah series | Heat-tolerant, large flower heads, veg. propagated |
| Mild-winter (zones 9–11) | Standard/tree forms, Orbit series | Perennial potential, sturdy stems |
| Mixed baskets (upright component) | Americana series, Horizon series | Compact mound, works alongside trailers |
| High-heat / humid south | Caliente, Fantasia, Savannah | Selected for heat and humidity tolerance |
What to look for when buying plants or seeds
At the nursery, resist the temptation to grab the plant already bursting with open flowers. A compact, dark green plant with plenty of unopened buds and healthy new growth at the stem tips will outperform a leggy, flower-heavy plant that's been sitting in a small pot too long. Check the undersides of leaves for aphids and look at the base of the stem, any mushiness, dark discoloration, or foul smell near the soil line suggests root rot or stem rot and that plant should stay on the shelf.
When ordering seeds online, stick with reputable seed companies that specify germination rates and pack dates. Fresh seed performs significantly better than old stock. For vegetatively propagated named cultivars (like the Caliente or Boldly series), check that the online supplier ships unrooted or rooted cuttings with phytosanitary documentation if they're crossing state or country lines, disease-free propagation material is worth paying a bit more for.
Seeds or cuttings: which route makes sense for you
This is one of the first real decisions you'll make, and both options work well, they just suit different situations. Seeds are more economical when you need a lot of plants (a whole bed, for example), and modern F1 hybrid seed lines produce surprisingly uniform results. The trade-off is time: you need to start 12 weeks before your last frost, and germination can be uneven. Cuttings, on the other hand, are faster to a flowering-size plant, preserve the exact traits of the parent cultivar (important for named varieties), and are your only real option if you want to carry over a favorite plant from last year.
| Method | Cost | Time to flowering plant | Cultivar fidelity | Best for |
|---|---|---|---|---|
| Seed | Low (10–50 seeds per pack) | 14–16 weeks from sow | Variable (F1 hybrids fairly uniform) | Large quantities, bed planting, beginners on a budget |
| Cuttings | Low (uses existing plants) | 8–10 weeks from cutting | Exact copy of parent | Named cultivars, overwintered stock, faster results |
Starting zonal geraniums from seed indoors
Timing is everything with seed-grown zonals. Count back 12 weeks from your average last frost date, that's your sow date. In most of the northern US and Canada, that means starting in late January or early February. The seeds need warmth and patience more than anything else.
- Fill small cells or a seed tray with a porous, sterile seed-starting mix (equal parts peat or coir plus perlite or vermiculite works well). Moisten the mix thoroughly before sowing.
- Sow seeds on or very near the surface. Many Pelargonium seeds respond to light for germination, so either leave uncovered or press them in with just the thinnest dusting of vermiculite (no more than 1/16 inch).
- Maintain substrate temperature at 70–75°F (21–24°C). A heat mat under the tray makes a real difference. Air temperature can be a few degrees cooler — it's the root zone warmth that matters.
- Place under grow lights or in a very bright window. At these temperatures, expect germination in 7–20 days. Don't panic if some are slow — geranium seed can be erratic.
- Once seedlings emerge, remove from the heat mat and keep under bright light for 14–16 hours per day to prevent stretching. Keep temperatures around 60–65°F (15–18°C) — slightly cooler nights are fine.
- When seedlings have two true leaves, thin or transplant to individual 3-inch pots using a general potting mix. Handle by the leaf, not the delicate stem.
- Begin hardening off 7–10 days before your transplant date. Day 1–2: 1–2 hours in bright shade, sheltered from wind. Add 1–2 hours per day and introduce morning sun gradually. By day 7–10 they should tolerate a full day outdoors.
- Transplant to the garden or final containers only after all frost risk has passed and nights are consistently above 50°F (10°C).
Propagating zonal geraniums from stem cuttings
Taking cuttings is genuinely easy once you've done it once, and it's the best way to carry a prized plant through winter or bulk up a favorite variety. Most home-grower zonal geraniums are propagated vegetatively to preserve cultivar traits; stem cuttings should be 3–4 inches (7–10 cm), stripped of lower leaves, inserted about 1 inch into a well-aerated rooting medium, and typically root in roughly 3–4 weeks under warm (65–75°F / 18–24°C) bright indirect light (see Plant Propagation by Stem Cuttings, NC State Extension) blank" rel="noopener noreferrer">Plant Propagation by Stem Cuttings — NC State Extension. Late summer (August) is a great time to take cuttings from outdoor plants before frost threatens, but you can do it almost any time the parent plant is actively growing.
- Choose a healthy, non-flowering stem tip. Using a clean, sharp knife or scissors, cut a 3–4 inch (7–10 cm) section just below a leaf node.
- Strip the lower leaves, leaving two or three leaves at the top. Remove any flower buds — you want the cutting focused on rooting, not blooming.
- Allow the cut end to air-dry for 1–2 hours. This lets the wound callus slightly, which reduces the risk of stem rot. This step is specific to geraniums and often skipped by people coming from other cuttings experience.
- Dip the cut end lightly in rooting hormone powder or gel (optional but speeds things up), then tap off any excess powder.
- Insert the cutting about 1 inch (2.5 cm) deep into a rooting medium of equal parts peat (or coir) and perlite. This mix stays moist but drains fast, reducing rot risk.
- Place in bright indirect light at 65–75°F (18–24°C). Do not mist heavily or enclose in plastic — geranium cuttings rot easily in high humidity. A very light misting of the leaves is fine.
- Roots typically form in 3–4 weeks. You'll know rooting has occurred when you feel gentle resistance if you tug the cutting lightly, or you see new growth emerging from the tip.
- Once rooted, pot up into a 3-inch pot with standard potting mix and grow on in good light for a few weeks before transplanting outdoors.
Soil, site selection, and getting the growing conditions right
Sun and site
Zonal geraniums need at least 6 hours of direct sun daily for best flowering. For a concise step-by-step guide on how to grow geraniums outside, see our how to grow geraniums outside guide. In cool coastal climates, full sun all day is ideal. In hot inland climates with brutal afternoon heat above 95°F (35°C), some light afternoon shade actually helps prevent heat stress and prolongs bloom. Avoid low-lying frost pockets or spots with poor air circulation, which invite botrytis fungal disease.
Soil for in-ground beds
Drainage is non-negotiable. Geraniums sitting in waterlogged soil will rot. In heavy clay beds, work in a 50:50 (by volume) mix of organic matter (compost) and coarse perlite or grit into the top 10–12 inches of the planting zone before you put a single plant in the ground. For step-by-step guidance on planting and maintaining geraniums in beds, see how to grow geraniums in the ground. Aim for a soil pH of 5.8–6.5, run a simple soil test first if you haven't used the bed before, because pH outside this range locks out nutrients even when fertilizer is applied.
Potting mix for containers
A good home mix for container geraniums is roughly one third peat or coir, one third perlite or coarse vermiculite, and one third well-rotted compost or quality sterilized potting soil. This drains fast but holds enough moisture and nutrition. Avoid using straight garden soil in pots, it compacts badly and harbors pathogens. For containers, always use pots with drainage holes. An 8–12 inch (20–30 cm) diameter container is the sweet spot for a single zonal geranium, smaller pots dry out too quickly and restrict root growth.
Planting in garden beds: step by step
- Prepare the bed at least a week before planting: dig to 10–12 inches, work in compost and perlite or grit, and rake level.
- Do a soil test if possible and adjust pH to 5.8–6.5 with lime (to raise) or sulfur (to lower). Incorporate a balanced slow-release granular fertilizer (such as 5-10-15 or 6-12-12) per label directions.
- Mark out planting positions. Space compact seed-grown types 12–15 inches apart; larger vegetatively propagated cultivars 15–18 inches apart.
- Dig holes slightly wider than the root ball and exactly as deep. The crown of the plant should sit at the same level it grew in the nursery pot — planting too deep causes crown rot.
- Firm the soil gently around the roots, eliminating large air pockets.
- Water thoroughly immediately after planting to settle the soil around roots.
- Apply a 1–2 inch layer of mulch around (not touching) the stems to retain moisture and suppress weeds.
Planting in containers and hanging baskets: step by step
- Choose a container with drainage holes — at least 8 inches in diameter for a single plant, 12–14 inches for a combination planting.
- Cover drainage holes with a piece of mesh or a few pot shards to prevent mix from washing out (skip the thick gravel layer — it actually raises, not lowers, the perched water table).
- Fill the container about two-thirds with your prepared potting mix.
- Remove the plant from its nursery pot and gently loosen any tightly circling roots.
- Set the plant so the crown sits at the same depth as it was growing. Fill in around the root ball and firm lightly.
- Leave about 1 inch of space at the top of the pot (a 'watering ledge') so water doesn't run straight off.
- Water thoroughly until it drains freely from the bottom, then empty any saucer after 30 minutes.
Watering and feeding: what actually works
Watering
Overwatering is the single most common reason zonal geraniums struggle. They like to dry out slightly between waterings, the soil should feel dry to the touch an inch below the surface before you water again. For in-ground plants, water deeply when dry, wetting the soil to 10–12 inches, then leave them alone until the top inch dries. For container plants in summer heat, that might mean checking every day or two. When you water, water thoroughly until it runs from the drainage holes, never leave pots sitting in full saucers. Water in the morning so foliage dries before evening, reducing disease risk.
Feeding
The number that matters most in a geranium fertilizer is the middle number, phosphorus, which supports root development and flower production. A balanced or slightly low-nitrogen formula like 5-10-15 or 6-12-12 is what most extension services recommend for geraniums, and I've found this to be genuinely better than a standard balanced fertilizer for flower count. High nitrogen encourages lush, leafy growth at the expense of blooms. For in-ground beds, work a slow-release granular fertilizer into the soil at planting, then supplement with a water-soluble bloom-booster every 4–6 weeks during the growing season. For containers, which flush nutrients out with every watering, a liquid feed every 2–4 weeks through summer is more effective than granular alone.
| Situation | Fertilizer type | Frequency | Notes |
|---|---|---|---|
| In-ground beds | Slow-release granular (5-10-15 or 6-12-12) | At planting + every 4–6 weeks | Reduce or stop feeding in late summer |
| Containers (summer) | Liquid bloom fertilizer, low N | Every 2–4 weeks | Water first, then feed to avoid root burn |
| Containers (overwintering indoors) | Dilute balanced liquid | Once a month or less | Minimal feeding while growth is slow |
| Newly transplanted seedlings | Dilute liquid starter fertilizer | Once at planting | Avoid heavy feeding until established |
Pruning, pinching and deadheading
These three tasks sound similar but serve different purposes. Pinching (removing the growing tip when the plant is young, at 3–4 leaf pairs) encourages branching and a bushy shape instead of a single tall stem, do this once or twice early in the season. Deadheading is the ongoing removal of spent flower clusters: once a bloom head is done, snap or cut the entire stem back to the base of that stem or to the nearest leaf. Leaving old flower heads on the plant not only looks untidy but redirects energy toward seed production rather than new blooms. Pruning is harder cutting, trimming leggy stems back by up to one third in midsummer if the plant gets rangy encourages a flush of new growth and flowers. Always cut just above a leaf node or branching point.
For bushy zonal types, the goal is a full, rounded shape with flower heads evenly distributed. For any trailing geraniums in mixed containers, the technique overlaps somewhat, pinching trailing stems at the tips encourages side shoots and better cascading coverage rather than a few long bare stems. If you're growing trailing types more extensively, the specific care differences are worth exploring in a guide focused on that type.
Training trailing geraniums and managing growth habit
While true zonals are inherently upright and bushy, some compact zonal cultivars can be used in mixed hanging baskets as the upright, mounded component alongside trailing ivy-leaf types. If you're growing a full trailing geranium (P. peltatum), placement matters more than training, hang the basket or place the container at a height where stems can cascade freely without touching the ground, which promotes rot. Trailing types need the same sun and drainage requirements as zonals but tend to tolerate heat slightly better and prefer to dry out a bit more between waterings. Pinching tips on trailing stems early in the season encourages a fuller, more branched cascade rather than a few long, sparse ropes of growth.
Seasonal maintenance: what to do and when
Spring
- Start seeds indoors 12 weeks before last frost
- Take stem cuttings from overwintered stock plants
- Harden off seedlings and rooted cuttings 7–10 days before transplanting
- Prepare beds: amend soil, adjust pH, add slow-release fertilizer
- Transplant after last frost when nights are above 50°F (10°C)
Summer
- Deadhead spent flower heads regularly (every few days to weekly)
- Feed containers every 2–4 weeks with a low-nitrogen liquid bloom fertilizer
- Check soil moisture daily for containers in heat, every 2–3 days for in-ground
- Pinch or prune any leggy stems back by up to one third in midsummer
- Scout for pests: check leaf undersides for aphids, mites, and caterpillar damage
- Water in the morning to keep foliage dry overnight
Autumn
- Take stem cuttings from healthy plants before first frost to overwinter
- Dig up and pot prized in-ground plants 2–3 weeks before first frost to bring indoors
- Cut back pot-bound plants by about one third before bringing indoors
- Reduce watering and feeding for overwintering plants
- Clean up dead foliage from beds to reduce disease carryover
Winter
- Keep overwintering plants in a bright, cool (45–55°F / 7–13°C) indoor spot
- Water sparingly — just enough to prevent complete drying
- Inspect monthly for pests and remove any yellowing or diseased leaves
- In mild-winter zones (9–11), continue light feeding and grooming outdoors
- Plan next season's varieties and order seeds in January
Month-by-month planting calendar by climate group
| Month | Cold-winter (zones 4–6) | Mild-winter (zones 7–8) | Frost-free (zones 9–11) |
|---|---|---|---|
| January | Order seeds; plan | Order seeds; start seeds indoors | Light feeding; groom plants; plan new varieties |
| February | Start seeds indoors (12 wks before last frost) | Continue seed-starting; take cuttings from stock | Take cuttings; new plantings possible in warmer areas |
| March | Grow on seedlings under lights; pot up | Harden off early seedlings; prep beds | Transplant new stock; fertilize established plants |
| April | Continue hardening off; last frost risk still high | Transplant after last frost (zones 7–8 last frost late March/April) | Full active growing season; feed, water, deadhead |
| May | Transplant after last frost (zones 4–6 last frost mid-May) | Beds fully planted; pinch for bushiness; begin feeding | Deadhead; midsummer prune if needed in warmer zones |
| June | Active growth; pinch, deadhead, begin feeding | Deadhead; feed; pest scouting | Continue maintenance; watch for heat stress |
| July | Peak bloom; deadhead, feed, water regularly | Midsummer prune if leggy; continue feeding | Some heat stress possible; afternoon shade may help |
| August | Take cuttings for overwintering; continue deadheading | Take cuttings for overwintering; continue care | Take cuttings; continue regular care |
| September | Bring pots indoors before first frost; pot up in-ground favorites | Reduce feeding; pot up plants to bring indoors | Light reduction in care; seeds can be started for winter color |
| October | Overwinter indoors or store bare-root in cool shed | Final overwintering prep; cut back before bringing indoors | Continue growing; light feeding |
| November | Minimal water for overwintering plants; cool bright location | Overwinter indoors; minimal care | Prune lightly; reduce feeding |
| December | Rest period; monthly watering; inspect for pests | Rest period; minimal watering; check for pests | Can still be in bloom; light maintenance |
Overwintering: keeping your plants alive through cold months
In zones 9–11, zonal geraniums are perennials and can stay outdoors year-round with minimal winter care. For tips on how to help perennials grow year-round in mild climates, see our guide on how to help perennials grow. Everywhere colder, you have a few options. The easiest is to take stem cuttings in late summer (August), root them indoors, and grow the young plants through winter on a bright windowsill. This essentially gives you fresh, vigorous plants every spring without the space needed to maintain a full-size plant.
If you want to keep the whole plant, dig it or bring the container indoors before the first frost. Cut it back by about one third, remove any dead or diseased material, and place it in the coolest bright spot you have, a cool sunroom or south-facing window at 45–55°F (7–13°C) is ideal. Water very sparingly through winter, just enough to stop the stems from shriveling. A third old-fashioned method is to shake the soil from the roots of in-ground plants, hang them bare-root in a cool, frost-free shed or basement (around 40–50°F), and replant in spring. This works, but I've found cutting survival rates with bare-root storage to be less reliable than overwintering in pots, so I tend to recommend pot storage or cutting propagation for most gardeners.
Pests and diseases: diagnosing and fixing problems
Most pest and disease problems on zonal geraniums come from one of three causes: too much moisture on leaves, poor air circulation, or plants that are already stressed. Fixing the conditions often reduces problems more than any spray. That said, here are the most common issues you'll encounter and what to do about them.
| Symptom | Likely cause | Action |
|---|---|---|
| Soft, sticky clusters on stems/buds; distorted growth | Aphids | Knock off with strong water stream; use insecticidal soap spray; encourage ladybirds |
| Fine webbing on undersides of leaves; stippled, pale foliage | Spider mites (especially in hot, dry conditions) | Increase humidity slightly; spray undersides with insecticidal soap or neem oil; avoid drought stress |
| Ragged holes in leaves; buds and flowers eaten | Caterpillars / geranium budworm (Helicoverpa) | Hand-pick at dusk when caterpillars feed; use Bacillus thuringiensis (Bt) spray as a non-chemical biological option |
| Gray-brown fuzzy mold on leaves, stems, or flowers | Botrytis (gray mold fungus) | Improve air circulation; remove affected tissue immediately; avoid wetting foliage; reduce humidity |
| Yellowing lower leaves; mushy stem base; wilting despite moist soil | Root rot (Pythium or Rhizoctonia, usually from overwatering) | Reduce watering immediately; check drainage; remove affected plants; do not replant geraniums in same spot without improving drainage |
| Yellowing leaves with green veins | Iron or manganese deficiency (often pH-related) | Test soil pH; adjust to 5.8–6.5; use a chelated micronutrient supplement |
| Pale, elongated, weak growth; few flowers | Insufficient light or too much nitrogen | Move to a sunnier location; switch to a lower-nitrogen fertilizer |
| Brown leaf edges; wilting between waterings | Underwatering or root-bound container plant | Check soil moisture; water more consistently; repot if roots are circling densely |
When to replace rather than rescue a plant
Zonal geraniums are not indefinitely productive plants. After 2–3 years, even well-managed plants tend to become woody, less floriferous, and more disease-prone. If a plant looks tired, spindly stems, reduced flowering, persistent leaf drop, the best move is to take fresh cuttings from any healthy growth remaining and start over. This is cheaper and faster than trying to nurse an aging plant back to peak performance. Similarly, if root rot has reached the crown or botrytis has spread throughout the plant, remove it entirely and don't replant geraniums in the same spot until you've improved drainage.
FAQ
What is a zonal geranium (Pelargonium × hortorum) and how do I tell it apart from trailing or scented geraniums?
Zonal geraniums (Pelargonium × hortorum) are the common bedding geraniums: mounded/bushy plants with rounded leaves often showing a darker "zone" band across the leaf. They differ from ivy/Trailing geraniums (P. peltatum), which have a trailing habit and flatter, lobed leaves suited to hanging baskets, and from scented‑leaf Pelargoniums, which are grown for aromatic foliage (different leaf shape/texture and fragrance). Look at growth habit (upright mound vs trailing), leaf shape and presence of a darker band to identify zonals.
Which zonal geranium varieties should I choose for beds, containers, and hanging baskets?
Choose varieties by habit and climate: - Beds/large borders: vigorous mounding types with 12–18" mature spread (look for large-flower series). - Containers/patio: compact/medium mounds (8–12" pots) — 'Pinto' and other compact series are good. - Hanging baskets/trailing effect: select semi-trailing or trailing cultivars or use ivy/Trailing Pelargonium (P. peltatum) if you need true spill. - Hot climates: choose heat‑tolerant selections and provide afternoon shade. Check plant/seed tags for mature width and habit when selecting.
Should I start zonal geraniums from seed or cuttings?
Both work; tradeoffs: - Cuttings: fastest to flowering size, preserve exact cultivar traits, root reliably (3–4" softwood stem cuttings, root in ~3–4 weeks at 65–75°F). Best for maintaining named cultivars. - Seed: lower cost, useful for many plants, but offspring may vary (especially with nonF1 seed); seeds take longer to reach bloom and require ~12 weeks lead time. Use cuttings for exact clones and earlier displays; use seed for bulk or trialing new genetics.
How and when should I start zonal geranium seed indoors?
Timing: sow about 10–12 weeks before your local average last‑frost date. Method: use a sterile, porous seed medium (peat or coir + perlite/vermiculite), surface‑sow seed or cover very lightly (many Pelargonium seeds respond to light), keep substrate warm (~70–75°F / 21–24°C) and evenly moist, provide bright indirect light; expect germination in 7–20 days. Prick out and pot up seedlings as true leaves form. Harden off 7–10 days before transplanting.
What is the correct technique to propagate zonal geraniums from cuttings?
Take 3–4" non‑flowering softwood cuttings, remove lower leaves leaving 1–2 leaf pairs, optionally dip in rooting hormone, insert ~1" into a well‑aerated medium (peat/coir + perlite), keep bright indirect light and 65–75°F (18–24°C). Maintain even moisture without waterlogging; root formation commonly in 2–4 weeks. After roots are established, pot up and harden off before planting out.
How do I choose soil and site for zonal geraniums (bed vs container)?
Light: full sun (≥6 hours/day) for best bloom; in hot climates allow light afternoon shade. Drainage: excellent drainage is essential—avoid waterlogged sites. Beds: amend heavy soils with organic matter and coarse material (50:50 topsoil:organic matter/perlite/sand in planting zone) to improve aeration. Containers: use a well‑draining potting mix (peat or coir + perlite/vermiculite + some compost). Target pH ~5.8–6.5. Ensure containers have adequate drainage holes and the pot size matches cultivar (8–12" for patio plants).
Next Article
How to Grow Geraniums Outside: Types, Planting & Care
How to grow geraniums outside: choose types, plant, propagate, care, troubleshoot and overwinter with confidence.