Growing geraniums outside successfully comes down to one thing most guides skip: knowing which geranium you actually have. The frost-tender bedding types (zonal, ivy, and trailing pelargoniums) need to come inside before first frost and thrive in full sun with sharp drainage. Hardy cranesbill geraniums (true Geranium species) are tough perennials that stay in the ground all winter and largely look after themselves once established. Get that distinction right, match your plant to your climate and site, and outdoor geraniums are genuinely rewarding. This guide walks through both groups, from choosing varieties to planting, feeding, troubleshooting, and getting through winter.
How to Grow Geraniums Outside: Types, Planting & Care

Harriet Whitmore
19 Jul 2026
Two very different plants share one name
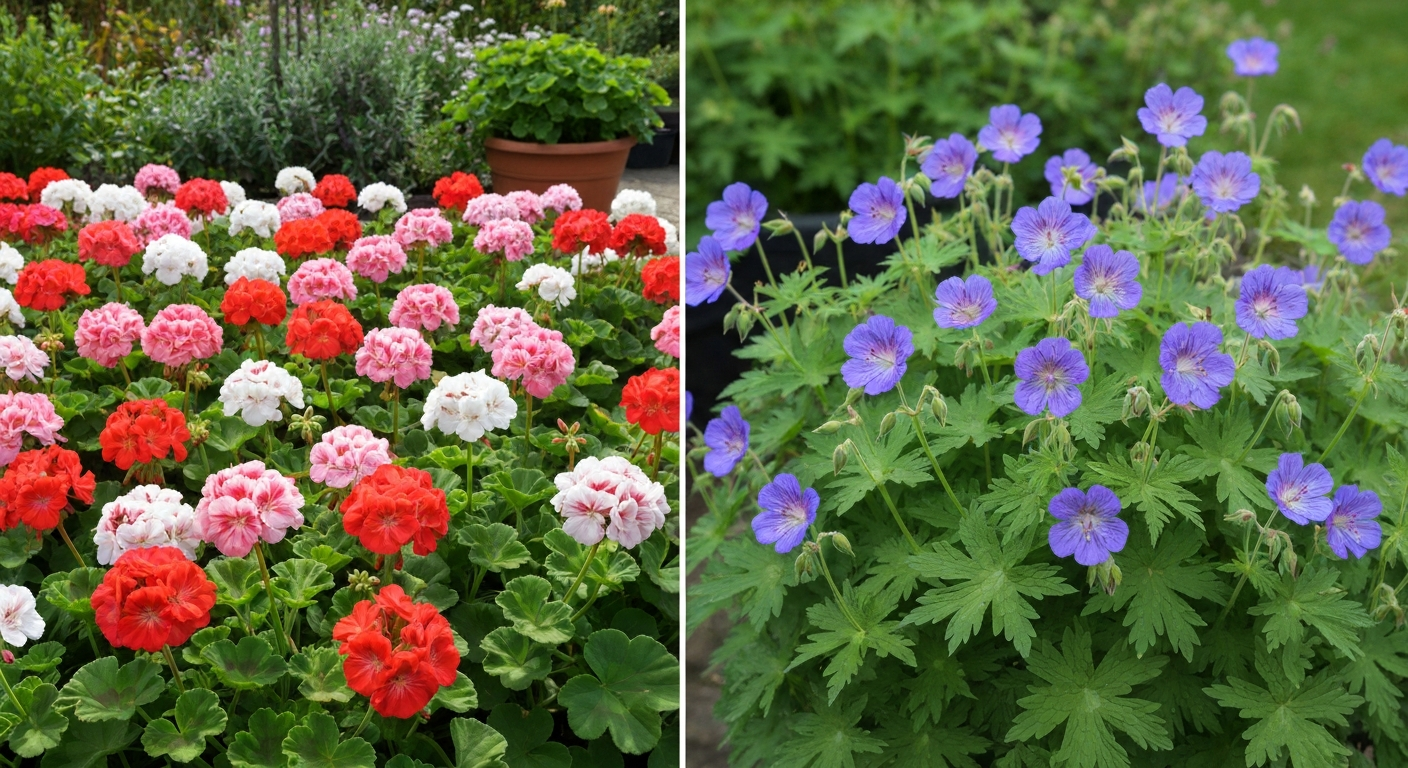
When most people say 'geranium,' they picture the bright, round-headed bedding plant sold at every garden center in spring. That plant is actually a Pelargonium, native to South Africa and frost-tender. The true botanical geraniums, called cranesbills, are a separate genus of hardy perennials native mostly to temperate regions of Europe and Asia. Both are beautiful, both are popular, but they have completely different cold-hardiness profiles and somewhat different cultural needs. This guide covers all four types you're likely to encounter outdoors: zonal pelargoniums, ivy-leaf pelargoniums, trailing pelargoniums (often grouped with ivy types), and hardy cranesbill geraniums.
Geranium types explained
Zonal pelargoniums (Pelargonium × hortorum)
These are the classic bedding geraniums with bold, rounded flower heads in red, pink, white, salmon, and bicolor shades. For detailed instructions on soil, light, and seasonal care specific to zonal geraniums, see how to grow zonal geraniums. They typically form tidy mounds from 1 to 3 feet tall and wide depending on the series, and they bloom prolifically from late spring until frost kills them. The name 'zonal' comes from the darker horseshoe-shaped zone often visible on the leaves. They're full-sun plants that handle heat well but won't survive freezing temperatures, which is why they're grown as annuals in most of the U.S. or overwintered indoors as rooted cuttings or potted plants.
Ivy-leaf and trailing pelargoniums (Pelargonium peltatum and interspecific hybrids)
Ivy-leaf pelargoniums have glossy, slightly waxy leaves with a shape similar to ivy and a naturally trailing or cascading habit, making them the go-to choice for hanging baskets, window boxes, and the edges of tall containers. For step-by-step tips on how to grow trailing geraniums, see our guide on how to grow trailing geraniums. Interspecific hybrids (crosses between ivy-leaf and zonal types) combine the trailing habit with more robust flowering and better heat tolerance. Like zonals, they're frost-tender and need the same overwintering treatment. The trailing habit means they need a bit more horizontal space or vertical drop to really perform.
Hardy cranesbill geraniums (Geranium spp. and hybrids)
True Geranium species are perennials that die back in winter (or remain semi-evergreen in mild climates) and return reliably each spring in their rated USDA hardiness zones. They form clumps or spreading mats, typically 6 to 24 inches tall, and produce a cloud of smaller, open-faced flowers in shades of blue, purple, pink, magenta, and white. Many bloom from late spring into midsummer; some, like Geranium 'Rozanne,' rebloom well into autumn. Hardy cranesbills are adaptable to a range of soils and light conditions, making them very useful in mixed perennial borders, as edging plants, and as ground cover under shrubs.
| Type | Genus | Frost Hardy? | Typical Height | Best Use |
|---|---|---|---|---|
| Zonal pelargonium | Pelargonium × hortorum | No — killed by frost | 1–3 ft | Beds, borders, containers |
| Ivy/trailing pelargonium | Pelargonium peltatum / hybrids | No — killed by frost | 6–18 in (trailing) | Hanging baskets, window boxes |
| Hardy cranesbill | Geranium spp. and hybrids | Yes — zone dependent | 6–24 in | Perennial borders, ground cover |
Choosing the right type and variety for your situation
Before buying a single plant, think about three things: your climate zone (especially your first fall frost date if you're planting pelargoniums), how much sun your site gets, and what you need the plant to do visually. Here are my shortlists based on common garden situations.
For beds and summer bedding displays
- Calliope® Medium Series: compact, self-cleaning, and very floriferous — one of the easiest to keep looking good all summer
- Americana® Series: reliable heat tolerance, compact habit (around 12–14 in), good for mass planting
- Caliente® Series: bred for heat and drought tolerance, excellent for hot-summer climates in the South or Southwest
- Tango Series: semi-compact, vivid colors, performs well in warm climates
For hanging baskets and window boxes
- Ivy League™: classic ivy-leaf type with strong trailing stems, good disease resistance
- Calliope® Large: interspecific hybrid, vigorous cascading growth, handles heat better than pure ivy types
- Contessa Series: trailing ivy type with good basket coverage and bright flowers
For perennial borders and ground cover
- Geranium 'Rozanne' (Zones 5–8): the most reliably long-blooming cranesbill, violet-blue flowers from early summer to first frost — hard to beat
- Geranium macrorrhizum cultivars (Zones 3–8): semi-evergreen ground cover, drought-tolerant once established, ideal under trees or shrubs
- Geranium pratense 'Johnson's Blue' (Zones 4–8): taller upright cranesbill (18–24 in), lavender-blue flowers in early summer, good for the middle of a border
- Geranium sanguineum (Zones 3–8): low spreading mats, magenta-pink flowers, extremely tough and adaptable
If you're gardening in Zones 3–4, skip the pelargoniums unless you're committed to overwintering them indoors and focus on the cold-hardy cranesbills, especially G. macrorrhizum and G. sanguineum. In Zones 9–11, pelargoniums can sometimes be grown as perennials outdoors, but they appreciate afternoon shade to avoid heat stress during peak summer.
Climate, hardiness zones, and when to plant
For pelargoniums, your last spring frost date is the most important number in your gardening calendar. You can find this using NOAA climate normals for your nearest weather station, or by looking up your ZIP code on the USDA Plant Hardiness Zone map (2023 edition). Pelargoniums go outside only after all frost risk has passed. Hardy cranesbills are planted differently: they go in the ground in spring or fall and rely on your USDA hardiness zone to confirm they'll survive winter.
| USDA Zone | Approx. Last Spring Frost | Pelargoniums Outdoors | Hardy Cranesbills | Notes |
|---|---|---|---|---|
| Zone 3 (–40 to –30°F min.) | Late May–early June | Early June at earliest | Zones 3–8 species only | Very short season; focus on cranesbills |
| Zone 4 (–30 to –20°F min.) | Mid–late May | After mid-May | Zones 4–8 species | G. macrorrhizum, G. sanguineum reliable |
| Zone 5 (–20 to –10°F min.) | Late April–mid-May | After mid-May | Most cranesbills | G. 'Rozanne' performs well here |
| Zone 6 (–10 to 0°F min.) | Mid-April | After mid-April | All cranesbills listed | Good pelargonium season length |
| Zone 7 (0 to 10°F min.) | Late March–mid-April | After last frost | All cranesbills listed | Long pelargonium season |
| Zone 8 (10 to 20°F min.) | Mid-February–March | March–April possible | Check cultivar ratings | Pelargoniums may overwinter with mulch |
| Zones 9–11 (20°F+ min.) | Frost rare or none | Year-round possible | Many struggle in heat | Pelargoniums semi-permanent; afternoon shade helps |
Starting pelargoniums from seed indoors
Pelargoniums are slow from seed, so start them 12–16 weeks before your last expected frost date. Sow at 70–75°F soil temperature and expect germination in 7–14 days. Transplant to cell packs once the first true leaves appear, and grow on at 60–65°F nights with as much light as possible. Harden off over 7–10 days before moving outside, introducing them gradually to outdoor light, temperature, and wind.
Planting hardy cranesbills
Containerized hardy cranesbills can go in the ground any time from spring through early fall, as long as you water them in well and avoid planting in the peak of midsummer heat if you're in a warm zone. For step-by-step details on planting and establishing hardy geraniums, see our guide on how to grow geraniums in the ground. Bare-root cranesbills are best planted in spring or early autumn. Fall planting (6 weeks before first frost) gives the roots time to establish before the ground freezes. Division of established clumps is best done in early spring just as growth resumes, or in early autumn.
Picking the right spot: sun, shade, and shelter
Bedding pelargoniums need a minimum of 6 hours of direct sunlight per day, and they really perform best at 6–8 hours or more. In hot climates (Zones 8–9), a spot with morning sun and light afternoon shade is often better than baking full sun all day, which can bleach flowers and stress plants. Hardy cranesbills are more flexible: most do well in 6 hours of sun, but many tolerate part shade (3–5 hours), especially in warmer regions. Geranium macrorrhizum is one of the best geraniums for genuinely shaded spots under trees.
Microclimates matter more than most beginners realize. A south or southwest-facing wall creates a warmer, more sheltered pocket that can extend the pelargonium season by several weeks in both spring and fall. Walls also provide reflected heat that benefits frost-tender plants. Conversely, open, exposed positions with cold prevailing winds are the worst spots for pelargoniums, and also cause more winter desiccation damage to evergreen cranesbill foliage in cold zones. If your garden is exposed, use a fence, hedge, or dense shrub planting as a windbreak before committing to a display in that spot.
Soil requirements: drainage, pH, and common problems
Both pelargoniums and cranesbills will rot in waterlogged soil, so drainage is the single most important soil factor. Before planting in a new bed, do a simple percolation test: dig a hole about 12 inches deep, fill it with water, let it drain, then fill it again and time how long the second fill takes to drain away. If it drains in 4–8 hours, you're fine. If it's still sitting after 12 hours, you have a drainage problem that needs fixing before you plant anything.
pH targets
Bedding pelargoniums prefer a slightly acidic to near-neutral soil: pH 6.0–6.5 is ideal. If a soil test shows pH below 5.5, lime the bed the season before planting to bring it up. UGA Cooperative Extension recommends mildly acidic to near‑neutral soil for bedding geraniums (target about pH 6.5) and advises liming if pH is 5.5 or below (Geraniums | UGA Cooperative Extension (B790)). Hardy cranesbills are more adaptable and tolerate a wider range of roughly pH 5.5–7.5, though most do best in the 6.0–7.0 range. A basic soil test from your county extension service costs a few dollars and removes all the guesswork.
Common soil problems and how to fix them
| Problem | Symptoms | Fix |
|---|---|---|
| Heavy clay, poor drainage | Water pools after rain; roots rot; plants yellow and collapse | Raise beds 4–6 in; work in 3–4 in of coarse grit and compost |
| Sandy soil, dries too fast | Wilts between waterings; nutrient deficiency signs | Add 3–4 in of compost or well-rotted manure; mulch surface |
| Acidic soil (pH below 5.5) | Poor growth, pale foliage, nutrient lockout | Apply ground limestone per soil test recommendation; re-test after 3 months |
| Alkaline soil (pH above 7.5) | Interveinal yellowing (iron/manganese deficiency) | Work in sulfur or acidifying compost; re-test after 6 weeks |
| Compacted soil | Stunted growth; water runs off rather than soaking in | Double-dig or broadfork to 12–18 in; incorporate organic matter |
Soil mixes and potting recipes
Getting the growing medium right makes an enormous difference, particularly for container-grown pelargoniums. The mixes below are ones I've settled on after a few years of trial and error. All measurements are by volume.
Bed improvement mix (per 10 sq ft of bed, worked to 10-inch depth)
- 2–3 cubic feet of compost or well-rotted manure
- 1 cubic foot of coarse horticultural grit or pea gravel (for clay soils — skip if soil is already sandy)
- 2 oz (56 g) of balanced slow-release fertilizer (e.g., 10-10-10 or 14-14-14) broadcast over the area and raked in
- Lime at the rate recommended by your soil test, if pH is below 5.8
Container potting mix for pelargoniums (per 10-inch pot)
- 3 parts peat-free multipurpose compost or quality potting mix
- 1 part coarse perlite (improves drainage and aeration significantly)
- 1 tsp (5 g) slow-release fertilizer granules (e.g., Osmocote 14-14-14, 6-month formulation) worked into the mix
- Optional: 1 part coir fiber to improve moisture retention in hot, exposed positions
Hanging-basket mix (per standard 14-inch basket)
- 4 parts lightweight peat-free potting mix (weight matters — heavy mixes stress basket brackets)
- 1 part perlite
- 1.5 tsp (7–8 g) slow-release fertilizer granules
- 1 tbsp (15 ml) water-retaining gel crystals, mixed dry before adding water (baskets dry out fast in wind and sun)
- Fill the basket so the soil level sits about 1 inch below the rim to allow for watering
Spacing and planting densities
Getting spacing right is one of those things that's easy to underestimate when you're looking at small transplants. Pelargoniums in particular fill out quickly, and crowding them reduces airflow, which encourages botrytis and other fungal problems. Here are the spacings I use and recommend.
| Situation | Spacing / Density | Notes |
|---|---|---|
| Zonal pelargoniums in a bed (mass planting) | 10–12 inches apart each way | Compact series like Americana; use 12–15 in for larger series |
| Zonal pelargoniums in a border (mixed planting) | 12–15 inches apart | Allow room to see adjacent plants |
| Trailing/ivy pelargoniums in a border edge | 12 inches apart | Will cascade and fill gaps quickly |
| Hardy cranesbill (clump-forming, e.g., 'Rozanne') | 18–24 inches apart | Spreads significantly once established |
| Hardy cranesbill (ground cover, e.g., G. macrorrhizum) | 15–18 inches apart | Fills in densely within one growing season |
| 10-inch container (pelargonium) | 1 zonal plant centered, or 2–3 small trailing types | One strong zonal per pot for best display |
| 12-inch container (pelargonium) | 1–2 zonal plants, or 3–4 trailing types | Combine upright zonal with 2–3 trailing ivy types at edges |
| 10-inch hanging basket | 3–4 trailing pelargoniums | Space around perimeter for even coverage |
| 12–14-inch hanging basket | 4–5 trailing pelargoniums | Add 1 upright zonal in center if basket is large enough |
| 16-inch or larger hanging basket | 5–6 trailing pelargoniums | Can mix varieties if flower colors complement each other |
For perennial cranesbill borders, I always plant in odd-number groups of 3 or 5 for a more natural look. A group of three G. 'Rozanne' plants at 18–20 inches apart will knit together into one cohesive clump by mid-summer and give you impressive coverage. Geranium 'Rozanne' (Geranium × 'Gerwat') is widely recommended as hardy to USDA Zones 5–8, with many trials and garden sources reporting reliable performance and occasional success in protected Zone 4 microclimates. For ground-cover use under shrubs, plant G. macrorrhizum at 15 inches in a grid or staggered pattern and it will close the gaps within one season.
Planting step by step
Planting pelargoniums in beds
- Wait until all frost risk has passed for your area — check your local last frost date against your USDA zone
- Prepare the bed by working in compost and grit as described in the soil mix section above
- Dig holes slightly wider than the root ball and at the same depth — pelargoniums do not like being planted too deep
- Remove the plant from its cell pack or pot, gently loosen any circling roots, and set it in the hole
- Backfill, firm gently with your fingers, and water in thoroughly
- Pinch out the growing tip on transplants that have not already branched — this promotes a bushier habit and more flower stems
Planting hardy cranesbills in the ground
- Prepare soil as above, incorporating compost but skipping heavy grit unless drainage is genuinely poor
- Dig a hole twice the width of the root ball and the same depth
- Place the plant at the same level it was growing in its pot — do not bury the crown
- Backfill with native soil mixed with some compost, firm in, and water thoroughly
- Mulch around (not over) the crown with 2 inches of bark mulch or compost to retain moisture
- Water regularly for the first 4–6 weeks while roots establish, then reduce to as-needed watering
Propagation: seed, cuttings, and division
Softwood cuttings (pelargoniums)
Taking cuttings is the best way to carry favorite pelargoniums through winter cheaply and easily. In late summer (August to early September), cut 3–4 inch tip cuttings just below a leaf node, strip the lower leaves, and let the cut end callus for an hour or two before inserting into a free-draining mix of equal parts perlite and potting compost. No rooting hormone is needed for pelargoniums, they root readily. Keep at 60–65°F in a bright spot out of direct midday sun. Roots develop in 3–5 weeks. These rooted cuttings overwinter indoors on a windowsill and go back outside after last frost the following spring.
Division (hardy cranesbills)
Most cranesbills benefit from division every 3–5 years to stay vigorous. Lift the entire clump in early spring or early autumn, split it into sections using two garden forks back to back, or a sharp spade for tough woody crowns like G. macrorrhizum. Each division should have several healthy shoots and a good root system. Replant divisions immediately at the original depth, water well, and keep consistently moist for the first few weeks.
Routine care through the growing season
Watering
Pelargoniums in the ground need watering roughly once or twice a week in dry weather during their first season, feel the soil 2 inches down and water when it's dry at that depth. Established plants are surprisingly drought-tolerant but will stop flowering well if stressed. Container pelargoniums dry out much faster: check daily in summer and water when the top inch of mix is dry. Hanging baskets in full sun and wind may need watering twice a day at peak summer. Hardy cranesbills in the ground are largely drought-tolerant once established and rarely need supplemental irrigation except during extended dry spells.
Feeding
For bedding pelargoniums in the ground, a slow-release granular fertilizer at planting (as described in the soil mix section) is usually sufficient for the first 6–8 weeks. After that, a fortnightly liquid feed with a high-potassium formula (such as a tomato fertilizer at half the recommended rate) encourages continued flowering over a high-nitrogen feed, which pushes leafy growth at the expense of blooms. For containers, start liquid feeding 4–6 weeks after potting (once the slow-release charge begins to deplete) and continue every 10–14 days through the season. Hardy cranesbills in well-amended soil need very little feeding, an annual top-dress of compost in spring is usually all they need.
Deadheading and pruning
Deadheading pelargoniums regularly makes a real difference to continuous bloom. Remove the entire flower stem back to the main stem, not just the spent flower head, leaving old stems clutters the plant and slows regrowth. A tidy-up mid-season (cutting back by about a third if plants become leggy) often triggers a fresh flush of growth and flowers within 2–3 weeks. For hardy cranesbills, the classic 'Chelsea chop' works well: cut the whole plant back to 3–4 inches from the ground after the first main flush of flowers, and most will regenerate and rebloom. G. 'Rozanne' is an exception, it blooms almost continuously and needs minimal intervention beyond removing the oldest stems.
Pests, diseases, and how to deal with them
| Problem | What you see | Treatment |
|---|---|---|
| Botrytis (grey mold) | Fluffy grey mold on stems or flowers, especially in cool wet weather | Improve airflow; remove affected tissue; avoid overhead watering; use copper-based fungicide if severe |
| Pelargonium rust | Orange-brown pustules on leaf undersides; yellow spots on top surface | Remove and destroy affected leaves; avoid wetting foliage; copper fungicide as preventive in high-risk seasons |
| Aphids | Sticky residue, distorted new growth, visible insects on stems | Blast off with water; apply insecticidal soap or neem oil; encourage beneficial insects |
| Vine weevil (containers) | Plants suddenly collapse; white C-shaped grubs in root ball | Use nematode treatment (Steinernema kraussei) in late summer; check root balls before overwintering |
| Caterpillars / geranium sawfly | Ragged holes in leaves, especially on hardy cranesbills | Hand-pick; neem oil spray; biological control |
| Root rot (Pythium / Phytophthora) | Wilting despite moist soil; blackened mushy roots | Improve drainage immediately; remove affected plants; do not replant geraniums in same spot for 2+ years |
Troubleshooting common failures
Leggy, sparse plants
Legginess in pelargoniums almost always means insufficient light. Move containers to a sunnier spot and cut the plant back by a third to encourage bushy regrowth. If the plant is in the ground and the site gets less than 5 hours of direct sun, it's in the wrong place. Pinching transplants at planting time prevents this problem from developing in the first place.
Few or no flowers
This is usually caused by too much nitrogen (which pushes green growth), too little light, or irregular watering. Switch to a high-potassium feed, confirm you're getting at least 6 hours of sun, and deadhead more frequently to prevent the plant from setting seed (which signals it to stop producing new flowers).
Yellowing leaves
Yellow lower leaves on pelargoniums are often a normal response to transplant stress or low light on aging leaves, these can simply be removed. Widespread yellowing across the plant is more concerning and usually points to overwatering and/or poor drainage, or occasionally nutrient deficiency (especially nitrogen or iron). Check drainage first, as root rot from waterlogging is the most common serious cause.
Root rot and wilting despite watering
If a pelargonium wilts even though the soil feels moist and the pot feels heavy, root rot is almost certainly the culprit. Unpot the plant and look at the roots, healthy roots are white or cream-colored; rotted roots are brown, mushy, and may smell. Cut away all rotted material with clean scissors, dust with sulfur powder, and repot into fresh, dry, well-draining mix. Reduce watering significantly and place in a bright, warm spot. Severely rotted plants are usually not worth trying to save, take a cutting from any healthy growth instead.
Overwintering and getting perennials through winter
Overwintering pelargoniums
Before your first fall frost, bring potted pelargoniums indoors or take softwood cuttings as described above. If you want to overwinter whole plants, cut them back by about half, remove any dead or diseased leaves, and pot them up (or keep in existing pots) in fresh, barely moist mix. Keep them in a cool but frost-free location, 45–50°F with some light is ideal, like an unheated spare room or cool greenhouse. Water very sparingly through winter: once a month is often enough in cool storage. In late February or March, move to a warmer, brighter spot, resume watering, and give a half-strength balanced liquid feed to encourage regrowth before hardening off and moving back outside.
Hardy cranesbills through winter
Once established in the right zone, hardy cranesbills need very little winter care. For more on how to help perennials grow, see our guide on establishing and maintaining long‑lived border plants. Cut back the dead foliage in late autumn or leave it until early spring if you prefer some winter structure. In Zones 3–4, a light mulch of 2–3 inches of shredded bark or straw over the crown after the ground freezes helps prevent freeze-thaw heaving. Remove the mulch in early spring as growth resumes. Borderline-hardy plants (e.g., G. 'Rozanne' in Zone 4 or protected pockets) benefit from being sited against a south-facing wall and given that mulch layer.
Seasonal care calendar
| Month / Season | Pelargoniums (tender) | Hardy Cranesbills |
|---|---|---|
| Late winter (Feb–Mar) | Start seeds 12–16 weeks before last frost; bring overwintered plants to warmer, brighter spot | Remove winter mulch; begin dividing established clumps if needed |
| Spring (Mar–May) | Harden off transplants; plant outdoors after last frost; pinch tips | Plant containerized plants; apply compost top-dress; watch for early growth |
| Early summer (May–Jun) | Begin high-K liquid feed every 10–14 days; deadhead regularly | Main bloom period for most species; deadhead or cut back after first flush |
| Midsummer (Jul–Aug) | Check containers daily for water; midsummer cut-back if leggy | Cut back post-bloom for rebloom (Chelsea chop); water during dry spells |
| Late summer (Aug–Sep) | Take softwood cuttings; reduce feeding | G. 'Rozanne' in full rebloom; light tidy-up only |
| Autumn (Sep–Oct) | Bring indoors before first frost or take final cuttings; cut back by half for storage | Allow foliage to die back; apply winter mulch in Zones 3–4 |
| Winter (Nov–Jan) | Store in cool, frost-free spot; water barely monthly; check for rot | Dormant; no action needed except mulch maintenance |
Final thoughts on getting it right
Most geranium failures I've seen come down to one of three things: planting pelargoniums before frost season is genuinely over, putting them in too little sun, or letting containers sit in waterlogged mix. Address those three points and you've eliminated the majority of problems before they start. For hardy cranesbills, the learning curve is even gentler, choose a species rated for your zone, improve drainage if your soil is heavy, and then largely let them get on with it. They reward that approach with minimal maintenance and years of reliable color. Whether you're filling a summer hanging basket with trailing pelargoniums or building a permanent low-maintenance border with cranesbills, both groups are genuinely satisfying to grow once you understand what makes each of them tick.
FAQ
What's the difference between 'geraniums' I buy for containers and the hardy cranesbill geraniums in the perennial border?
There are two different genera: Pelargonium (the common bedding geraniums sold as zonal, trailing/ivy and interspecific types) are frost‑tender, usually grown as annuals or overwintered indoors. True geraniums (Genus Geranium, commonly called cranesbills) are generally hardy perennials. Treat Pelargonium like tender summer plants (bring inside before frost); treat hardy Geranium spp. according to their USDA hardiness rating for in‑ground winter survival.
How do I choose the right type and varieties for beds, borders, hanging baskets and containers?
Choose by growth habit and use: - Zonal pelargoniums (Pelargonium × hortorum): upright mound, 12–90 cm tall — best for beds and mixed containers. - Ivy/trailing pelargoniums (Pelargonium peltatum and interspecific): trailing habit — best for hanging baskets and window boxes. - Scented‑leaf pelargoniums: foliage interest, patio containers. - Hardy cranesbill geraniums (Geranium spp.): clump or mat‑forming perennials — best for borders, groundcover, long spring–summer bloom (eg. Geranium 'Rozanne', G. macrorrhizum, G. pratense 'Johnson's Blue'). Sample recommendations: Zonal series: Calliope®, Americana® (compact, bedding); Trailing/Ivy: Ivy League™, interspecific trailing mixes (3–5 plants in a 12″ basket); Hardy: 'Rozanne' (groundcover/long bloom), G. macrorrhizum (semi‑evergreen groundcover), G. pratense (taller border).
When should I plant geraniums outdoors in my USDA zone/region?
Use last‑spring and first‑fall frost dates for your exact location (USDA/NOAA/PRISM). General rules: - Pelargoniums (tender): set out after the last expected spring frost and when night temps stay above ~50°F (10°C). In Zones 9–11 you can plant earlier; in cooler zones wait until soil warms (often late May–June in Zones 4–6). - Hardy Geraniums (cranesbills): plant in spring or early fall when soil is workable; spring planting gives root establishment before winter. For specific timing look up local median last‑frost date and allow 2–4 weeks after for safety if uncertain.
What are the ideal site and soil conditions (drainage, pH, soil mixes for beds vs containers)?
Site: full sun (≥6 hrs/day) for best bloom; in hot climates provide afternoon shade for Pelargonium. Soil: well‑drained, moderately fertile. pH: aim ~6.0–7.0 (Pelargonium ~6.0–6.8 ideal; hardy Geraniums tolerate ~5.5–7.5). Drainage test: dig 30 cm (12″) hole, fill with water — drains within 4–8 hours is good; >12 hours indicates poor drainage. Bed mix: native soil amended with 20–30% compost and coarse sand or grit for drainage. Container mix: equal parts high‑quality potting mix, coarse perlite or grit, and compost or slow‑release fertilizer (or a commercial potting mix labeled for containers). Use pots with drainage holes and avoid waterlogged soil.
Step‑by‑step: How do I plant geraniums in the ground (in‑ground) and in containers?
In‑ground planting: 1) Choose site with proper sun/drainage. 2) Dig a hole twice the rootball diameter, same depth as rootball. 3) Amend backfill with 20–30% compost and coarse grit if drainage poor. 4) Place plant, backfill, firm gently, water deeply to settle. 5) Mulch 2–3 cm (1″) around plants but keep mulch off crowns to avoid rot. Containers: 1) Use a pot with drainage holes sized to plant (e.g., 6–8″ pot for single zonal; 10–12″ for mixed combos; 12″+ hanging for trailing). 2) Fill with container mix leaving 2–3 cm (1″) headspace. 3) Plant at same soil level as nursery pot, firm, water thoroughly until water drains. 4) Place in appropriate light; avoid overwatering — allow top 2–3 cm (0.5–1″) to dry between watering for Pelargonium.
What are practical planting densities and spacing for borders, beds, hanging baskets and window boxes?
Spacing guidelines: - Zonal (upright) pelargoniums: space 30–45 cm (12–18″) apart for full beds. - Compact/Patio varieties: 20–30 cm (8–12″) spacing. - Trailing/ivy pelargoniums: 20–30 cm (8–12″) between plants in baskets or boxes; in hanging baskets use 3–5 plants for 30 cm/12″ baskets. - Hardy Geraniums: low mat form (e.g., 'Rozanne') 30–45 cm (12–18″) apart; taller species (G. pratense) 45–60 cm (18–24″). Adjust for desired density and eventual spread shown on plant tag.
Next Article
When Do Begonias Start to Grow? Timing, Types & Planting Calendar
When do begonias start to grow: clear planting dates, timelines by type, and quick care fixes for reliable starts.