Growing mums for profit is genuinely one of the more approachable ways to turn your garden or small greenhouse into a revenue stream, especially if you can hit that sweet spot of having full, colorful pots ready right when fall demand peaks. I won't sugarcoat it: there's real timing pressure, some technical detail around pinching and feeding, and a learning curve the first season. But once you run through a production cycle, the workflow clicks into place and you can scale it confidently. Here's exactly how to do it.
How to Grow Mums for Profit: Sell-Ready Guide
Harriet Whitmore
24 Mar 2026
Pick market-ready mum varieties and plan your crop schedule

Not every mum variety is a good fit for selling. You want garden mums (Chrysanthemum x morifolium), not florist types, because garden mums present as full, bushy, pot-ready plants that customers can take home and drop straight into a fall display. Florist mums are grown on single stems for cut arrangements and have completely different production requirements. Stick to garden mums.
Within garden mums, focus on series that are bred for consistent, uniform performance at commercial scale. Proven performers include the Chelsey series from Ball (Chelsey Yellow is a reliable benchmark), the Belgian Mum series, and offerings from Dümmen Orange's garden mum program. These are bred with growers in mind: predictable flowering windows, strong basal branching, uniform finished height, and good post-sale longevity. When you're sourcing, request current cultivar sheets from your supplier because specs like flowering response group, target pot size, and days-to-flower get updated regularly.
Mums are short-day plants, meaning they initiate flower buds when nights are long enough, typically around 13 hours or more of darkness. That biology is your production calendar anchor. Most fall mums are sold from late August through October, so you need to count backward from your target sell date to set your start date. A rough rule: plan for 14 to 16 weeks from rooted cutting to finished sale-ready pot for a standard 8-inch pan. If you're starting from unrooted cuttings or seed, add another 2 to 3 weeks.
For most growers in zones 5 through 7, planting rooted cuttings in late May to mid-June gives you a September to October finish. In warmer zones (8 and above), you may need to push start dates later or use black cloth to artificially shorten days and trigger budding on schedule, since natural short days arrive later in the season. More on that in the feeding and growth control section.
One practical move I recommend early on: batch your crop into two or three succession plantings spaced about 2 weeks apart. This staggers your bloom window and keeps you from having everything hit peak at once, which is a real problem if you're selling at a farmers market or roadside stand and can only move so many pots per weekend.
Propagation and starting mums: seed vs. cuttings for faster saleability
You have two main options to start mums: vegetative cuttings or seed. Each has a different role in a commercial context, and the choice affects both your timeline and your crop uniformity.
Vegetative cuttings (the preferred route for selling)
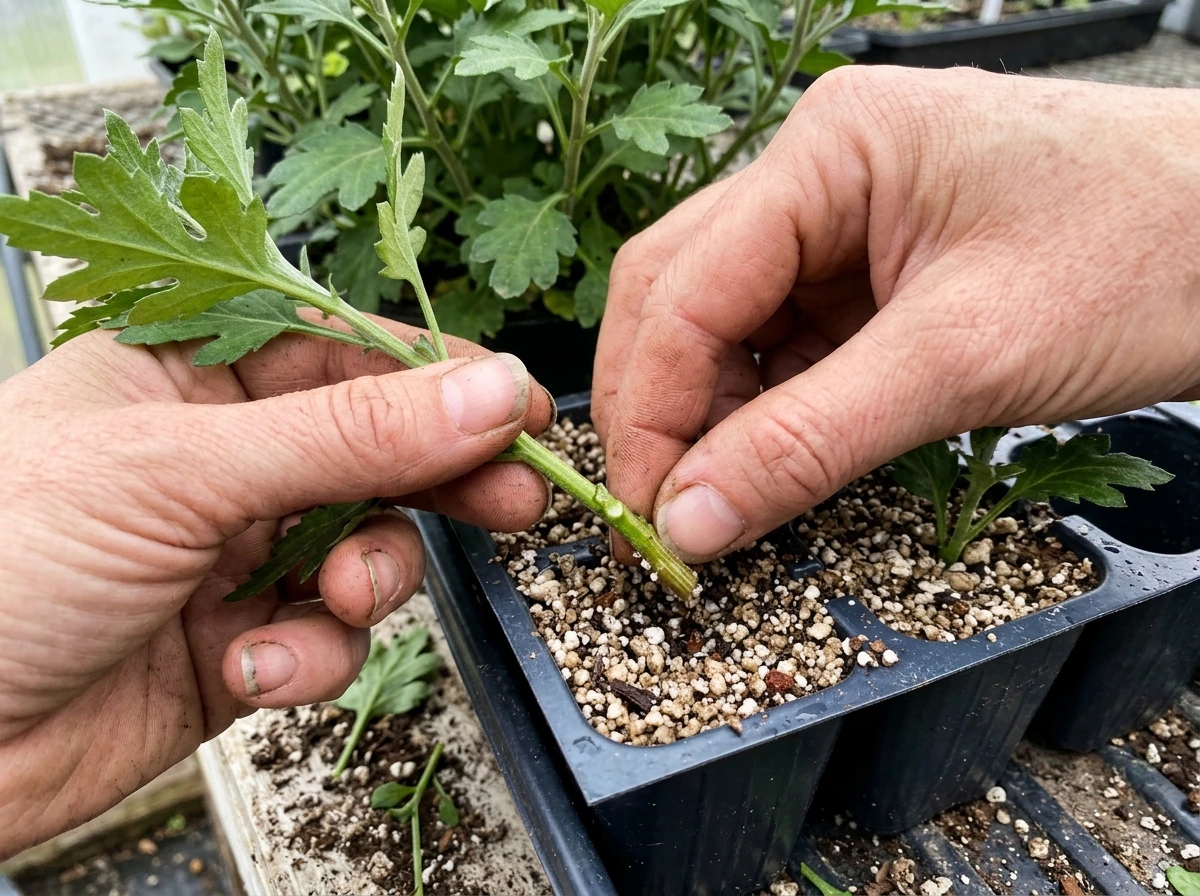
Rooted cuttings purchased from a propagation specialist like Ball, Dümmen Orange, or Syngenta are the industry standard for a reason. Every plant is genetically identical, which means your finished pots will look uniform in color, habit, and bloom timing. Buyers notice that consistency. Rooted cuttings arrive ready to pot, cutting weeks off your production timeline compared to starting from unrooted tips or seed. For a first commercial season, buying in rooted cuttings is the smarter investment even if the per-unit cost is higher than seed.
If you want to take your own cuttings from stock plants to reduce input costs in future seasons, take 3 to 4 inch stem tips from healthy, actively growing mother plants in early spring. Dip the cut end in rooting hormone powder (IBA at about 1,000 to 3,000 ppm), stick into a clean, sterile propagation mix, and maintain high humidity (a mist bench or dome works) with bottom heat at around 68 to 72°F. Rooting typically takes 2 to 3 weeks. Just make sure your stock plants are disease-free before you start cutting, because you'll multiply any pathogen problems right along with the plants.
Starting from seed
Seed-grown mums are viable but come with trade-offs. Germination is straightforward: surface sow at 65 to 70°F, keep moist, and expect germination in 10 to 14 days. The problem is variability. Open-pollinated mum seed produces plants with inconsistent flower color, size, and timing, which is a real liability when you're trying to present market-ready pots that all look the same. Seed is better suited for gardeners growing for personal enjoyment or experimenting with new selections. For commercial production where uniformity and predictability matter, stick with rooted cuttings.
Soil, containers, spacing, light, and watering for strong, uniform blooms
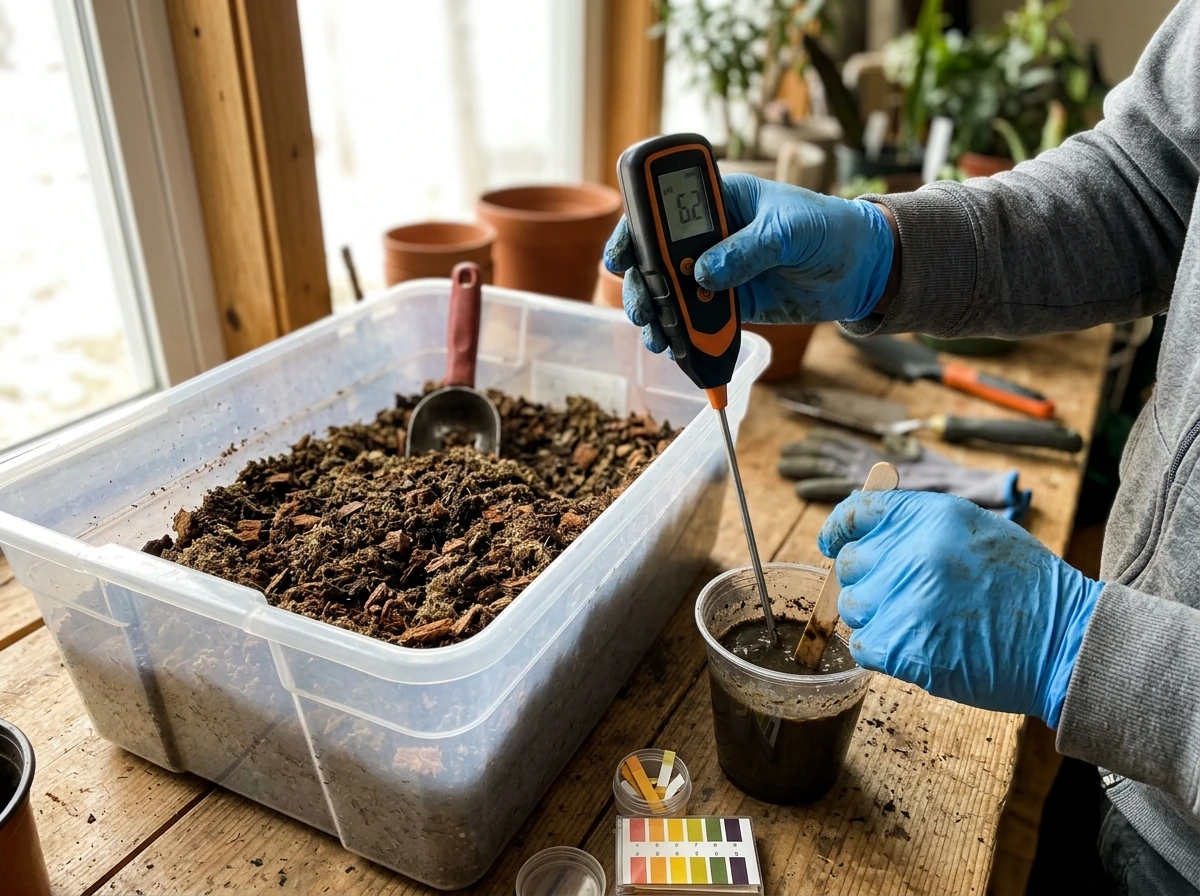
Growing media and pH
Mums are particular about media pH. In a soilless mix (peat, coir, or bark-based), target a pH of 5.8 to 6.4. Ball's production guides specifically identify this range for soilless mixes, while Syngenta's Grower Success Guide targets a tighter 5.5 to 5.9 for their programs. The practical takeaway: stay in the 5.8 to 6.2 range and you'll be in good shape for nutrient uptake. Going above 6.5 locks out iron and manganese, leading to interveinal chlorosis (yellowing between leaf veins) that tanks plant quality. Test your media pH before planting and again mid-season using a pH meter or send samples to a lab.
For EC (electrical conductivity, which measures fertilizer salt levels in the media), the Ball Chelsey Yellow guide targets a SME EC of 0.9 to 1.3 mS/cm or a PourThru EC of 1.4 to 2.0 mS/cm. Syngenta targets a slightly higher SME EC of 1.5 to 2.1 mS/cm in some programs. Both are in a similar productive range. The point is to monitor regularly so you catch buildup or depletion before it shows up as plant stress.
Containers and spacing
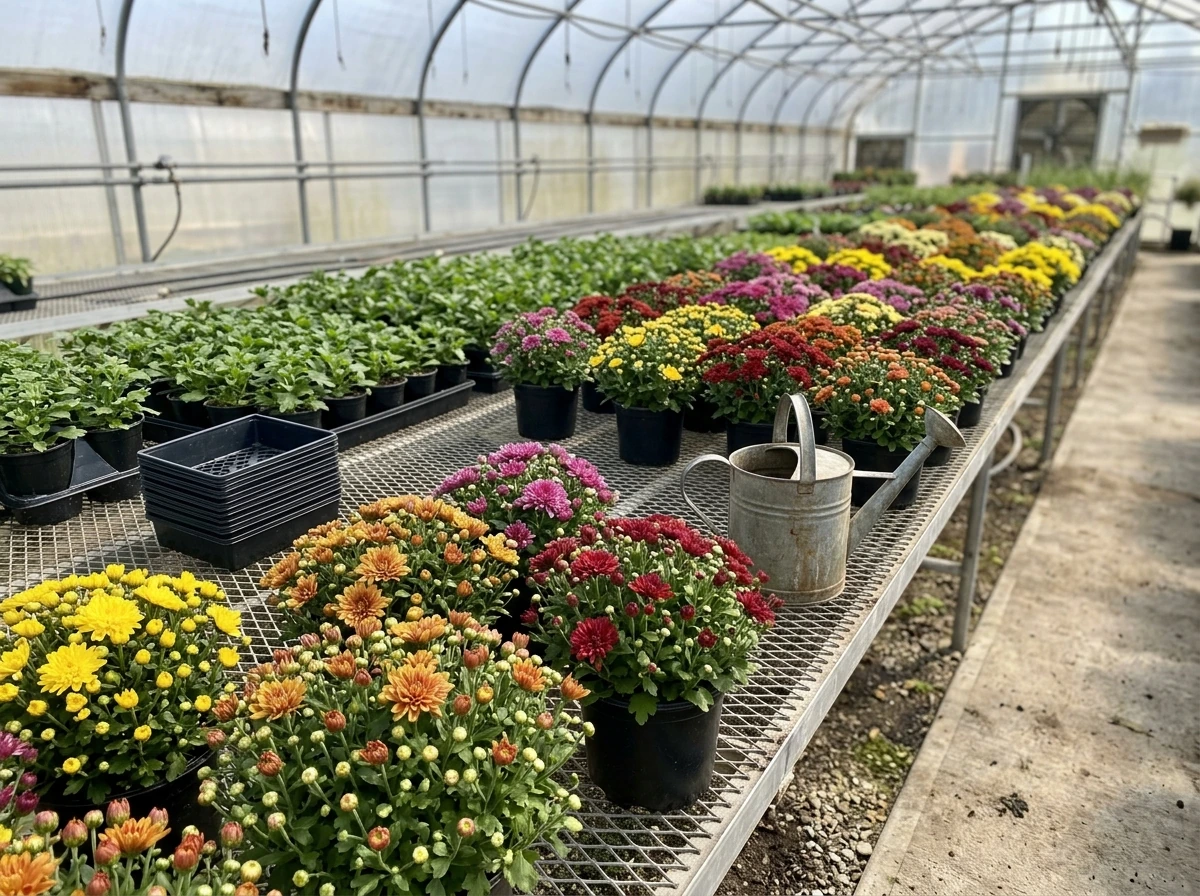
The 8-inch mum pan is the market standard. It's what customers expect at garden centers and farm stands, it displays well, and it's the format most buyers mentally associate with fall mums. Larger formats like 10-inch or 12-inch pots can command higher prices but require longer production time and more space. Start with 8-inch pans and expand from there once you have the workflow down.
For an 8 x 5-inch mum pan, Ball's production guide recommends 1 to 3 plants per pot (PPP) with final spacing on center of 16 to 20 inches (41 to 51 cm). NCSU extension guidance for an 8-inch pot suggests 18 to 24-inch centers. The principle from Greenhouse Grower best practices is straightforward: leaves should not overlap or touch adjacent plants. Overcrowding reduces airflow, promotes disease, and produces uneven, stretched plants. When in doubt, give more space rather than less. Tight spacing might look efficient early in the season, but it costs you quality by finish.
Light requirements
Mums need full sun: at least 6 hours of direct light daily, and 8 to 10 hours is better during vegetative growth. Insufficient light during the vegetative phase produces thin, elongated stems that won't hold up at market. Once plants are in their short-day flowering phase, light intensity still matters for flower color development and plant density. If you're growing under shade cloth to manage heat, limit shade to 30 percent maximum. More than that and you start compromising stem strength and bloom quality.
Watering
Mums are thirsty, especially in midsummer when they're growing hard. Water when the top inch of media is dry, but never let pots dry out completely. Drought stress at any point during production stresses the plant and can trigger premature budding, which throws off your timing. At the same time, consistently waterlogged media promotes Pythium root rot. Water in the morning so foliage dries before evening, which reduces fungal disease pressure. If you're scaling up, drip irrigation on a timer pays for itself quickly in labor savings and disease reduction.
Feeding, pinching, and growth control to time flowering and maximize quality
Fertilizing for production
Start with a balanced, complete fertilizer at transplant: something like a 20-10-20 or 17-5-17 at 200 to 250 ppm nitrogen, applied at every watering (constant liquid feed) or weekly as a drench. During vegetative growth, slightly higher nitrogen promotes branching and canopy fill. Once plants shift into bud development, reduce nitrogen and boost potassium to support flower development and color intensity. A 15-0-15 or similar low-phosphorus, high-potassium formulation is commonly used during finishing. Phosphorus isn't the limiting nutrient here, and excess phosphorus can actually suppress micronutrient uptake.
Keep testing. Regular media EC checks (PourThru method is easiest in pots) tell you whether nutrients are building up or getting depleted. If EC climbs above target, leach pots with plain water. If it drops below, bump up your fertilizer rate. Don't guess when you can measure.
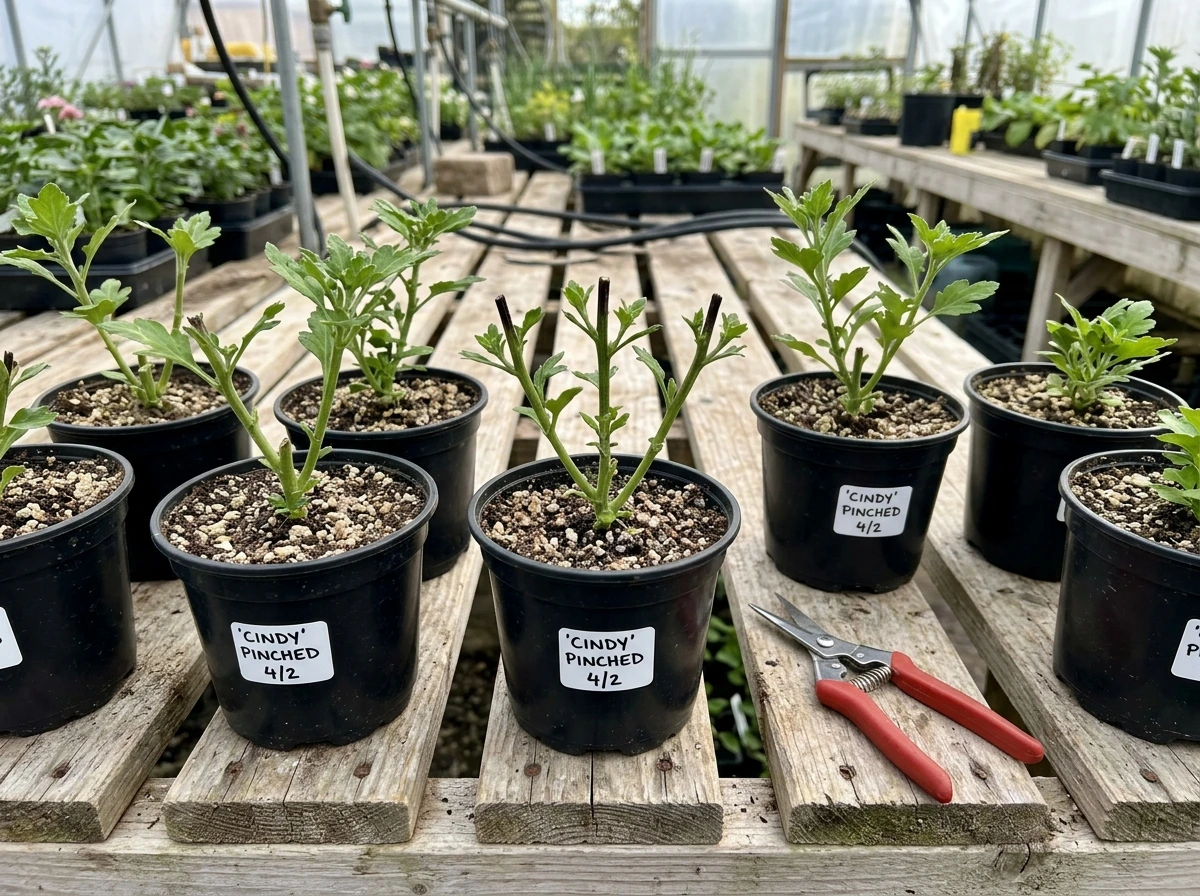
Pinching: the key to bushy, full plants
Pinching is what turns a single-stemmed rooted cutting into a full, globe-shaped plant with dozens of flower buds. Without it, you get a sparse, leggy plant that won't sell. The technique: remove the growing tip of each stem, leaving 3 to 5 leaves below the cut. This redirects energy into side shoots, dramatically increasing branch count and ultimately flower count.
The Ball Chelsey Yellow guide is specific about timing: pinch when new growth (after transplant) reaches about 1 to 1.5 inches. That usually means waiting 1 to 2 weeks after transplanting rooted cuttings to let roots establish first. If you want purple punch grow tips specifically, focus on pinching timing, steady EC and pH targets, and consistent short-day day length control. A second pinch (soft pinch) 3 to 4 weeks after the first increases branching further. Stop all pinching by mid-July in most northern zones (zones 5 to 6), or about 6 to 7 weeks before your target bloom date. Pinching too late delays flowering and you risk having plants that are still green when your selling window opens.
Managing temperature and day length for on-time flowering
Temperature is one of the trickier variables in mum production. According to MSU Extension and Greenhouse Management reporting from UMass and UConn specialists, high night temperatures during flower bud initiation are a primary cause of heat delay, crown buds, poor branching, and uneven flowering. Specifically, night temperatures above 70 to 72°F during the first few weeks of short days can cause these problems. This is why midsummer timing is critical: if your nights are warm through August, plants may fail to initiate properly even when day length is right.
Dümmen Orange's best practices document targets 12.75 to 13.5 hours of darkness until flower color is visible. In most of the U.S., this naturally arrives in late August to September. If you're in a warmer southern zone and need to force earlier flowering, use black poly shade cloth to black out plants for 13+ hours starting in mid-July, pulling cloth off during the heat of the day. Conversely, if you're in a northern zone and worried about early budding from cool nights in early summer, keep plants under lights for extended day length (night-interruption lighting) during the vegetative phase to hold them back.
Ball's mum guide also notes that low night temperatures at planting can cause premature flower initiation, so avoid setting cuttings out when nights are still dipping below 50°F in spring. That's a problem that shows up as small, prematurely budded plants that never develop into full, saleable specimens.
Growth regulators
If your plants are running tall, plant growth regulators (PGRs) can help you hit a more compact, marketable finished height. Dümmen Orange's best practices document lists ethephon as an option for influencing flower development, with application frequency conditioned on temperature: above 65°F (18°C) vs cooler conditions. B-Nine (daminozide) and Cycocel (chlormequat) are also commonly used in commercial mum programs to control stretch. If you're newer to PGRs, start with a conservative rate and test on a small batch before applying across your whole crop.
Pest, disease, and common growth problems
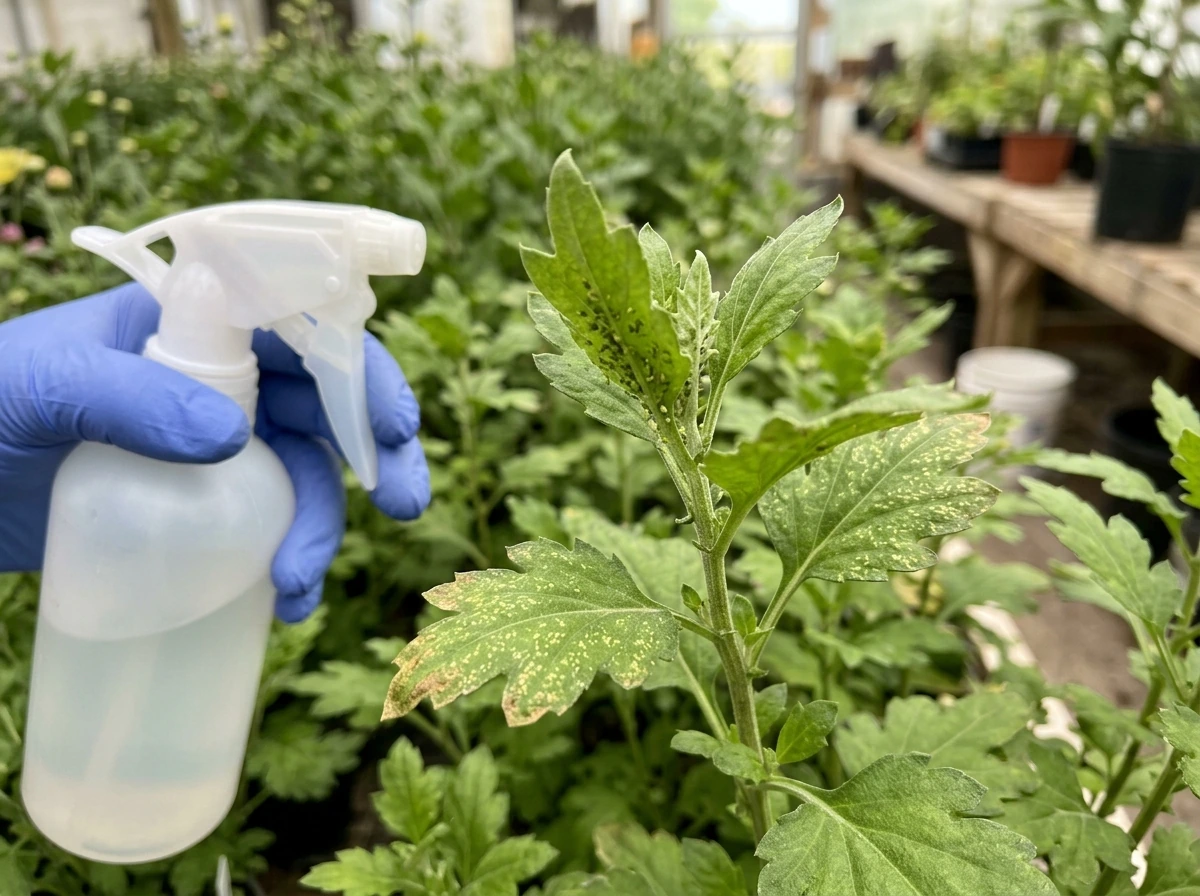
The pests you'll most likely face
Aphids are the most common insect pest on mums. They cluster on new growth and undersides of leaves, sucking sap and producing honeydew that promotes sooty mold. At small scale, a strong spray of water knocks populations back. Insecticidal soap or neem oil work well for early or moderate infestations. For heavier pressure or larger operations, check your state extension's current IPM tables for labeled systemic options. Chrysanthemum leaf miners (Liriomyza species) create distinctive winding tunnels through leaves. They're harder to control once inside the leaf, so monitor early, remove heavily affected leaves, and use yellow sticky traps to track adult populations.
Spider mites flare up during hot, dry weather, leaving stippled, bronze-tinted foliage. Keeping plants adequately watered and maintaining good humidity reduces mite pressure. Miticides are often necessary for commercial-scale outbreaks, and you need to rotate active ingredients because mites develop resistance fast. Thrips are another occasional problem, particularly damaging flowers. Blue sticky traps help monitor populations.
Diseases to watch for
Gray mold (Botrytis cinerea) is probably your biggest disease threat, especially in cool, humid fall conditions when plants are nearing bloom. It appears as fuzzy gray spore masses on flowers and stems. Prevention is the best approach: space plants for airflow, water in the morning, remove dead or dying tissue promptly, and avoid getting water on flowers. Once Botrytis takes hold in a flowering crop, it spreads fast. Fungicides labeled for Botrytis applied as a preventive program during bud development are commonly used in commercial production.
Chrysanthemum white rust and common rust (Puccinia chrysanthemi) produce orange-yellow pustules on leaves and are reportable diseases in some states. Rust spreads rapidly in wet conditions. Avoid overhead irrigation and use resistant cultivars where available. Powdery mildew appears as white powdery coating on leaves, usually late in the season. It's unsightly and reduces market value. Adequate spacing and good airflow are your primary prevention tools.
Common growth problems and fixes
| Problem | Likely Cause | Fix |
|---|---|---|
| Leggy, stretched plants | Insufficient light or pinching skipped/too late | Increase light exposure; pinch earlier next cycle; consider PGRs |
| Premature budding (small plants) | Cool nights at planting or early stress | Delay transplant until nights stay above 50°F; use night-interruption lighting |
| Crown buds / uneven flowering | High night temps during bud initiation | Move plants to cooler location; use shade cloth to reduce heat stress |
| Sparse blooms | Too few pinches or nutrient deficiency | Add a second pinch; review fertilizer EC and pH |
| Yellowing leaves (interveinal) | pH too high, locking out iron/manganese | Lower media pH to 5.8–6.2; apply chelated iron as foliar |
| Root rot / wilting despite wet soil | Pythium; overwatering or poor drainage | Improve drainage; reduce watering frequency; apply labeled fungicide drench |
| Botrytis on flowers | High humidity + poor airflow + overhead water | Improve spacing; water in the morning; remove affected tissue; apply preventive fungicide |
Harvest, finish, and sell: pot prep, hardening off, and quality standards
Timing your pull to market is everything. The best window for selling mums is when they're showing full bud color but not yet fully open, roughly at what growers call the "puffy bud" stage. At this point, plants look colorful and full on the display table, but customers get another 3 to 4 weeks of bloom time at home. If you wait until plants are fully blown open, they look stunning for a day or two then start declining, and you'll get complaints. Earlier is better.
Hardening off
If you've been growing in a greenhouse or under any protection, harden plants off before sale. Move them to a sheltered outdoor location with morning sun for about a week before putting them out for display. This acclimation reduces transplant shock for buyers and makes your plants more resilient on a display table exposed to wind and full sun. Plants that go straight from a climate-controlled greenhouse to a sunny parking lot sell day tend to droop badly and reflect poorly on you.
Quality standards buyers expect
- Full, symmetrical canopy with no bare patches or obvious gaps
- Flower buds showing color but mostly closed at point of sale
- No visible pests on foliage or under leaves
- No significant disease symptoms (spots, mold, rust lesions)
- Clean pot exterior with no algae, salt crust, or soil splatter
- Foliage that is dark green (not yellowing or pale) all the way to the base
- Proper label with variety name, color, and basic care instructions
Presentation matters more than most new growers expect. Wipe down pots, remove any dead or damaged leaves, and add a simple care tag. Even a basic printed card that says 'Water when dry, full sun, remove spent blooms' dramatically improves perceived value and repeat customer rates. Group plants by color on your display table and keep a consistent finished height across each variety grouping.
Scaling for profit: costs, labor, yield planning, and quick start checklist
Understanding your costs and margins
Let's be concrete. A rooted cutting from a commercial propagator typically costs $0.50 to $1.25 per plant depending on variety and quantity. An 8-inch pot with growing media, fertilizer, and associated inputs adds roughly $0.50 to $1.00 per pot in variable costs. Labor is your biggest expense and hardest to track: propagation, potting, pinching, watering, spraying, and selling time all add up. A realistic minimum sale price for a well-grown, full 8-inch mum pan at retail is $8 to $15, with premium varieties or larger pots going higher. At a farmers market or farm stand, $10 to $12 is a common entry-level retail price and still generates reasonable margin if you control your input costs.
Wholesale to garden centers or florists typically runs 40 to 60 percent of retail, so $4 to $7 per pot. That's tighter but viable at volume, especially if you're already set up for large batches. For most small growers starting out, direct retail (farm stands, farmers markets, local selling) is where the margins actually work.
Yield and space planning
At 18-inch centers (a conservative spacing for 8-inch pots), you can fit about 4 pots per square yard of growing space. A 10 x 20-foot growing area (200 square feet) gives you roughly 88 pots, allowing for walking space. If you sell 80 of those at $10 each, that's $800 in gross revenue from one 200-square-foot batch. Scale that to 3 succession batches and 600 square feet of growing space, and you're looking at $2,400 in gross revenue before costs. That's a meaningful side income, and it scales from there.
Quick start checklist
- Choose 2 to 3 market-ready garden mum varieties from a reputable propagator and order rooted cuttings for your target plant date (count back 14 to 16 weeks from your sell date)
- Prepare 8-inch mum pans with a quality soilless mix; check media pH and adjust to 5.8 to 6.2 before planting
- Transplant rooted cuttings after spring frost danger has passed and nights are consistently above 50°F
- Apply a balanced starter fertilizer at transplant (200 ppm nitrogen); begin constant liquid feed program
- Pinch when new growth reaches 1 to 1.5 inches; repeat pinch 3 to 4 weeks later; stop all pinching by mid-July (or 6 to 7 weeks before target bloom date)
- Space pots to 18 to 20-inch centers and ensure leaves never overlap adjacent plants
- Monitor media EC and pH every 2 weeks; adjust fertilizer rate as needed
- Watch night temperatures during August: if consistently above 70°F, use shade cloth or relocate to manage heat delay risk
- Implement a preventive pest and disease scouting routine; check plants weekly and use sticky traps
- Harden off plants 7 days before sale; bring to market at puffy-bud stage; label and present cleanly
- Track your costs per pot and actual sale price per batch to refine inputs and pricing for next season
If you're also planning around which season best fits your growing situation, it's worth reading up on how to grow mums for fall and where to grow mums to dial in your location-specific timing before you order cuttings. If you're specifically targeting the fall season, learning how to grow fall mums will help you line up pinching, day-length control, and planting dates for on-time blooms. If you want to keep mums returning year after year, focus on how to grow mums as perennials alongside your timing and day-length control. Get one full production cycle under your belt, keep notes on what threw off your timing or quality, and you'll make much smarter decisions for season two. when to grow mums for fall If you want a more precise, step-by-step schedule, see when to grow mums for fall as a related guide to fine-tune your planting and forcing dates.
FAQ
How do I avoid missing the puffy-bud selling window when weather shifts?
Aim for sale-ready color at the “puffy bud” stage, then use a simple cut-and-count rule for your next batch. Mark a sample pot each week and record (1) first visible bud color, (2) when buds look fully colored but still tight, and (3) when the first flowers open. If your sell window slips because of warm nights, start future successions 3 to 7 days earlier for that same cultivar and pot size.
What’s the safest way to trial plant growth regulators without hurting my sell timing?
Take a small, labeled batch approach. Apply your chosen PGR program to 10 to 20 pots at first (same cultivar, same pot size, same week of growth), then compare height at pinch stop (mid-July) and at sale date. If you see delayed budding or weaker canopy fill, reduce the rate or shorten the treatment window next time rather than treating the full crop immediately.
How can I tell whether my problem is watering, nutrient buildup, or pH/EC before it affects flower quality?
For a quick stress check, look at new growth. Underwatering usually shows dull, wilting new shoots and dry pull-away media near the pot edge, while overwatering often leads to yellowing that starts lower in the plant and a persistent soggy surface. Use your EC and media pH tests together, if EC is rising but plants look chlorotic, you may be overfeeding plus oxygen-poor media, not just a watering issue.
Can I start mums earlier than the recommended window to sell sooner?
Yes, but only if you can control day length and temperature consistently. The article’s timeline assumes outdoor or naturally managed short days, so if you want to start early in a cooler spring, keep the crop vegetative until you are ready to initiate, then trigger short-day conditions without delay. The common mistake is exposing plants outdoors too early, causing uneven initiation that makes a single uniform sell batch impossible.
What’s the best hardening-off routine if buyers are picking up from a greenhouse or indoors?
Plan for a hard hardening-off schedule based on exposure, not just time. Start with morning sun and shade the afternoon heat for the first 2 to 3 days, then gradually increase wind exposure. If the first day is sunny and windy, extend the acclimation to 10 days, because abrupt sun plus dry wind is a fast way to cause bud blast and leaf drop after sale.
How do I prevent uneven early growth after potting?
Build a potting calendar that includes “media hydration” time. Many growers pot too dry, then chase irrigation for days, which swings EC and creates uneven early growth. Pre-moisten your media to a consistent wetness level before filling, then start constant liquid feed at a measured rate and adjust only after you see stable runoff EC and new root establishment.
What should I change in feeding once I see bud set or bud color starting?
You can, but only if you match your feed strategy to flowering stage. If you keep nitrogen high after buds set, you often get delayed coloring and taller, floppier plants. Use your stage transition to reduce nitrogen and raise potassium, then watch for a “fast fade” pattern that indicates potassium and overall salt balance are off (EC too high or uptake disrupted).
How should I handle transport and on-site storage so plants don’t decline before I sell them?
For farmers market sales, time the harvest. If you move pots long distances or store them in a warm shed overnight, buds can open faster than expected or droop from heat stress. Keep sold or loaded plants shaded and cool, ideally moving them early in the day, and avoid storing full sun-exposed inventory for long periods.
What scouting routine prevents pest problems from wiping out my sale-quality pots?
Don’t rely on a single pest spray schedule. Use targeted monitoring: check undersides twice a week for aphids, look for stippling and webbing for mites, and inspect flowers for thrips presence. Rotate action types if you treat, because repeating the same class quickly leads to control failure, especially with mites.
If gray mold appears, what immediate steps help stop it from spreading across the crop?
Yes, and it usually comes down to spacing and sanitation. Remove yellowing lower leaves and spent tissue early to reduce Botrytis food sources, keep airflow paths open around benches, and avoid watering late in the day. If you spot Botrytis, remove affected plant parts immediately (bag and discard), then switch to a preventive approach rather than trying to “wait it out.”
Next Article
How to Grow Mums as Perennials: Step-by-Step Guide
Grow perennial mums step by step: pick hardy varieties, plant right, pinch and divide, overwinter, and troubleshoot for