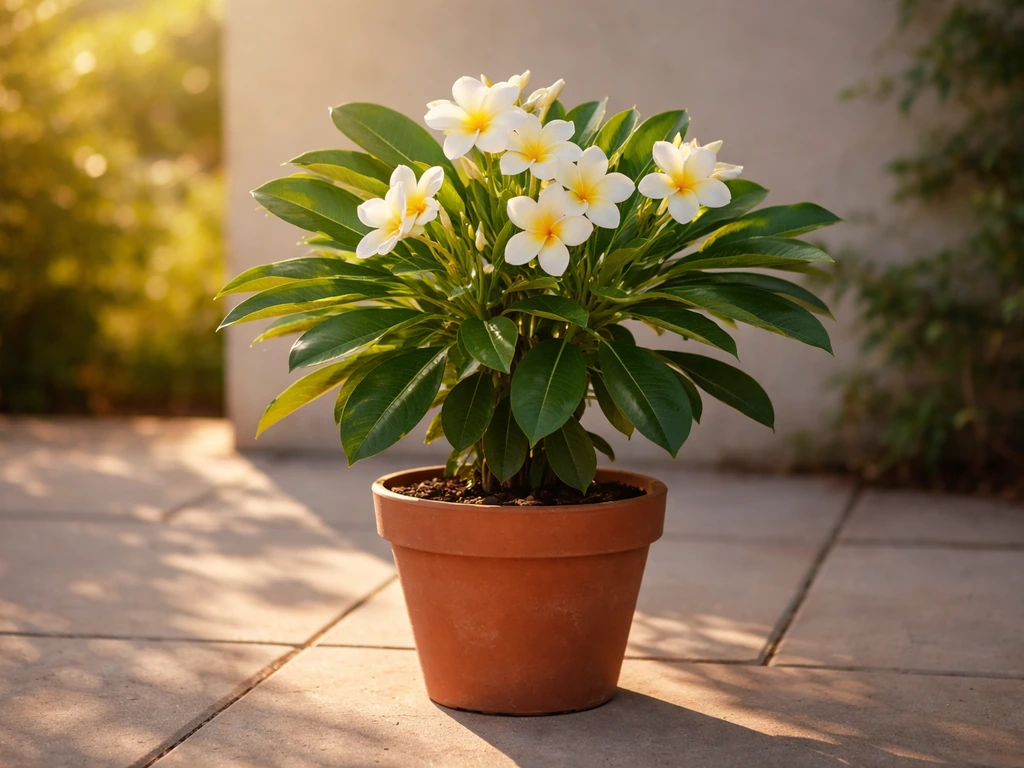
Plumeria pudica is absolutely worth the patience it demands. Take cuttings rather than seeds if you want to see flowers in your lifetime (realistically 3 to 4 years from a cutting, versus 3 to 5 years or more from seed), get the drainage right from day one, give it full sun and warmth, and go easy on the water. For more detailed guidance, see our step-by-step advice on how to grow pincushion protea. Do those four things and this plant will reward you with distinctive white blooms on paddle-shaped leaves that look nothing like a typical plumeria.
How to Grow Plumeria Pudica From Seed or Cuttings

Harriet Whitmore
6 Jun 2026
Getting to know Plumeria pudica

Plumeria pudica is a bit of an odd one out in the plumeria family. Where most plumerias are deciduous and drop their leaves in winter, pudica is evergreen, holding its distinctive spoon- or paddle-shaped leaves year-round. The flowers are white with a yellow center, smaller and more delicate than the big tropical blooms you might picture on a classic plumeria lei, but they're produced reliably once the plant matures. It's also more compact and shrubby than some of its cousins, which makes it a genuinely good choice for container growing.
In terms of climate, pudica is a true tropical. It originates from South America and thrives in USDA hardiness zones 10 to 12. It can handle brief dips to around 40°F (4°C) without permanent damage, but anything near or below freezing will kill it. If you're in zones 9 or colder, you'll be growing this plant in a container and bringing it indoors for winter, which is completely doable. Gardeners in warm coastal California, Florida, Texas, and Hawaii can grow it outdoors year-round. Everyone else treats it as a patio plant that spends its summers outside and winters on a sunny windowsill or under grow lights.
One of the things I genuinely like about this species is that it forms a thickened stem base (sometimes called a caudex), which stores water and nutrients. This is both a survival advantage and a warning: that stored moisture is precious, and overwatering rots it fast. Understanding that the plant is built to handle dry periods is the single most useful thing you can carry into every other decision you make about its care.
Starting from seed vs cuttings: which should you choose?
This is probably the most important practical decision you'll make, so let's be honest about it. Seeds are fascinating but slow. The Plumeria Society of America puts the wait at 3 to 5 years before you see flowers from a seed-grown plant, and with pudica specifically, some growers report it takes even longer. Seeds also don't reliably reproduce the parent plant's flower color or form, so you're partly gambling on the outcome. If you enjoy the propagation process and are genuinely excited about that uncertainty, seeds are a fun project. But if your goal is a blooming plant on your patio, cuttings are the answer.
Cuttings from pudica still require patience. Unlike faster-blooming plumeria varieties that can flower within 1 to 2 years of rooting, pudica tends to take around 3 to 4 years from cutting to first bloom. That's slower than many people expect, and it's worth knowing upfront so you're not troubleshooting a perfectly healthy plant just because it hasn't flowered yet. The upside is that cuttings carry the full genetics of the parent, so you know exactly what you're getting.
How to take and root a cutting
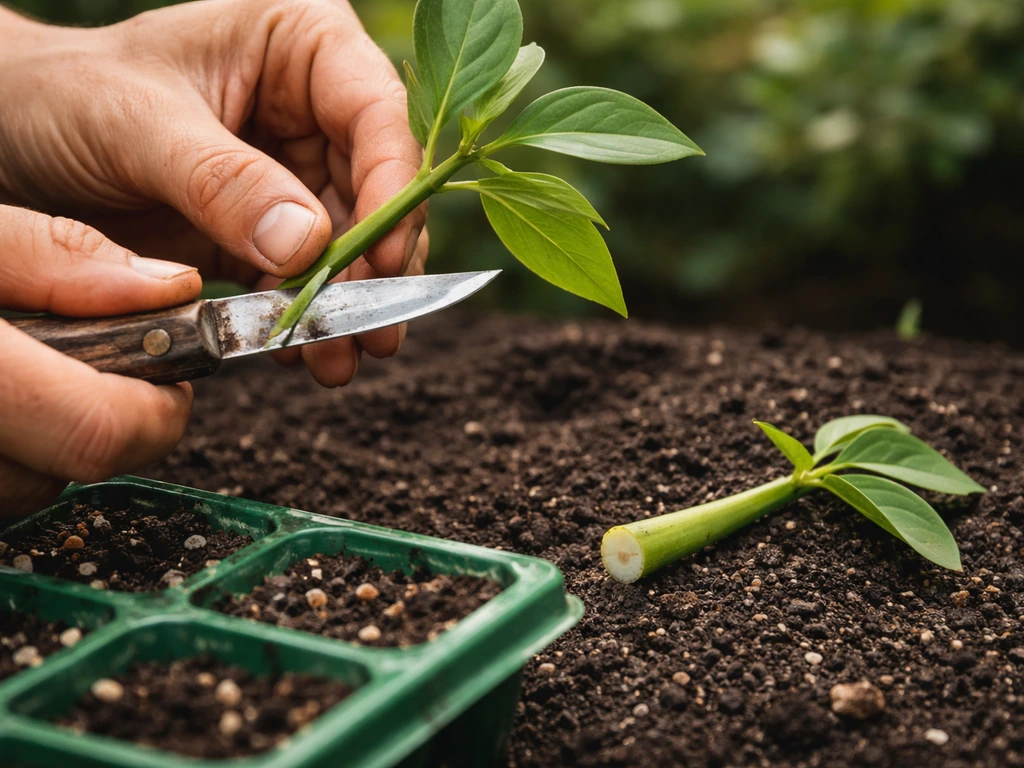
You can take cuttings at any time of year, but late spring and early summer give you the best rooting conditions because warmth accelerates callusing and root development. Cut a tip section 12 to 18 inches long from a healthy stem, using a clean, sharp blade. The white milky sap that immediately bleeds out is a latex irritant, so wear gloves. Once cut, set the cutting aside in a warm, shaded, dry spot for at least 3 to 7 days. This drying step is non-negotiable: the cut end needs to form a firm, dry callus before it goes into any growing medium, otherwise it will rot before it ever roots.
Once calloused, dip the base in a rooting hormone powder (optional but helpful), then plant it about 2 to 3 inches deep in a very well-draining mix. Do not water for the first week after planting. After that, water lightly and infrequently. Roots typically form within 4 to 8 weeks in warm conditions, and you'll know rooting has occurred when you see new leaf growth emerging from the tip. Until that happens, resist the urge to water heavily or check the roots by pulling the cutting out.
Starting from seed (if you go that route)
Plumeria pudica seeds have a papery wing attached to one end. Sow them with the wing pointing upward in a light, moist seed-raising mix, just barely covered, in a warm spot (around 75 to 85°F / 24 to 30°C). Germination usually takes 1 to 3 weeks. Keep seedlings in bright, indirect light initially, then gradually move them into full sun as they develop. Expect slow going for the first year or two, and be prepared to repot carefully once roots fill the container.
Soil, pot size, and container setup
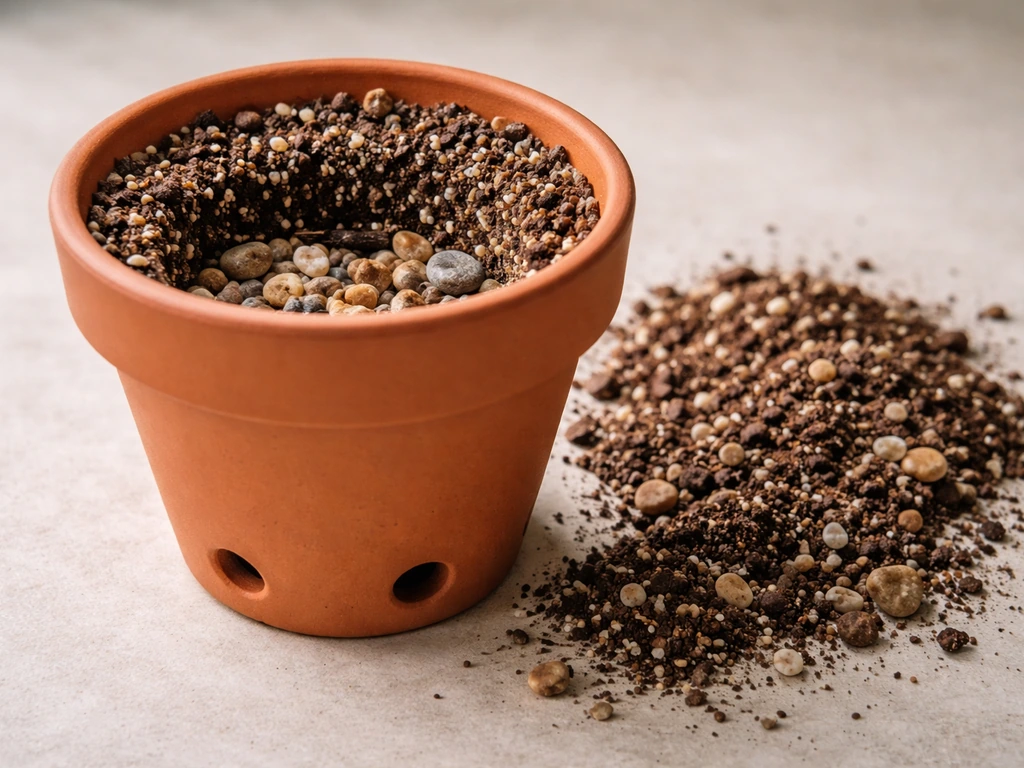
The number one killer of plumeria pudica in home gardens is root and stem rot from poor drainage, so getting the container and soil right upfront is worth spending real time on. I've learned this the hard way: a beautiful cutting doing everything right above the soil line can be quietly rotting below it in a mix that holds too much moisture.
For soil, skip standard potting mix on its own. It holds way too much moisture for plumeria's liking. Instead, use a blend that drains fast and dries out relatively quickly between waterings. A practical mix that works well is roughly 50% coarse perlite or pumice combined with 50% quality potting mix, or a dedicated cactus and succulent mix amended with extra perlite. The goal is a mix that stays loose, never compacts to a soggy mass, and allows air to reach the roots.
Pot choice matters almost as much as the mix. Terracotta is genuinely better than plastic here because it's porous and allows moisture to evaporate from the sides, reducing the risk of the root zone staying wet too long. Whatever pot you use, it must have drainage holes, and ideally more than one. Don't use saucers that allow the pot to sit in pooled water.
For pot size, start small and size up gradually. A freshly rooted cutting or young plant does well in a 6- to 8-inch pot. Moving too quickly to a large pot means there's excess damp soil surrounding the roots with no root mass to drink it up, which is a rot setup. Repot into the next size up (adding about 2 inches of diameter) once roots visibly fill the container, typically every 1 to 2 years in the early growth stages.
Light, temperature, and seasonal timing
Plumeria pudica is a full-sun plant. It wants at least 6 hours of direct sun daily to grow well, and ideally closer to 8 hours if you want it to build toward blooming. In lower light it will survive but grow slowly and spindly, and it won't bloom. This is one of the most common reasons home growers get frustrated: the plant looks alive but isn't thriving, and the culprit is usually not enough direct sun.
Temperature-wise, pudica is happiest between 65 and 95°F (18 to 35°C). It tolerates brief cooler periods but should not be left outdoors once night temperatures drop below about 50°F (10°C) consistently. At those temperatures, growth slows noticeably. Below 40°F (4°C), you risk real damage to the plant.
Seasonal timing for outdoor vs indoor growers
If you're in zone 9 or colder, your seasonal rhythm will look something like this: move the plant outdoors once nighttime temperatures are reliably above 55°F (around mid-spring in most temperate climates), position it in the sunniest spot you have, and let it enjoy the growing season through summer and into early fall. Once nights start dropping toward 50°F, usually in September or October depending on your location, bring it back inside. Indoors, your best placement is a south-facing window with as much direct light as possible. If your windows don't deliver enough sun, a full-spectrum grow light running 12 to 14 hours a day will keep the plant from going dormant and declining.
Because pudica is evergreen, it doesn't fully shut down over winter the way deciduous plumerias do, but it will slow down considerably in cooler indoor conditions with less light. Reduce watering significantly during this slower period and hold off on fertilizing until spring growth picks up again. Think of winter indoors as a maintenance phase, not a growth phase.
Watering and fertilizing for blooms
Watering plumeria pudica is really about restraint. The general rule I follow is: water thoroughly, then wait until the top 2 to 3 inches of soil are completely dry before watering again. During the active growing season (spring through summer), in a warm outdoor location, this might mean watering every 7 to 10 days. In a cooler indoor setup or during winter, that interval extends to every 2 to 3 weeks or even longer. Every time you think it's time to water, stick your finger into the soil and wait one more day if it's not fully dry. You'll rarely regret waiting; you'll often regret watering early.
For fertilizing, plumeria responds well to a high-phosphorus fertilizer, since phosphorus is the nutrient most directly tied to root development and flowering. A fertilizer labeled for flowering plants with a ratio like 10-30-10 or similar works well. Apply it at half strength every 3 to 4 weeks through spring and summer. As the plant matures and you're working toward encouraging blooms, some growers shift to a bloom-boosting formula (higher middle number in the NPK ratio) in mid-to-late summer when the plant would naturally be initiating flowers. Stop fertilizing entirely in fall and don't resume until you see active new growth returning in spring.
One thing to avoid: high-nitrogen fertilizers. Nitrogen pushes leafy, vegetative growth at the expense of flowering. If you've been feeding with a general-purpose or lawn-type fertilizer, that could be part of why your plant is lush and green but not blooming.
| Season | Watering frequency | Fertilizing |
|---|---|---|
| Spring (plant waking up) | Every 10-14 days, increasing as temps rise | Resume at half strength, every 3-4 weeks |
| Summer (active growth) | Every 7-10 days outdoors; check soil first | Full schedule, high-phosphorus formula |
| Early fall (slowing down) | Reduce to every 14 days | Stop by early fall |
| Winter (indoors, slow period) | Every 2-4 weeks, soil must dry fully | None |
Pruning, pests, diseases, and troubleshooting
Pudica is generally a low-maintenance plant once established, but it does have a handful of recurring problems that home growers run into. Here's what to look for and what to actually do about each one.
Leggy or slow growth
If your plant is stretching toward the light with long internodes (the spaces between leaves growing longer than they should), it's not getting enough direct sun. Move it to a brighter spot, or outdoors if the temperature allows. Leggy growth can be pruned back, and this actually encourages branching, which ultimately gives you more stem tips and therefore more potential blooms. Cut just above a node (the bump where a leaf attaches), and the plant will typically put out two new branches from that point. Always let the pruning cuts dry and callus for a day or two before watering.
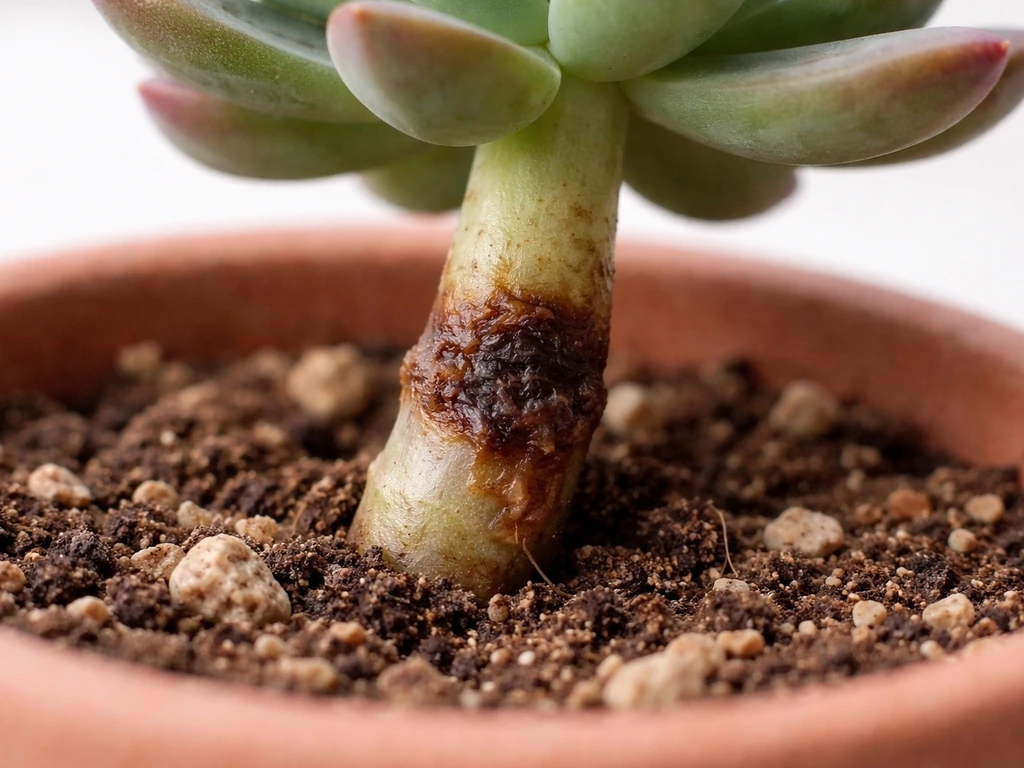
Stem or caudex rot
Rot is the most serious problem you'll face and it almost always comes from overwatering or poor drainage. Signs include soft, mushy, or discolored sections of the stem, often with a foul smell. If you catch it early and the rot is confined to the bottom of the cutting or stem, you can sometimes save the plant by cutting back into healthy tissue until you see firm white or greenish flesh with no soft spots, then re-callousing the cut and repotting in fresh, dry mix. If the rot has reached the main caudex, recovery is much harder. The lesson here is to catch the problem early by checking the base of the plant periodically rather than waiting for visible above-soil symptoms.
Leaf drop
Because pudica is evergreen, significant leaf drop is a stress signal rather than a normal seasonal event. Common causes include cold temperatures (below 50°F), overwatering, underwatering combined with dry indoor air, or a sudden change in light. Diagnose by checking the conditions: if the plant has just moved indoors, it's likely adjusting to lower light. If the soil has been consistently moist, ease off watering and check for rot. If it's winter and the plant is in a cold spot, move it somewhere warmer. Some minor leaf drop when transitioning between environments is normal; heavy or sustained leaf drop is not.
Poor or no blooming
First, check whether the plant is actually old enough to bloom. A cutting from pudica realistically takes 3 to 4 years to flower, so a young plant that's doing everything right may simply need more time. Beyond age, the most common bloom blockers are insufficient direct sunlight (the single biggest one), excess nitrogen in the fertilizer, and overwatering. If you are wondering how to grow polyanthus, start by matching the light requirements to your conditions, since lack of sun is one of the biggest reasons many flowering plants fail to bloom not enough direct sunlight. If you still need a clearer plan, see more detailed guidance on how to grow primulas from start to finish Poor or no blooming. If your plant is mature and healthy but not blooming, switch to a high-phosphorus bloom fertilizer, maximize its sun exposure, and let the soil dry out more aggressively between waterings.
Pests and fungal issues
The most common pests on plumeria are spider mites (tiny dots on leaf undersides with fine webbing, usually worse in dry indoor conditions), mealybugs (white cottony clusters in leaf joints), and thrips (causing silvery streaking on leaves). For mites and mealybugs, wiping leaves with a damp cloth followed by an application of neem oil solution works well for light infestations. Heavier infestations respond better to insecticidal soap applied every 5 to 7 days for 3 to 4 treatments. Thrips are trickier; removing and disposing of affected leaves and using a systemic insecticide may be needed if the infestation persists.
Plumeria rust is a fungal disease showing as orange-yellow powdery spots on leaf undersides, and it spreads easily in humid conditions with poor airflow. Remove and dispose of affected leaves (don't compost them), avoid wetting foliage when watering, and improve air circulation around the plant. A copper-based fungicide can help stop the spread if applied early. Keeping the plant in a well-ventilated spot is the best preventive measure.
Pruning basics
Pudica doesn't require heavy pruning, but shaping it occasionally encourages the branching that leads to more blooming tips. The best time to prune is late winter or early spring before the new growing season kicks in. Always use clean, sharp tools, and remember to let cuts callus before the plant gets watered. Remove any dead, damaged, or crossing branches, and if you want a bushier plant rather than a tall, single-stemmed one, tip-prune the growing ends each spring.
What good progress actually looks like
It helps to have some benchmarks so you're not second-guessing a plant that's actually doing fine. In year one from a rooted cutting, you should see the plant establish, push new leaves regularly through the warm months, and reach maybe 12 to 18 inches in height. In years two and three, growth accelerates, branching becomes more apparent, and the caudex at the base starts to thicken noticeably. By year three or four, a well-grown pudica in good conditions will begin initiating its first flower clusters, typically at the tips of mature branches.
The checkpoints to watch across seasons: new leaf growth emerging in spring signals the plant has come through winter in good shape. Steady, firm (not leggy) stem growth through summer shows it's getting enough light and nutrition. A firm, solid caudex base going into fall means your watering has been right. A plant that's soft at the base, yellowing more than expected, or failing to push new growth despite warm conditions is telling you something is off, and running through the checklist above (drainage, light, fertilizer type, temperature) will usually point you to the cause.
If you enjoy growing other striking flowering plants with specific care requirements, the same patience-and-conditions mindset applies to things like agapanthus and pincushion protea, which similarly reward growers who dial in the right drainage and sun exposure rather than applying generic care. The principles transfer well once you've built the habit of reading your plants rather than following a rigid schedule. Pieris japonica care focuses on planting in well-drained soil, providing the right light, and managing consistent moisture to support healthy growth and blooms how to grow pieris japonica.
FAQ
Should I water a plumeria pudica cutting immediately after I pot it?
No. If your plumeria pudica cutting is still callusing or you just planted it, avoid any watering for about a week. The cutting end must stay dry enough to stay sealed, then you can start light watering only after the root zone is established.
What’s the biggest mistake with pots and saucers when growing plumeria pudica?
For pudica, favor a pot that lets excess water escape quickly, terracotta is ideal, but the key is drainage holes and a fast-drying mix. A common mistake is using a saucer, then leaving the pot sitting in runoff, which keeps the base too wet and triggers rot.
My pudica leaves are yellowing, how do I tell rot from normal stress?
If the stem is firm but leaves yellow, first check light and fertilizer before assuming rot. Pudica often shows stress from insufficient direct sun or too much nitrogen, whereas rot usually starts with soft, mushy, or foul-smelling tissue at the base.
How should I adjust watering for plumeria pudica in winter indoors?
In winter, you can water less even if the plant is evergreen, because growth slows indoors when light is weaker. Wait until the top 2 to 3 inches of mix are completely dry, then resume a more active watering rhythm only when spring leaf growth restarts.
Can I move my indoor plumeria pudica outside in spring, and how do I avoid leaf burn?
Aim for bright direct sun, at least 6 hours daily, and protect from sudden sunshock when moving outdoors. Ease it in over 7 to 14 days, especially if it was indoors or under grow lights, so the leaves don’t scorch.
When is it safe to fertilize a newly rooted plumeria pudica cutting?
Yes, but only lightly and after it has rooted and started new growth. During rooting, do not fertilize, and once active growth begins, use half-strength high-phosphorus feed every 3 to 4 weeks. Overfeeding early can increase rot risk because you keep the plant in a wetter, faster-growing state.
How do I plant plumeria pudica seeds correctly (seed orientation and coverage)?
No winged seeds are not “upside down” if you plant them with the papery wing end facing upward, but you still want the seed just barely covered. If germination is slow beyond 3 weeks, check warmth and that the mix stays lightly moist, not wet.
My plumeria pudica isn’t blooming, what should I troubleshoot first?
If you don’t get flowers, don’t jump to pruning first. Verify maturity, then correct the biggest blockers: direct sun amount, nitrogen level, and watering that’s too frequent. A high-phosphorus or bloom-oriented fertilizer usually helps only after light and age are adequate.
When should I prune plumeria pudica to encourage more branching and blooms?
You can prune to control height and encourage branching, but avoid heavy pruning right before the plant’s light drops. Late winter to early spring is the best window, and always let cut surfaces dry briefly before resuming watering to reduce entry points for rot.
My mite or mealybug problem keeps coming back, what’s the practical fix?
If spider mites or mealybugs keep returning, the plant may be too dry, especially indoors, and infestations often restart from hidden eggs on leaf undersides. Increase humidity slightly around the plant (not soggy soil), inspect weekly, and repeat treatments on schedule rather than doing a single spray.
Citations
The Plumeria Society of America states that growing plumeria from seed typically involves a 3–5 year wait for blooms.
Plumeria Seeds and Seedlings (The Plumeria Society of America) PDF - https://theplumeriasociety.org/plumeria/wp-content/uploads/2014/05/Plumeria-Seeds-and-Seedlings.pdf
The Plumeria Society of America notes that plumeria cuttings may be taken any time of year, but root establishment appears most successful with warm, dry conditions while allowing the cut surface to dry/callous and sealing before planting.
Plumeria Cuttings: Making and Rooting (The Plumeria Society of America) PDF - https://theplumeriasociety.org/plumeria/wp-content/uploads/2014/05/Plumeria-Cuttings.pdf
NurseriesOnline (USA) reports that plumeria plants “should flower 1–2 years after the cutting is planted.”
How to Grow Plumeria (NurseriesOnline USA) - https://www.nurseriesonline.com/gardening-articles/how-to-grow-plumeria/
LizPlants states that Plumeria pudica can take about 3–4 years from cutting to produce its first flowers (noting it is slower/different versus many other plumerias).
How to Grow Plumeria pudica — LizPlants - https://lizplants.com/grow/plumeria-pudica
Next Article
How to Grow Pincushion Protea From a Cutting
Step-by-step how to grow pincushion protea from a cutting, root, transplant, and troubleshoot rot or no rooting.