Montbretia (Crocosmia) is one of the easiest summer-blooming corms you can plant, and once it settles in it will reward you with arching sprays of fiery orange, red, or yellow flowers from mid-summer well into autumn. Plant dormant corms in spring after your last frost date, about 3 to 5 inches deep and 6 to 8 inches apart, in a sunny spot with fertile, well-drained soil. Keep them consistently moist while they establish, then step back, established clumps need very little fuss. That said, there is a bit more nuance around hardiness zones, winter storage, and containment in mild climates, so let me walk you through everything from site prep to propagation.
How to Grow Montbretia: Planting, Care & Propagation Guide

Harriet Whitmore
11 Aug 2026
What montbretia actually is (and why it's worth growing)
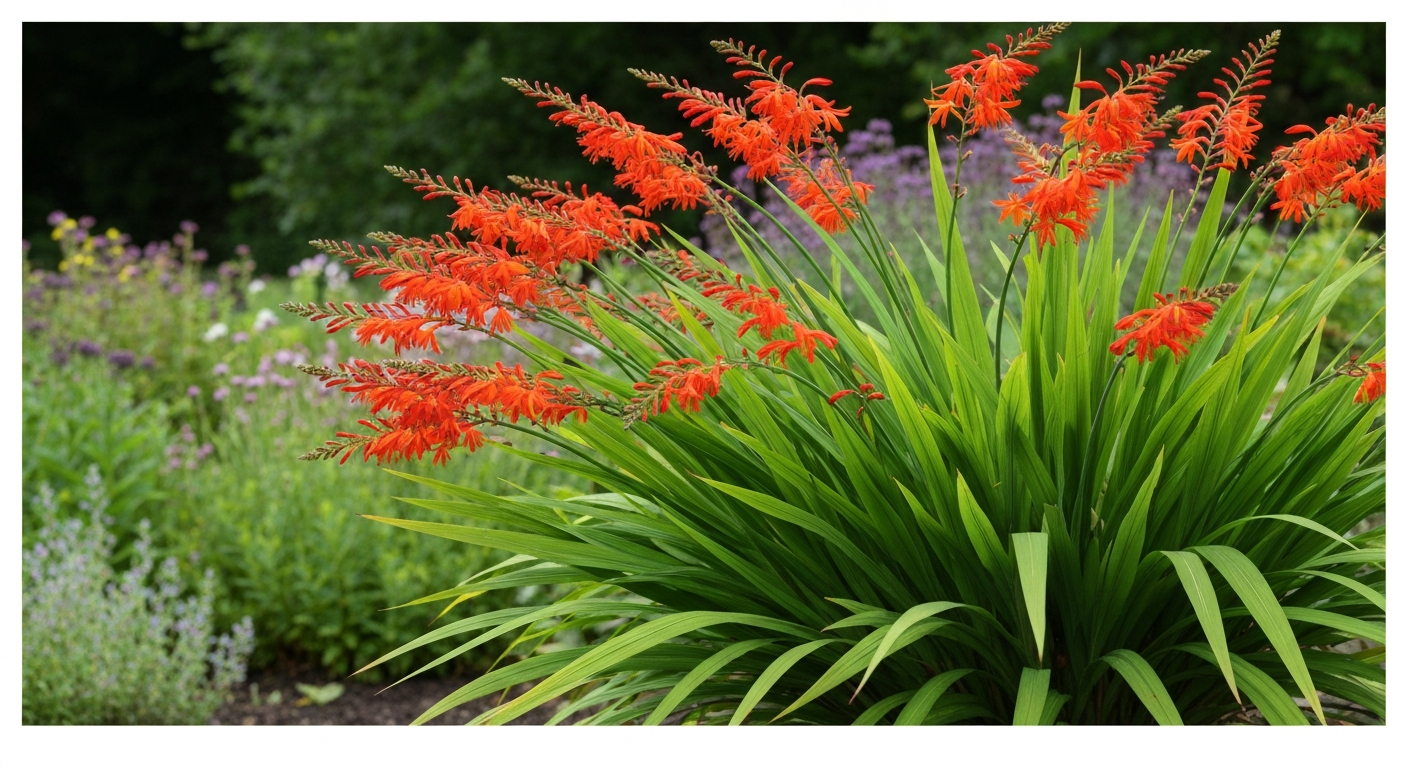
Crocosmia is a genus of cormous perennials native to the grasslands and rocky slopes of southern Africa, and the plant most gardeners call montbretia is the widely grown hybrid Crocosmia × crocosmiiflora, a cross between C. aurea and C. pottsii. It produces strap-like leaves that fan out from the base and tall, wiry stems carrying elegant zigzag spikes of tubular flowers. Most cultivars reach 50 cm to 1 m (about 20 to 40 inches) tall, while statement varieties like 'Lucifer' can push up to 1. RHS lists most Crocosmia cultivars as 0.5–1 m tall, with some selections (including 'Lucifer' and taller species) reaching up to 1.2–2.0 m RHS lists most Crocosmia cultivars as 0.5–1 m tall, with some selections (including 'Lucifer' and taller species) reaching up to 1.2–2.0 m.. 2 m or taller. The bloom window runs from roughly June through August or September depending on your climate, which means you get colour right when many early-summer perennials are fading.
The flowers are not just beautiful in the border, they are exceptional cut flowers too. Research on 'Lucifer' inflorescences found an average vase life of nearly 19 days when harvested at the right stage and placed in floral preservative, which makes them genuinely useful for home arrangements. Beyond cutting, montbretia naturalizes readily (sometimes too readily, more on that below), spreads politely in borders, and attracts hummingbirds and long-tongued bees. It is versatile, long-blooming, and relatively undemanding once established, which is exactly why it belongs in so many gardens.
Choosing the right spot: sun, soil, and drainage
Montbretia genuinely needs a warm, sunny position to flower well. Full sun (six or more hours of direct light daily) produces the best bloom count and sturdiest stems. It will tolerate partial shade, but in my experience anything less than four hours of sun leads to floppy growth and poor flowering, one of the most common reasons gardeners are disappointed with their plants. If you are working with a partly shaded border, prioritize spots that get morning sun rather than just afternoon shade.
Soil drainage is equally important. Crocosmia corms will rot in waterlogged ground, so if your soil is heavy clay or stays wet through winter, you need to address that before planting. Fortunately, montbretia is tolerant of a range of soil textures, loam, sandy soil, and organic-rich beds all work well, as long as drainage is adequate. NC State Extension's Plant Toolbox lists Crocosmia as tolerant of loam, sandy and high-organic soils and gives a soil pH range of about 6.0–8.0 with good to moist drainage preferred. It performs best in fertile, moisture-retentive soil that does not dry out completely in summer, and it tolerates a wide pH range from roughly 6.0 to 8.0, so most garden soils are fine without adjustment.
How to prepare the soil before planting
- Dig the bed to a spade's depth (roughly 30 cm / 12 inches), loosening any compacted layers beneath.
- If your soil is heavy clay, work in a 5 to 8 cm (2 to 3 inch) layer of horticultural grit and garden compost to improve drainage and structure.
- For sandy soils, incorporate generous amounts of well-rotted compost or aged manure to improve moisture retention and fertility.
- Rake the surface level and leave it to settle for a few days before planting.
- Do not add high-nitrogen fertilizer at planting — it encourages leafy growth at the expense of flowers. A slow-release balanced granular feed mixed into the planting zone is fine.
Planting step-by-step: depth, spacing, and technique
Crocosmia corms look a bit like small, flattened bulbs with a pointed growing tip at the top. Getting depth right matters, too shallow and the corms are vulnerable to frost and drying out; too deep and emergence is delayed. The RHS recommends planting at roughly three times the depth of the corm itself, which typically works out to about 8 to 10 cm (3 to 4 inches) for standard corms. Missouri Botanical Garden advises 3 to 4 inches deep, while NC State Extension suggests around 5 inches for some site conditions. I find 3 to 4 inches works well in most free-draining soils, and I go a bit deeper (5 inches) in lighter, sandy beds where corms can dry and shift more easily.
- Identify the growing tip (the pointed or slightly budded end) — this goes upward. If you are uncertain, plant the corm on its side; it will orient itself.
- Dig individual holes or a wide trench for a group planting, going 8 to 13 cm (3 to 5 inches) deep.
- Space corms 10 to 20 cm (4 to 8 inches) apart. Closer spacing (around 10 cm) creates a dense, naturalized look faster. Wider spacing (15 to 20 cm) suits borders where you want clumps to develop gradually without immediate crowding.
- Set each corm in position with the tip facing up, then backfill firmly to eliminate air pockets.
- Water in well after planting to settle the soil around the corms.
- Label the area if planting before leaves emerge — it is easy to accidentally dig into dormant corms.
For container planting, use a pot at least 30 cm (12 inches) wide and deep. Fill with a loam-based potting mix combined with one part horticultural grit for drainage. Plant at the same depth as in the ground, fit three to five corms per container depending on pot size, and place the container in full sun. Containers dry out faster than borders, so monitor moisture closely.
When to plant: timing by USDA zone and climate
The general rule is to plant dormant corms in spring once the risk of hard frost has passed and the soil has warmed to at least 10°C (50°F). The exact timing varies meaningfully across climate zones, so here is how to think about it by region.
| USDA Zone | Hardiness notes | Planting window | Winter treatment |
|---|---|---|---|
| Zone 5 | Marginally hardy; corms can survive with protection | Mid to late April (after last frost) | Lift corms in October or apply 10–15 cm mulch |
| Zone 6 | Generally hardy with mulch | Early to mid-April | Heavy mulch in autumn; lifting optional |
| Zone 7 | Hardy in most winters | Late March to early April | Light mulch or none needed |
| Zone 8 | Reliably hardy | March, or autumn planting of containerised plants | No lifting needed; thin and divide every 3–4 years |
| Zone 9 | Thrives; can naturalize aggressively | February to March, or autumn | Monitor spread; divide regularly to control |
| Zone 10+ | Too hot and dry for reliable perennial growth in many areas | Autumn for winter/spring growth | Treat as annual or provide summer shade/moisture |
Most Crocosmia cultivars are documented as hardy in USDA zones 5 to 9, with 'Lucifer' among the hardiest selections. NC State Extension rates typical montbretia as zones 6a to 9b, which reflects the conservative, field-tested view. If you are in zone 5 or in a cold microclimate within zone 6, I would not rely on mulch alone the first winter, lift and store the corms until you know how your site performs. Containerised Crocosmia can technically be planted from spring through autumn, but avoid planting during hot, dry spells without irrigation in place.
Month-by-month seasonal care checklist
This timeline is structured around temperate northern hemisphere gardens (roughly zones 6 to 8). Adjust earlier by four to six weeks for zones 9 and above, and later by two to four weeks for zone 5.
| Month | Key tasks |
|---|---|
| February–March (Zones 8–9) | Plant corms or containerised plants; top-dress established beds with compost; remove winter mulch once growth tips emerge |
| March–April (Zones 6–7) | Plant dormant corms after last frost; prepare soil; water in; watch for emerging shoots |
| April–May (Zone 5) | Plant after last frost (usually mid to late April); keep soil evenly moist; no fertilizer yet |
| May–June (All zones) | Shoots emerge and grow rapidly; water regularly if dry; apply a balanced feed to containers; check for aphids |
| June–July | Flower spikes appear; cut flowers for vases as buds begin to open; stake tall cultivars if needed; continue watering containers |
| July–August | Peak flowering; deadhead spent spikes to tidy (optional for bloom extension); feed containers fortnightly with high-potassium feed |
| September | Late flowers on some cultivars; begin reducing watering as foliage starts to yellow; stop feeding |
| October | Leave foliage to die back naturally (feeds the corm); apply mulch in zones 5–6; lift corms in zone 5 once foliage is fully dead |
| November–January | Corms dormant; check stored corms monthly for rot; plan divisions for spring; order new cultivars |
Watering, feeding, and keeping corms healthy through the season
Newly planted corms need consistent moisture to establish roots and push up their first shoots. Water regularly from planting until you can see healthy leaves emerging and the plant looks settled, usually four to six weeks. After that, established in-ground plants are surprisingly self-sufficient. They prefer moist soil in summer but rarely need supplemental watering unless you are going through an extended dry spell of two or more weeks without rain. For an alternative container method, see our guide on how to grow begonia in water. When you do water, water deeply and less frequently rather than shallow daily watering, this encourages roots to go deeper and makes the plant more drought-tolerant.
For feeding, in-ground plantings in reasonably fertile soil generally do not need regular fertilizing. I occasionally top-dress established clumps with a shovelful of compost in early spring, but that is about it. Containers are a different story. Because pots dry out and nutrients leach quickly, container-grown Crocosmia benefits from a fortnightly liquid feed with a high-potassium fertilizer (tomato feed works well) applied from when the flower spikes begin forming through to the end of flowering. High potassium promotes flowering rather than excessive leaf growth, which is exactly what you want.
Lifting and storing corms in cold climates
In zone 5 (and cold pockets of zone 6), you will want to lift corms after the first hard frost blackens the foliage. Cut the stems down to a few centimeters, carefully dig up the corm chains with a fork, shake off excess soil, and let them dry in a frost-free, airy spot for a week or two. Then store them in a paper bag or crate of barely damp horticultural sand or peat-free compost, somewhere cool but frost-free (around 5 to 10°C / 40 to 50°F). For related advice on storing and growing corms, see how to grow begonia corms. Check monthly and remove any corms showing rot or mold. Replant in spring as you would fresh corms.
Staking, deadheading, and keeping stems upright
Floppy stems are one of the more frustrating issues with montbretia, and they are almost always caused by one of three things: too much shade, overly rich nitrogen-heavy soil, or a tall cultivar in an exposed position. Fix the cause first. In shadier spots, move plants if possible or accept that staking will be a regular job. For genuinely tall cultivars like 'Lucifer' (which can reach 1.2 m), a few bamboo canes and soft twine installed before the stems get tall enough to flop is the simplest approach. I use a ring stake or a grid of twine strung between canes set around the clump, the foliage grows up through it and hides the support completely.
Deadheading is optional with montbretia. Removing spent flower spikes keeps the border tidy and may encourage a few additional side spikes on some cultivars, but it does not dramatically extend the flowering season. What matters more is leaving the foliage intact after flowering ends, the leaves are photosynthesizing and sending energy back down into the corm for next year. Cutting the leaves back in late summer is one of the reasons some gardeners get progressively weaker flowering each year. Wait until the foliage has turned yellow and died back naturally before tidying.
Propagating montbretia: division, offsets, and seed
Crocosmia is genuinely easy to propagate, and in fact the more pressing question for most gardeners is usually how to slow it down rather than speed it up. That said, if you want more plants intentionally, you have three good options: dividing established clumps, separating individual corm offsets, or growing from seed.
Dividing established clumps (the most reliable method)
Division is the fastest, easiest way to make more plants and also the best way to reinvigorate a clump that has become congested and is flowering less well. Established clumps form dense chains of interconnected corms that gradually crowd themselves, dividing every three to four years keeps them productive. The best time to divide is in early spring just as new growth is beginning, which gives the divisions a full growing season to re-establish. Early autumn works too in milder zones (8 and above), but I prefer spring because the risk of rot in wet autumn soil is lower.
- Use a garden fork to lift the entire clump, working from the outside inward to avoid spearing corms.
- Shake or wash off excess soil so you can see the corm chains clearly.
- Pull or cut the chains apart into sections of three to five corms each — these will establish faster than single corms.
- Discard any old, shriveled, or rotted corms from the center of the clump.
- Replant divisions immediately at the same depth as before, spacing them as you would fresh corms (10 to 20 cm apart).
- Water well and keep consistently moist until new growth is visible.
Separating corm offsets
As corms mature they produce small offset cormlets attached to the main corm chain. These are essentially the same as dividing the clump, just at a smaller scale. When you lift and divide, you can detach individual small offsets and grow them on in a nursery bed or deep container for one season before planting them into their final position. They typically take two growing seasons to reach flowering size from offset, compared to one season for a larger division, so it is a slower route, but useful if you want to bulk up a rare or expensive cultivar.
Growing montbretia from seed
Seed propagation is slower (plants typically take three or more years to flower) and the results are variable, hybrid cultivars like Crocosmia × crocosmiiflora will not come true from seed, so seedlings may look quite different from the parent plant. That said, it can be fun if you enjoy experimenting and have patience. Collect seed from ripe pods in autumn when they begin to split. Sow fresh seed in autumn in pots or trays of free-draining compost, and leave outdoors or in a cold frame over winter, the cold period (stratification) helps break dormancy. Germination occurs in spring. Alternatively, store seed dry and cold over winter and sow in late winter indoors with artificial stratification (4 to 6 weeks in a damp paper towel in the refrigerator before sowing). Grow seedlings on in pots for at least one full season before transplanting outside.
Recommended cultivars and their uses
Montbretia is far more varied than the classic roadside orange you might see naturalizing in mild coastal areas. Here are some of the best cultivars worth tracking down, with honest notes on what they are actually suited to.
| Cultivar | Flower colour | Height | Best use | Zone hardiness |
|---|---|---|---|---|
| 'Lucifer' | Vivid scarlet-red | Up to 1.2 m (4 ft) | Back of border, cut flowers, dramatic focal point | Zones 5–9 |
| 'Emily McKenzie' | Deep orange with mahogany markings | 60–75 cm (2–2.5 ft) | Mid-border, cut flowers | Zones 6–9 |
| 'Solfatare' | Apricot-yellow with bronze foliage | 50–60 cm (20–24 in) | Containers, small borders, colour-themed planting | Zones 6–9 |
| 'George Davison' | Clear yellow | 60–70 cm (24–28 in) | Border colour contrast, cut flowers | Zones 6–9 |
| 'Severn Sunrise' | Salmon-apricot | 60–80 cm (24–32 in) | Cottage gardens, warm-toned borders | Zones 6–9 |
| 'Hellfire' | Deep red-orange | 70–90 cm (28–35 in) | Borders, cut flowers, companion to late-summer perennials | Zones 6–9 |
'Lucifer' deserves special mention because it is the cultivar most likely to be available at garden centers and it really does earn its reputation, the flowers are extraordinary, the height gives drama, and the vase life (nearly 19 days in studies) makes it excellent for cutting. For smaller gardens or containers, 'Solfatare' is my personal favorite: the bronze-tinted foliage is attractive even when the plant is not flowering, and the apricot-yellow blooms are softer than the typical orange.
Common pests, diseases, and problems
Montbretia is genuinely low-maintenance from a pest and disease perspective, but there are a handful of issues worth knowing about before they catch you off guard.
Pests
- Aphids: Clusters of small insects on new growth and flower stems, especially in dry weather. Blast off with a strong jet of water or apply insecticidal soap. Usually not serious enough to warrant stronger action.
- Thrips: Tiny insects that cause silvery streaking on petals and leaves. More common in hot, dry conditions. Remove affected foliage and improve air circulation; insecticidal soap or neem oil can help in severe cases.
- Red spider mite: More of a problem on container-grown plants in warm, dry conditions. Look for fine webbing and bronzed leaves. Increase humidity around plants and apply an appropriate miticide if needed.
- Vine weevil: Grubs can eat corms, particularly in containers. Use nematode biological controls applied to moist compost in late summer.
Diseases and physiological problems
- Corm rot: Caused by waterlogged soil or storing wet corms. Prevention (good drainage, dry storage) is far easier than cure. Affected corms must be removed and discarded.
- Botrytis (grey mold): More common in cool, wet conditions, particularly on stored corms or late-season foliage. Improve air circulation, avoid overhead watering late in the day, and remove affected plant material promptly.
- Poor flowering: Usually caused by too much shade, overcrowded corms (time to divide), planting too shallow, cutting back foliage before it dies naturally, or excessive nitrogen in the soil.
- Yellowing leaves mid-season: Could be a watering issue (overwatering or underwatering), nutrient deficiency in containers, or a natural response to heat stress. Eliminate causes systematically.
Managing montbretia where it naturalizes or becomes invasive
This is something you genuinely need to know before you plant. Crocosmia × crocosmiiflora has become naturalized in parts of the United States, particularly on the West Coast, and is flagged in regional invasive plant databases including EDDMapS, Calflora, and the USDA Invasive Plant Atlas. In mild, moist climates (much of coastal California and the Pacific Northwest), it can spread aggressively into disturbed areas and outcompete native plants. If you are in one of these regions, check your state or county's invasive species list before planting montbretia outdoors, and consider growing named cultivars of other Crocosmia species in containers instead.
Even in non-invasive contexts, montbretia spreads enthusiastically through corm multiplication and can take over a border faster than you expect. The most practical containment strategy is regular division every three to four years combined with prompt removal of any plants spreading beyond intended boundaries. Digging out escaped plants is straightforward in lighter soils but can be persistent work in established clumps, the corm chains break easily and any fragment left in the ground can regrow. For targeted removal, cut foliage repeatedly throughout the growing season to exhaust the corm's energy reserves over one to two seasons, or carefully excavate and sieve the soil to remove all corm material.
Growing montbretia in containers
Container growing is actually a smart choice for montbretia, especially if you want to control spread, protect plants in zone 5, or grow the more tender cultivars in colder climates. If you’re also interested in container plants with a trailing habit, see our guide on how to grow weeping begonia. If you enjoy container gardening, you might also find our guide on how to grow polka dot begonia useful for similar tips on light, watering, and potting mix. If you're looking for a striking, shade-tolerant container plant with dramatic foliage, see our guide on how to grow begonia maculata. If you also enjoy container gardening, see our guide on how to grow rex begonia for tips on cultivating shade‑loving, decorative‑leaved begonias in pots. Use a pot at least 30 cm (12 inches) wide and deep with drainage holes. A mix of two parts loam-based compost to one part horticultural grit works well. Plant three to five corms per pot at the standard depth, place in full sun, and water consistently, containers dry out quickly. Feed fortnightly with a high-potassium liquid fertilizer from bud formation through to the end of flowering. In autumn, either move the pot to a frost-free shed or garage in colder zones, or lift the corms from the pot and store them as described above. Repot every two to three years as the corms fill the container and flowering starts to decline.
Troubleshooting at a glance
| Problem | Most likely cause | Fix |
|---|---|---|
| No flowers or very few | Too much shade, overcrowding, foliage cut back too early, excess nitrogen | Move to sunnier spot; divide clump; let foliage die naturally; reduce nitrogen feeding |
| Floppy, weak stems | Insufficient sun, high-nitrogen soil, tall cultivar in exposed site | More sun; stake tall varieties; avoid nitrogen-heavy feeds |
| Corm rot | Waterlogged soil or wet storage conditions | Improve drainage; store dry; discard affected corms |
| Pale, streaked leaves | Thrips or spider mite | Inspect undersides of leaves; apply insecticidal soap or neem oil |
| Plant not returning after winter | Corms killed by frost (zone too cold) | Mulch more heavily or lift corms next autumn; try 'Lucifer' (hardier to zone 5) |
| Spreading too far | Natural corm multiplication | Divide and remove every 3 years; install a buried root barrier |
Montbretia is one of those plants that delivers a lot for relatively little effort once you understand what it actually needs: sun, decent drainage, and the patience to leave the foliage alone after flowering. Get those three things right and it is hard to fail with. Whether you are tucking corms into a summer border, building a cutting garden with 'Lucifer' at the back, or growing 'Solfatare' in a terracotta pot on a sunny patio, you will have flowers reliably from mid-summer onward, and more corms to divide and share with every passing year. For related shade-tolerant container planting tips, see how to grow begonia semperflorens. For related container-growing tips, see how to grow a begonia.
FAQ
What is montbretia (Crocosmia) and which species/hybrid do gardeners usually grow?
Montbretia commonly refers to the garden hybrid Crocosmia × crocosmiiflora (aurea × pottsii) and a group of Crocosmia species and cultivars. These are cormous, clump-forming perennials from southern Africa grown for mid-summer to autumn flowers in orange, red, yellow and apricot tones. Different cultivars vary in height (most 0.5–1.0 m; some up to 1.2–2.0 m).
Where should I plant montbretia (site and soil)?
Choose a sunny, sheltered site with fertile, moisture-retentive but well-drained soil. Montbretia tolerates loam and sandy soils and pH near neutral (about 6.0–8.0). Avoid heavy waterlogged sites and deep shade (flowering will be poor). In hot, dry climates provide afternoon shade or extra irrigation during establishment.
When is the best time to plant montbretia corms by climate zone?
Plant dormant corms in spring after the last hard frost in most climates. Timing by broad zones: - USDA zones 8–9 (mild winters): spring or autumn planting is fine; autumn planting can give earlier establishment. - USDA zones 6–7: plant in spring after frost. - USDA zone 5 and colder: plant in late spring once soil warms, or plant shallowly and be prepared to lift for winter. Container corms can be potted from spring through early summer; avoid planting into very hot, dry ground.
Exactly how deep and how far apart should I plant montbretia corms?
General practical ranges (choose within range by cultivar size): - Depth: plant corms about 3 times their height. Common guidance: 7–10 cm (3–4 in) deep; for very small corms 5–7 cm (2–3 in); for large corms 10–12 cm (4–5 in). - Spacing: 10–20 cm (4–8 in) apart for most cultivars; larger vigorous types 20–30 cm (8–12 in). For dense summer display space closer; for long-term clumps allow wider spacing to reduce overcrowding.
How do I prepare the planting hole and soil mix?
Loosen soil to at least 20–25 cm depth. Work in 3–5 cm of well-rotted compost or garden compost and a balanced granular fertilizer at planting if soil is poor. Ensure good drainage: if heavy clay, mix in sharp sand or grit. Plant the corm with the pointed end (growing tip) up and cover to the recommended depth; firm gently and water.
What is a seasonal care timeline and checklist for montbretia?
Spring: plant corms after frost; remove winter mulch in mild climates; water to establish. Early summer: side-dress with compost if needed; start liquid feeding for containers. Mid-summer (flowering): stake tall clumps or place supports; deadhead spent florets to encourage continued flowering; water during dry spells. Late summer–autumn: reduce feeding as flowering wanes, allow foliage to ripen. Autumn (cold climates): apply protective mulch or lift corms for storage if required. Winter: leave mulch in situ in mild zones; store lifted corms cool and dry in colder zones.
Next Article
How to Grow Begonia maculata: Complete Care & Propagation
Complete guide to growing Begonia maculata: light, soil, watering, propagation, seasonal timelines, pests & fixes.