Climbing geraniums, most commonly the ivy-leaved pelargonium (Pelargonium peltatum), are not true climbers in the botanical sense but vigorous trailing scramblers whose stems can reach around 2 metres (roughly 7 feet) and will happily weave through a trellis, tumble over a fence, or cascade from a raised container. Give them full sun, well-drained fertile soil, consistent watering, and something to lean against, and they will reward you with continuous clusters of flowers from late spring right through to autumn. If you want a complete guide, focus on sun, well-drained soil, consistent watering, and regular deadheading to keep your geraniums blooming Give them full sun.
How to Grow Climbing Geraniums: Step-by-Step Care Guide

Harriet Whitmore
17 Jun 2026

Know which type you have before you start
When people talk about climbing or trailing geraniums, they almost always mean ivy-leaved pelargoniums, named for their fleshy, glossy, ivy-shaped leaves. These are the plants you see spilling out of window boxes in Mediterranean villages or covering a sunny garden wall in summer. They are technically evergreen perennials in frost-free climates but are grown as summer annuals in colder regions. They are different from upright zonal geraniums (the classic bedding type) and from scented-leaf pelargoniums, though all belong to the same genus. If you want scented varieties or upright types, those have their own particular quirks worth reading up on separately. Scented pelargoniums are grown a little differently, so it helps to follow the specific tips for how to grow scented pelargoniums.
Within the ivy-leaved group there is a useful range of sizes and flower colours to choose from. Standard varieties produce long cascading stems ideal for training over a fence or up a trellis. Compact or small-leaved varieties suit hanging baskets and tall containers where you want shorter, denser growth. Hybrid crosses between ivy-leaved and zonal types give you slightly more upright habits with bigger flower heads. If you want maximum coverage on a wall or fence, go for a standard trailing variety. If you are working with a balcony or small garden, a compact hybrid gives you colour without taking over.
- Pelargonium peltatum (species form): long trailing stems up to 2 m, smaller florets, vigorous scrambler
- Standard ivy-leaved hybrids (e.g., Cascade series, Decora series): heavy flowering, strong trailing growth, best for walls and fences
- Compact ivy-leaved varieties (e.g., Tornado series, Mini Cascade): shorter stems, ideal for containers and hanging baskets
- Ivy x zonal crosses (e.g., Caliente series): semi-trailing with larger flower heads, slightly more heat and disease tolerant
Pick the right spot and set up your support
Sunshine is non-negotiable. Ivy-leaved pelargoniums will simply not flower in shade, full stop. Aim for a minimum of six hours of direct sunlight a day. A south- or west-facing wall, fence, or trellis is ideal in the northern hemisphere. A little afternoon shade in very hot climates is fine and can actually prevent scorching on the hottest days, but if you are in a temperate climate, grab every ray you can get.
For supports, a lightweight wooden or metal trellis attached to a sunny wall works brilliantly. Horizontal wires fixed 20 to 30 cm apart along a fence are another easy option. Because these plants scramble rather than grip with tendrils or suckers, you will need to loosely tie stems to the support as they grow, using soft twine or plant clips. A trellis with squares around 10 to 15 cm makes it easy to weave stems through as they extend.
Spacing matters more than people expect. If you are planting along a fence or trellis, space plants 40 to 60 cm apart. This gives each plant enough root space and air circulation to stay healthy. Cramming them together causes humidity to build up, which invites fungal problems. If you want faster coverage, plant 40 cm apart, but be ready to thin or trim more actively once they establish.
Soil and planting, whether in the ground or in a pot
Ivy-leaved pelargoniums prefer fertile, free-draining soil with a neutral to slightly alkaline pH (around 6. RHS Plant details list Pelargonium peltatum as a bushy evergreen trailing perennial that prefers well-drained fertile neutral-to-alkaline soil in full sun blank" rel="noopener noreferrer">fertile, free-draining soil with a neutral to slightly alkaline pH. 5 to 7.5). Waterlogged roots are one of the fastest ways to kill these plants. In heavy clay ground, dig in plenty of grit and compost before planting, or better yet, raise the bed slightly. If you are growing geums, focus on well-drained soil and steady moisture while plants establish, then reduce watering once they’re established waterlogged roots. In sandy soil, add compost to improve water and nutrient retention without compromising drainage.
Planting in the ground
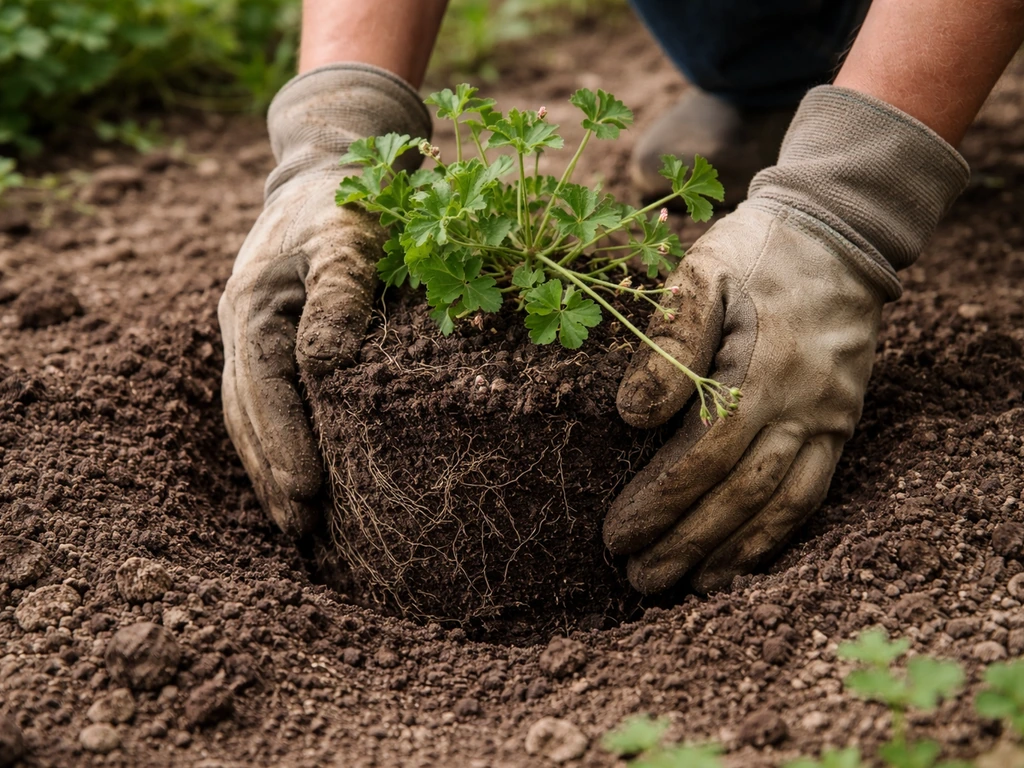
Wait until all frost risk has passed before planting out. In most of the UK and northern Europe that means late May to early June. In USDA zones 9 to 11 (frost-free areas) you can plant year-round. Dig a hole roughly twice the width of the root ball, mix a handful of slow-release fertiliser into the backfill, plant at the same depth as the pot, firm in well, and water thoroughly. Then tie the leading stems loosely to your trellis or support right away so they start growing in the right direction.
Planting in containers
Containers are actually a great option for climbing geraniums, especially if you want to move plants under cover before frost. If you want the full guide, including light, watering, feeding, and training, learn how to grow gerbera plants climbing geraniums. Use a good-quality peat-free compost mixed with around 20 percent perlite or grit to keep drainage sharp. A pot of at least 30 cm diameter per plant is the minimum. Larger pots, say 40 to 45 cm, hold moisture more evenly and need less frequent watering. Always make sure the pot has drainage holes. Place a small trellis obelisk or bamboo cane frame in the pot so the stems have something to climb from day one. In containers, the compost nutrients deplete faster than in-ground soil, so feeding is more important (more on that below).
Light, watering, and feeding for the best blooms
Full sun is the foundation, but watering and feeding are where most people either succeed or struggle. Ivy-leaved pelargoniums are somewhat drought-tolerant because their stems are slightly succulent, but they flower best with consistent moisture during the growing season. The goal is to keep the compost or soil evenly moist but never waterlogged.
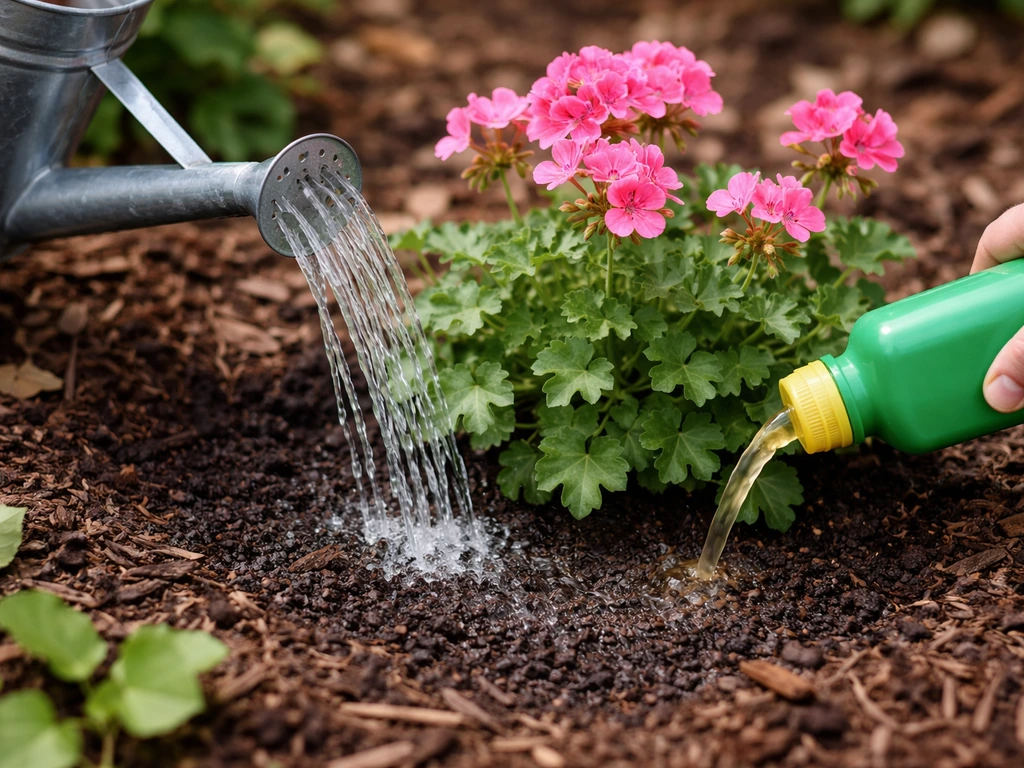
Watering
For in-ground plants, water deeply once or twice a week in warm weather and reduce to once a week or less during cooler periods. For container plants, check the top 2 to 3 cm of compost daily in summer. When it feels dry to the touch, water thoroughly until it drains from the bottom. In very hot weather that might mean daily watering. Always water at the base of the plant rather than overhead. Wet foliage sitting overnight encourages botrytis (grey mould), which is one of the most common issues with pelargoniums.
Fertilising
Once plants are established and actively growing (usually from four to six weeks after planting), switch to a high-potassium liquid feed. A tomato fertiliser works perfectly here. High potassium promotes flower production rather than leafy growth. Feed container plants every seven to ten days during the growing season. In-ground plants can be fed every two weeks. Avoid high-nitrogen feeds once plants are established, as these push leaves at the expense of flowers. If you used a slow-release fertiliser at planting, wait about six weeks before starting liquid feeds.
Training, pruning, and making more plants
Training stems onto a support
Because ivy-leaved pelargoniums scramble rather than self-attach, you need to guide them actively, especially in the first few months. Every couple of weeks, check for new long stems and weave them through the trellis or tie them loosely to wires with soft twine or stretchy plant ties. Tie just behind a leaf node if you can, which encourages the stem to branch out at that point. Spread stems out horizontally across the support rather than letting them all grow straight up. Horizontal training encourages more lateral shoots, and more shoots means more flower clusters.
Pruning for continuous flowers
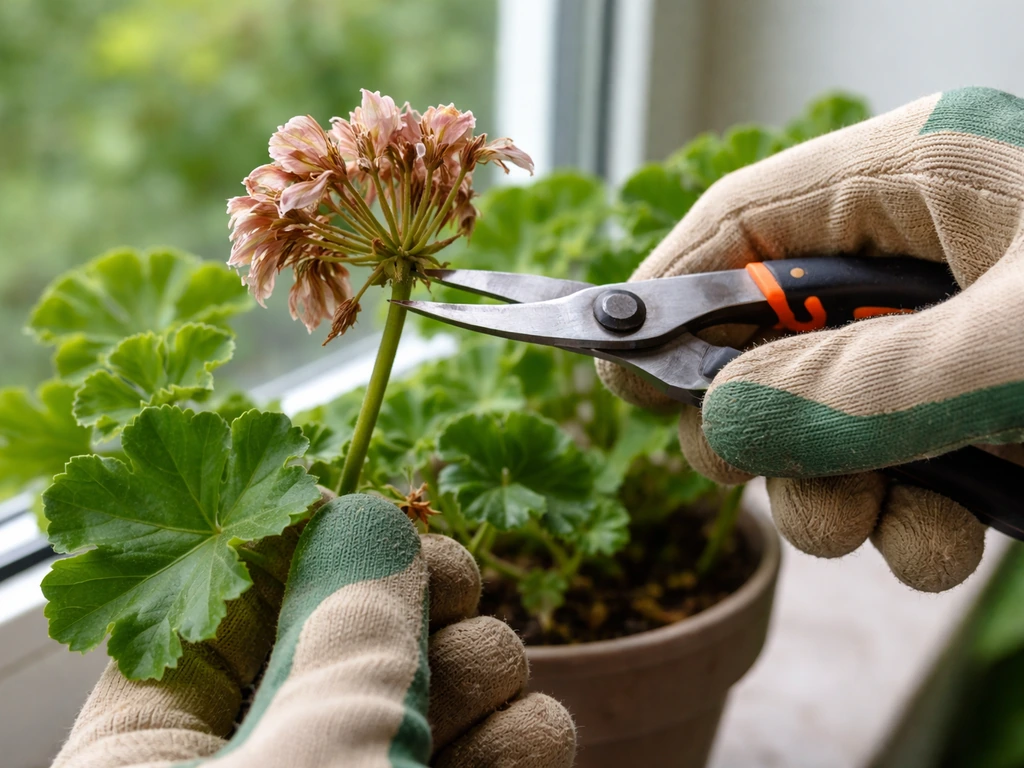
Deadhead regularly throughout the season. Remove spent flower clusters at the base of the flower stalk, not just the petals, to encourage the next flush of blooms. If stems are getting too long or bare at the base, pinch or cut them back by about a third. Do this in late spring or midsummer for the best regrowth. In autumn, before any risk of frost, cut the whole plant back hard (by about half) if you plan to overwinter it. This is also the time to bring container plants under cover.
Taking cuttings
Ivy-leaved pelargoniums root very easily from stem cuttings, which is the main reason gardeners keep them going year after year. Take a cutting of around 10 to 12 cm from a non-flowering stem tip in late summer (August to September in the UK and northern Europe). Remove the lower leaves, leave two or three leaves at the top, and let the cut end dry out for an hour or two to callous slightly. Then push it into a small pot of gritty compost or a 50/50 mix of perlite and compost. Do not cover with a propagator lid as pelargonium cuttings rot if kept too humid. Keep them in a warm bright spot (not full blazing sun), water very sparingly, and they will root in three to five weeks.
Seasonal care calendar
| Season / Month (UK & northern Europe) | What to do |
|---|---|
| Late winter (Feb to Mar) | Start cuttings overwintered indoors, or sow seed under glass at 18 to 21°C. Keep existing plants in a frost-free place with minimal watering. |
| Spring (Apr to May) | Move plants to a bright windowsill or unheated greenhouse. Begin light watering and feeding as growth resumes. Harden off plants before planting out. |
| Late spring (late May to Jun) | Plant out after last frost. Set up supports. Tie in first stems. Begin high-potassium liquid feed 4 to 6 weeks after planting. |
| Summer (Jun to Aug) | Water regularly, feed every 7 to 10 days (containers) or every 2 weeks (ground). Train and tie in new growth. Deadhead continuously. |
| Late summer (Aug to Sep) | Take stem cuttings for next year. Continue deadheading. Cut back any very long bare stems to encourage late flushes. |
| Autumn (Oct to Nov) | Bring container plants under cover before first frost. Cut back by half. Reduce watering significantly. In-ground plants in frost-prone areas: lift and pot up, or take cuttings and compost the parent plant. |
| Winter (Nov to Feb) | Keep overwintered plants in a frost-free bright spot (minimum 5°C). Water sparingly once a month. Do not feed. |
Since today is mid-June 2026, if you are in the UK or northern Europe, you are right in the sweet spot for getting plants in the ground or into containers. If you have just bought a plant or received a rooted cutting, plant it out now, set up your support, tie in the stems, water well, and start feeding in about four weeks. If you already have an established plant that is growing but not yet flowering heavily, check it is getting full sun, start or continue high-potassium feeding, and make sure you are deadheading spent blooms.
When things go wrong: common problems and fixes
No flowers or very few blooms
This is the most common complaint and almost always comes down to one of three things: not enough sun, too much nitrogen, or a pot that is too large. If the plant is in shade or partial shade, it will not flower reliably. Move it into full sun. If you have been feeding with a general-purpose or high-nitrogen fertiliser, switch to a high-potassium feed immediately. Counterintuitively, if your container plant looks healthy and leafy but will not flower, it may be in too big a pot. Pelargoniums often flower better when slightly root-bound. Try moving it into a slightly smaller pot.
Leggy, bare, or floppy stems
Leggy growth with long gaps between leaves usually means insufficient light or over-feeding with nitrogen. Move the plant to a sunnier spot and cut the leggy stems back by a third to a half. This forces the plant to push new bushy growth from lower nodes. Pinch out the growing tips of young plants a few times in spring to encourage branching right from the start, which prevents the leggy habit developing in the first place.
Yellowing leaves
Yellow leaves on pelargoniums are usually caused by overwatering and poor drainage. Check that the pot or soil is not waterlogged. If it is, ease off watering, improve drainage, and remove any yellowed leaves to reduce disease risk. Occasionally yellowing is caused by nutrient deficiency (especially magnesium), in which case a foliar feed with Epsom salts (one teaspoon per litre of water) can help. In container plants, general yellowing toward the end of a long season often just means the compost is exhausted and a good liquid feed is needed.
Pests
Vine weevil is the most serious pest for container-grown pelargoniums. The grubs eat roots and can kill a plant before you notice anything wrong above ground. If a plant suddenly wilts and does not recover after watering, tip it out of the pot and look for small cream-coloured grubs in the compost. Treat with a biological nematode drench in early autumn or use a vine weevil compost treatment when potting up. Aphids and whitefly can also appear on new growth, especially under glass. A strong blast of water or an insecticidal soap spray deals with both effectively.
Fungal disease (botrytis and rust)
Botrytis (grey mould) appears as fluffy grey patches on stems or leaves and is almost always triggered by overwatering, overhead watering, or poor air circulation. Remove affected material, water at the base only, and space plants adequately. Pelargonium rust shows up as yellowish spots on the upper leaf surface with powdery orange-brown pustules underneath. Remove affected leaves promptly, avoid wetting foliage, and if the problem persists, apply a fungicide labelled for rust. Good air circulation around your trellis is the best long-term prevention.
Transplant shock and slow establishment
Newly planted pelargoniums often look a bit miserable for the first two to three weeks, especially if they were not hardened off gradually before going outside. Do not panic. Keep them watered, sheltered from strong cold winds for the first week, and resist the urge to feed before they have settled in. Once you see new growth and the stems start reaching toward the trellis, they have established and you can get into the regular feeding routine.
A simple ongoing care routine that actually works
The honest truth about climbing geraniums is that they are not difficult, but they do reward consistent attention. A quick check every few days through the summer, deadheading spent blooms, tying in any long new stems, and keeping up with watering and feeding will produce far better results than occasional bursts of intensive care. Think of it as a five-minute garden job every few days rather than a big weekly task.
- Check moisture levels every one to two days for container plants; water deeply at the base when the top 2 to 3 cm of compost is dry
- Feed with a high-potassium liquid fertiliser every seven to ten days (containers) or every two weeks (in-ground) from six weeks after planting until late summer
- Deadhead spent flower clusters at the base of the stalk every few days for continuous blooming
- Tie in new trailing stems every one to two weeks and spread them horizontally across the support
- Cut back any excessively long or bare stems by a third in midsummer to encourage fresh bushy growth
- Take cuttings in late summer to secure plants for next year, especially before any frost risk arrives
Get these basics right and you will have a wall, fence, or trellis covered in colour all the way from June to the first frosts. If you are also curious about other pelargonium types, growing scented varieties follows a similar approach with a few extra considerations around foliage care, and upright geranium plants have their own distinct pruning and planting rhythms worth exploring separately. If you want a different plant altogether, our guide on how to grow gypsophila covers ideal light, soil, and spacing too.
FAQ
My climbing geranium looks fine but isn’t flowering yet, should I fertilize right away?
Yes, but timing matters. Ivy-leaved pelargoniums can look “stalled” after transplanting, but you should not start heavy feeding immediately. Wait until you see new growth or at least 3 to 4 weeks after planting before switching to high-potassium liquid feed, and keep watering evenly while they establish.
Can climbing geraniums grow in acidic soil, and how do I adjust it?
Aim for a pH around neutral to slightly alkaline, but do not try to correct pH quickly. If you suspect acidic soil, top-dress with compost and use slow-release balanced fertility at planting, then rely on correct watering and high-potassium feeding for flowers. Large, sudden changes in soil pH can stress plants and reduce flowering.
Why does my climbing geranium have lots of leaves but few flowers in a large container?
If the plant is in ground, you cannot easily “shrink” the soil volume, but you can reduce overfeeding and improve drainage. For containers, move up only one pot size at a time. If your pot is much larger than the root mass, switch to a slightly smaller pot or use a smaller container for new plants, because excess compost holds too much moisture and often delays flowering.
What’s the correct way to deadhead climbing geraniums for more blooms?
Deadheading is about removing the spent flower stalk at the base of the stem, not just pinching off petals. Cutting back the entire flower cluster plus a short section behind it (if that stalk is the only part that is spent) reduces the plant’s energy spent on seed and encourages the next flush.
When should I pinch or trim my climbing geranium, and when is it too late to pinch?
Lightly pinch only when plants are young or when you are trying to prevent leggy growth. In mid-summer, pinching too aggressively can remove flower-forming tips, and you may get a slower bloom. Use trimming in two modes: late spring or early summer for shaping, midsummer for minor correction, and a heavier cut only before overwintering.
How do I tell if my yellow leaves are from overwatering versus nutrient deficiency?
Waterlogged roots are the main cause of yellowing and collapse, so choose watering methods that avoid keeping the crown wet. Use a watering can with a narrow spout aimed at the base, empty saucers after watering containers, and ensure pot drainage holes are clear. If the soil is compacted, top-dress with grit and compost rather than watering more frequently.
Can I propagate climbing geraniums from cuttings, and what are the biggest mistakes to avoid?
Yes, but you must do it carefully. Take cuttings from non-flowering tips in late summer, let the cut end callous, and avoid high humidity. Use gritty compost or a perlite mix, water sparingly, and keep the cuttings bright but not scorching, then gradually increase light exposure once roots form.
How should I overwinter climbing geraniums in pots (and how much should I water)?
They are not heavy frost-tolerant in containers. Before cold weather, cut back and move containers to a bright, cool place (just above freezing if possible). Water minimally during dormancy so compost barely stays lightly moist, then restart watering and feeding when growth resumes.
What should I change on my trellis setup to prevent grey mould (botrytis)?
Most fungal problems come from wet foliage and poor airflow. If you can, train stems to cover the trellis while still leaving space for air to move, water at the base, and remove affected leaves early. Also, avoid thick, tangled growth, since it traps moisture near the stems overnight.
I’m growing climbing geraniums in containers, what’s the best way to prevent vine weevil?
Vine weevil control works best before damage becomes obvious. Inspect the compost surface for adult activity, and for containers use a preventive biological control when repotting or in early autumn. If you find grubs, treat promptly, because the plant can fail suddenly due to root loss.
Next Article
How to Grow Geums From Seed to Bloom Step by Step
Step-by-step geum seed to bloom guide: choose type, sow timing, seedling care, container or bed planting, seasonal tips