Growing poinsettias in a greenhouse gives you real control over the one thing that makes or breaks the crop: darkness. These are short-day plants, which means they flower in response to long, uninterrupted nights rather than cold temperatures or calendar dates. Get the darkness right, keep temperatures in the right bands, and manage water and nutrients consistently, and you can reliably force spectacular bract color for the holidays, or honestly, for any target date you choose. This guide walks you through everything: plant biology, a month-by-month forcing calendar, environmental setpoints, equipment choices, potting media, irrigation, fertilizing, pruning, propagation, troubleshooting, and notes on regional adjustments if you're growing in a warm climate like Florida, Australia, or the Philippines. For a concise beginner's primer, see the guide 'how do you grow a poinsettia'.
How to Grow Poinsettias in a Greenhouse: Complete Guide

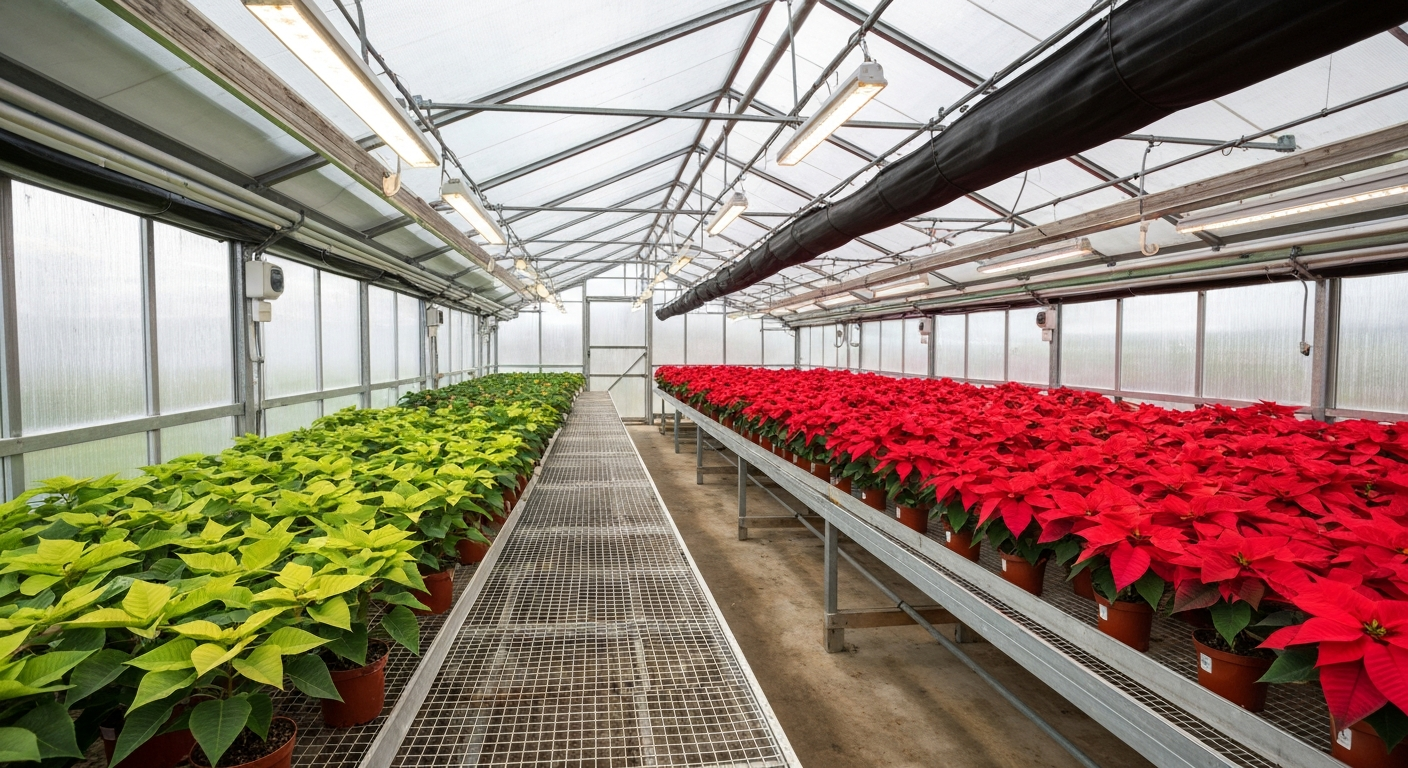
How poinsettias actually work (and why greenhouses help)
Poinsettias (Euphorbia pulcherrima) are native to Mexico and Central America, where they can grow into large shrubs or small trees. In cultivation, we treat them as container plants and exploit their photoperiodic response to control bloom timing precisely. The 'flowers' most people admire are actually colored bracts, modified leaves surrounding the small, inconspicuous true flowers called cyathia at the center. Bract coloration is triggered by exposing the plant to long nights consistently for 8 to 11 weeks, depending on cultivar.
The magic threshold is roughly 14 to 14.5 hours of uninterrupted darkness per day. Once you hit that consistently, floral initiation begins. A greenhouse lets you impose this schedule regardless of what the outdoor day length is doing, which is exactly why it's so valuable for this crop. Even growers in tropical climates (where natural nights are too short to trigger blooming at the right time) can hit their target date by using blackout curtains to extend the dark period artificially.
The other reason a greenhouse helps is temperature management. Flower initiation is fastest when daytime canopy temperatures run around 60 to 70°F (15 to 21°C). According to Poinsettia Cultural Characteristics, Texas A&M Ornamental Production, floral initiation is most rapid at canopy temperatures of about 60–70°F (15–21°C), and elevated night temperatures can delay initiation Poinsettia Cultural Characteristics — Texas A&M Ornamental Production. High night temperatures can slow or even delay initiation, which is a real problem in warm climates. Inside a greenhouse you can cool, shade, and ventilate to hit these targets in ways that are simply impossible outdoors.
Planning your crop: set a target date first
The most important planning decision is working backwards from your desired bloom date. Most hobby growers aim for mid- to late December for the traditional holiday display, but there's no reason you can't target Thanksgiving, Valentine's Day, or a spring event. I find it easiest to count backwards from the day you want fully colored bracts visible.
- Count back 8 to 11 weeks for the photoperiod (blackout) forcing period — this is when darkness triggers bract development. Faster-response cultivars finish in about 8 weeks; slower ones need up to 11.
- Count back another 6 to 8 weeks before that for the vegetative pinching and establishment phase after transplanting your rooted cuttings or plugs.
- Count back another 4 to 6 weeks for propagation and rooting if you're starting from unrooted cuttings.
- Add a buffer week for any delays — cuttings that root slowly, weather events, equipment issues.
For a mid-December bloom with an 8-week forcing cultivar, you'd start blackout around October 1, transplant rooted plugs in late July or early August, and take cuttings in late June or early July. That lines up with a full timeline starting about 22 to 24 weeks before the target date. If you're buying rooted plugs (which I strongly recommend for beginners, it removes a tricky propagation step), you can compress the schedule by 4 to 6 weeks.
Month-by-month greenhouse calendar (targeting mid-December bloom)
| Month | Stage | Key Tasks |
|---|---|---|
| Late June – Early July | Propagation | Take 3–4 inch tip cuttings or receive unrooted cuttings; stick into moist propagation media; maintain canopy temp 78–82°F day, 72–75°F night; shade to 200–300 μmol·m⁻²·s⁻¹ PPFD |
| Late July – Early August | Rooting / Plug Receipt | Roots visible in 3–4 weeks; begin acclimating to higher light (up to 400–600 μmol·m⁻²·s⁻¹); or receive finished rooted plugs and transplant into final containers |
| August | Vegetative Growth | Long natural days keep plants vegetative; pinch shoot tips once or twice to encourage branching; fertilize at 200–250 ppm N; maintain day temps 70–75°F |
| September | Pre-forcing / Final Pinch | Perform final pinch 4–5 weeks before starting blackout; allow new breaks to develop; no pinching once blackout begins |
| October 1 – November/December | Blackout Forcing | Impose 14-hour dark / 10-hour light cycle daily; maintain temps 60–70°F day, slightly cooler nights; monitor for light leaks constantly |
| Late November – December | Bract Development / Finish | Bracts color up and expand; reduce nitrogen, maintain potassium; display or sell when cyathia are visible but tight |
Photoperiod management: the make-or-break step
I'll be honest, the first time I tried forcing poinsettias, I thought I was being careful with my blackout curtains and ended up with a batch that barely colored by Christmas. The culprit was a small gap at the base of one curtain panel where a sliver of light from a streetlamp crept in every night. It sounds dramatic, but photoperiodic sensitivity research has confirmed that light levels as low as around 0.1 μmol·m⁻²·s⁻¹ (roughly 0.5 footcandles) can disrupt initiation in short-day crops. Practical production guidance recommends keeping night-period light leaks below 0.5 lux, as close to absolute darkness as you can realistically achieve.
Blackout curtain systems
The standard solution is a retractable blackout curtain system that covers the roof and sides of the growing area. Purpose-built systems use overlapping curtain tails at gutters and sealed edges at walls so there are no seam gaps. For a hobby greenhouse, a motorized retractable system is ideal, it ties into a timer controller that deploys the curtains at sunset (or earlier if needed) and retracts them automatically in the morning. Manual systems work too, but consistency matters: missing even a single night during the forcing period can delay bract coloration measurably. I set mine to deploy 30 minutes before sunset and retract 30 minutes after the 10-hour light period ends.
When installing or inspecting your system, walk through the greenhouse after dark with your eyes adapted to darkness. You'll spot every gap and pinhole. Seal them with blackout tape or foam backer rod. Pay special attention to door seams, ventilation louver surrounds, and anywhere electrical conduit passes through the curtain line.
Supplemental lighting during the day
During the 10-hour light period of forcing (and throughout the vegetative phase), you want enough light for good growth and bract expansion. In fall and winter at northern latitudes, natural light is often insufficient. Supplemental lighting targeting a daily light integral (DLI) of around 12 to 16 mol·m⁻²·d⁻¹ is used in commercial finishing, with supplemental PPFD commonly in the 100 to 200 μmol·m⁻²·s⁻¹ range from HPS or LED fixtures. Modern white-spectrum LEDs are increasingly the choice for hobby greenhouses because they run cooler and are more energy-efficient. The critical rule: any supplemental lights must be off during the blackout dark period, full stop.
Light, temperature, humidity and ventilation: the numbers that matter
These four factors interact constantly, and once you have sensors in place you'll start to see how pulling on one lever affects the others. Here are the target thresholds I work toward at each stage.
| Growth Stage | Day Temp (°F) | Night Temp (°F) | VPD (kPa) | Light (PPFD μmol·m⁻²·s⁻¹) |
|---|---|---|---|---|
| Propagation (0–2 weeks) | 78–82 | 72–75 | 0.3–0.4 | 200–300 (shaded) |
| Post-rooting / Toning | 74–78 | 68–72 | 0.4–0.5 | Up to 400–600 |
| Vegetative / Establishment | 70–75 | 65–68 | 0.5+ | 600–1200+ (natural + supplemental) |
| Forcing / Bract Development | 65–72 | 60–65 | 0.5–0.8 | 600–1000 (during 10-hr light period) |
VPD (vapor pressure deficit) is the measure of how much 'room' the air has to absorb moisture, it's more useful than relative humidity alone because it accounts for temperature. At propagation you want a high-humidity, low-VPD environment (around 0.3 to 0.4 kPa, equating to roughly 85 to 90% RH) to prevent cutting desiccation before roots form. Once plants are rooted and established, progressively increase VPD toward above 0.5 kPa to promote healthy transpiration and reduce the risk of botrytis and bacterial diseases, which thrive in stagnant, humid conditions.
Ventilation basics
A minimum of 2 to 3 air changes per hour is the practical winter benchmark for a hobby greenhouse, enough to keep humidity from stratifying and to prevent combustion gas buildup if you use gas heaters. In summer, temperature management requires much more ventilation capacity, especially if you're using evaporative cooling pads and exhaust fans. Size your fan system based on worst-case summer heat, not winter needs. The cooling season is typically the binding constraint. Louvers, ridge vents, and side-wall vents all contribute, but powered exhaust fans give you reliable control. If you're in a consistently hot climate (Florida, central Australia, the Philippines), cooling capacity and shade cloth will be your most important equipment investments.
Greenhouse equipment you actually need
You don't need a commercial-grade facility to grow great poinsettias, but a few key pieces of equipment genuinely make the difference between guessing and knowing what's happening inside your greenhouse.
- Heating: a thermostat-controlled unit heater sized for your greenhouse volume and your coldest winter night temperatures; propane and natural gas heaters are common; electric is simpler but more expensive to run in cold climates
- Cooling / shade: shade cloth rated at 30–50% light reduction for summer propagation and finishing; evaporative cooling pads with exhaust fans for hot climates; roll-up sidewalls for passive ventilation in mild conditions
- Blackout curtain system: retractable roof and sidewall curtains with overlap tails and sealed edges; motorized systems tied to a timer are strongly preferred over manual
- Supplemental lighting: HPS or white-spectrum LED grow lights capable of delivering 100–200 μmol·m⁻²·s⁻¹ at canopy level; put them on the same timer system as the blackout curtains
- Environmental sensors: at minimum a digital thermometer/hygrometer logging min/max values; ideally a controller that reads temperature, humidity, and CO₂ and manages heating, cooling, and ventilation automatically
- Benches: raised wire-mesh or slatted benches improve air circulation around pots and reduce disease pressure; keep pot bases off solid surfaces to prevent root rot
- Irrigation equipment: drip lines or ebb-and-flow trays for container crops; manual watering works fine at small scale but requires disciplined monitoring
- pH and EC meters: inexpensive but essential for monitoring your nutrient solution and substrate leachate
One investment I wish I'd made earlier is a basic data-logging environmental controller, the kind that records temperature and humidity overnight so you can see whether your night minimums are hitting the targets even when you're not physically present. Many issues with slow bract development or stretched internodes trace back to night temperatures running higher than the grower realized.
Potting media, containers and drainage
Poinsettias are notoriously sensitive to overwatering and root rot, which means your substrate choice is more important than it might seem. You want a mix that drains quickly but holds enough moisture and nutrients between irrigations. A commercially formulated peat- or coir-based soilless mix with added perlite (typically 20 to 30% perlite by volume) hits that balance well. Straight garden soil is too dense and should be avoided entirely in containers.
Container size affects plant size and water management. A standard 6-inch pot works well for a single-stem or lightly pinched plant; 8- to 10-inch pots suit bushier, multi-pinched specimens. Make sure every container has drainage holes, I run mine on raised wire-mesh benches so excess water drains away rather than pooling in saucers. If you plan to move plants outdoors or plant them in the landscape, see guidance on how to grow poinsettias in the ground for site selection, soil preparation, and seasonal considerations. If you're growing in a warm climate and planning to eventually transition plants outdoors or into the ground, that's a different cultural track covered separately for climates like Florida and Australia.
Substrate moisture targets
Research using volumetric water content (VWC) sensors gives us some useful benchmarks. At container capacity (freshly watered and drained), a typical peat-perlite mix sits around 45 to 60% VWC. The practical stress threshold, where growth suffers and leaf wilt becomes visible, is around 25% VWC. I aim to irrigate when the substrate hits approximately 35% VWC, keeping plants comfortably between that point and container capacity without sitting waterlogged. During the finishing phase, slightly lower VWC (regulated deficit, keeping plants on the drier end of the comfortable range) can reduce internode stretch, which is a real advantage if you want a compact, well-proportioned plant.
Watering and irrigation: getting it consistently right
More poinsettias die from overwatering than underwatering, in my experience. The most common scenario: the grower waters on a fixed calendar schedule regardless of how wet the substrate actually is. Roots sitting in saturated media for even a few days create conditions where Pythium and Phytophthora root rot can establish quickly, and once you see wilting and blackened stems at the soil line, the plant is usually unrecoverable.
The better approach is to check the substrate before every irrigation event. Lift the pot, dry pots are noticeably lighter. Push your finger 1 to 2 inches into the media. If it still feels moist, wait. If a VWC sensor is available, water when readings approach 35%. When you do water, water thoroughly until a modest amount drains from the bottom, a leaching fraction of roughly 10 to 20% of the applied volume is ideal because it helps flush accumulated fertilizer salts from the substrate. For detailed guidance on leaching fractions and monitoring substrate EC, see Salt management and leaching fraction examples in container production (MDPI – crop salinity studies). Poinsettias in small containers in a warm greenhouse may need daily watering during active growth; the same plants in cool weather might go 3 to 4 days between irrigations.
Reading the signs
- Overwatering signs: lower leaves yellowing and dropping, soft stem at the soil line, media stays wet for more than 2–3 days after watering, algae growing on pot surface
- Underwatering signs: wilting during the day that partially recovers at night, dry brittle soil, leaf curl and marginal browning, premature bract drop in late-stage plants
- Salt buildup signs: white crusty deposits on pot rim or substrate surface, marginal leaf scorch, slow growth despite adequate watering — respond by increasing leaching fraction temporarily and monitoring substrate EC with a pour-through test
Fertilizing your greenhouse poinsettias
Poinsettias are moderate to heavy feeders during vegetative growth and need a more targeted approach once forcing begins. The practical approach I use is constant liquid feed at a consistent concentration, adjusted by growth stage.
| Stage | N Rate (ppm) | Notes |
|---|---|---|
| Propagation (first 2 weeks) | 0–50 ppm N | Minimal or no fertilizer until roots establish; avoid salt stress on cuttings |
| Post-rooting to transplant | 100–150 ppm N | Begin balanced fertilizer (e.g., 20-10-20); increase gradually as roots establish |
| Vegetative / Establishment | 200–250 ppm N | Balanced fertilizer with calcium and magnesium; maintain pH 5.8–6.2 in substrate |
| Forcing phase | 150–200 ppm N | Reduce nitrogen slightly; maintain potassium; calcium nitrate helpful to firm bracts |
| Late finishing (last 2–3 weeks) | 100–150 ppm N, higher K | Reduce N further; higher potassium-to-nitrogen ratio helps harden and intensify bract color |
Keep substrate pH between 5.8 and 6.2. Outside this range, nutrient lockout becomes a real problem, iron and manganese deficiency in particular shows up as interveinal chlorosis on young leaves. Check pH at every pour-through test, which I do monthly at minimum and weekly during active forcing. Magnesium deficiency (interveinal yellowing on older leaves) is common when watering frequency is high and leaching is removing Mg faster than the fertilizer program replaces it, supplementing with Epsom salts at 1 teaspoon per gallon occasionally resolves it quickly.
Propagation: cuttings and plugs
If you're a beginner, buying rooted plugs from a wholesale supplier or a specialty nursery is genuinely the most reliable starting point. Rooted plugs arrive ready to transplant, eliminating the 3 to 5 weeks and specialized environment needed to root unrooted cuttings. The difference in success rate for a first-time poinsettia grower is significant. For a deeper look at the plug route specifically, the guide on how to grow poinsettias from plugs covers sourcing and handling in detail.
If you do want to propagate from cuttings, either to save money, multiply a specific cultivar you already own, or simply learn the skill, take 3- to 4-inch tip cuttings from healthy, actively growing stock plants in late June or early July (for a December target). Cut just below a node, remove lower leaves, and let the cut end dry for 10 to 15 minutes to reduce latex bleeding before sticking into your propagation media.
Propagation environment
This is where many beginners lose cuttings. The first two weeks after sticking are critical. Keep the propagation area shaded to a maximum of 200 to 300 μmol·m⁻²·s⁻¹ PPFD, direct sun will desiccate unrooted cuttings before they have any ability to replace lost water. Mist the cuttings or use a closed propagation chamber to maintain very high humidity (85 to 90% RH, VPD around 0.3 to 0.4 kPa). Root-zone temperature should be 78 to 82°F (25 to 28°C) during the day, dropping to 72 to 75°F (22 to 24°C) at night. Heating mats under the trays are excellent for hitting this root-zone target even when air temperatures are lower. Once you see new leaf growth and resistance when gently tugging a cutting (usually 3 to 4 weeks), roots have formed. Begin acclimating plants to higher light levels, up to 400 to 600 μmol·m⁻²·s⁻¹, over the following week.
Pinching for shape and bract count
Poinsettias won't produce the full bushy display with many colored bract clusters unless you pinch them during the vegetative phase. Each pinch removes the growing tip and forces the plant to branch, with each branch eventually producing a bract cluster at the top.
For a standard 6-inch container with one or two bract clusters, a single pinch in mid-August is often sufficient. For a larger, multi-stem pot, give plants a first pinch shortly after transplanting (when new growth is 3 to 4 inches long) and a second pinch in early September. Stop all pinching at least 4 to 5 weeks before you start blackout forcing, if you pinch too late, the new growth that breaks afterward won't have enough time to develop mature bract tissue before initiation begins, and you'll get an uneven or delayed display.
Variety recommendations for greenhouse culture
The poinsettia cultivar landscape has expanded enormously. Modern varieties are bred for specific response times, bract shapes, colors, and plant architecture. For greenhouse growers targeting a December bloom, I focus on cultivars with known response times and good indoor holding quality.
| Cultivar / Series | Bract Color | Response Time (weeks) | Notes |
|---|---|---|---|
| Prestige Red | Classic red | ~8 weeks | Industry workhorse; compact habit, disease-tolerant, excellent holder |
| Freedom Red | Deep red | ~8–9 weeks | Vigorous, large bracts; widely available as plugs; good for 6–8 inch containers |
| Ice Punch | Red with white center | ~8 weeks | Novelty bi-color; same care as standard red varieties; eye-catching for holiday display |
| Princettia Hot Pink | Hot pink | ~7–8 weeks | Compact; suited to smaller pots; naturally branching habit reduces pinching needed |
| Marble Star | White/pink marbled | ~8–9 weeks | Elegant soft tones; needs consistent temperature management for best color expression |
| Sonora White | Creamy white | ~8 weeks | Clean white; shows fertilizer stress quickly — excellent 'canary' for your nutrition program |
Always confirm response time with your plug or cutting supplier, since breeding programs update these constantly. A cultivar listed as '8 weeks' from one supplier may perform differently than the same name from another if the genetics have been updated. For your first crop, stick with one or two well-known red varieties, they're the most forgiving, the most documented, and the ones where troubleshooting advice is easiest to find.
Regional adjustments: hot climates and year-round growing
Growing poinsettias in a greenhouse in a northern temperate climate is mainly about managing cold, providing supplemental light in fall and winter, and using blackout curtains to extend the dark period in late summer when natural nights are still too short. In warm climates, Florida, subtropical Australia, the Philippines, the challenges flip. You're fighting heat, managing humidity, and often dealing with natural night lengths that are close to but not quite long enough at the right time of year, or (in tropical regions) natural nights that are consistently too short to trigger blooming reliably without blackout assistance.
In these climates, cooling and shade cloth become your primary infrastructure investments. Evaporative cooling can bring greenhouse temperatures down by 10 to 15°F on hot days, but in high-humidity subtropical and tropical environments (think parts of Florida in summer, or the Philippines year-round) evaporative cooling loses effectiveness because the air is already close to saturation. In those conditions, refrigerative cooling or aggressive ventilation combined with shade cloth is more reliable. The temperature targets for flower initiation, 60 to 70°F (15 to 21°C), can be genuinely difficult to hit in peak summer in these regions, so timing your forcing period to coincide with naturally cooler months where possible makes the environmental control task much more manageable. For location-specific guidance on outdoor and in-ground culture, there's dedicated coverage for Florida growing and for Australian conditions that goes into those regional nuances in more detail. For detailed, location-specific instructions, see the section on how to grow poinsettia in Australia. For gardeners in warm regions interested in training flowering vines, see our guide on how to grow Pyrostegia venusta (flame vine). For location-specific guidance, see the guide on how to grow poinsettia in the Philippines for practical tips tailored to tropical conditions. For detailed, location-specific advice, see our guide on how to grow poinsettias in Florida.
After-Christmas care and re-blooming
Once the holiday display is done, most people treat their poinsettia as disposable, but if you've gone to the effort of growing it yourself in a greenhouse, you already have the infrastructure to re-bloom it the following year. Keep the plant in a warm, bright spot (your greenhouse works perfectly) after the holiday season. Cut stems back to about 6 to 8 inches in late winter or early spring, around February or March, to encourage fresh vegetative growth. Resume regular watering and fertilizing as new shoots emerge. By May or June you'll have a vigorous stock plant that can either be maintained and forced again directly, or used to provide cuttings for a new crop, which is often the better approach since cuttings from your own vigorous stock plants can produce excellent plants the following season. For a detailed walkthrough of the post-Christmas re-blooming process, the guide on how to grow poinsettia after Christmas covers each step from pruning through re-forcing.
Troubleshooting common problems
Bracts not coloring or coloring unevenly
This is almost always a photoperiod problem. Check your blackout system for light leaks immediately, walk the greenhouse after dark with your eyes fully adjusted. Confirm that your timer is deploying curtains at the right time and that no interior lights (heater pilot lights, equipment indicator LEDs, timer displays) are inside the curtain line. If the system looks solid, check night temperatures: high night temps (above 70°F/21°C) during forcing can significantly delay bract initiation even when darkness is adequate. Reduce night temperatures to 60 to 65°F and extend the forcing period by a week or two to compensate.
Stretchy, leggy stems
Internode stretch in poinsettias is driven by low light, high temperatures, and high nitrogen. Check that your supplemental lights are delivering adequate PPFD during the light period. Increase air movement to reduce boundary layer humidity around leaves. Slightly reduce nitrogen in your fertilizer program and allow the substrate to run a bit drier (but not past the 25% VWC stress threshold). A cooler pre-dawn temperature pulse (negative DIF technique) can physically reduce internode elongation, but be careful, extreme DIF in poinsettias has been shown to delay flowering, so moderate temperature differentials are safer than aggressive ones.
Root rot and stem rot
Pythium and Phytophthora are the most common culprits. Prevention is the only reliable strategy: well-draining substrate, containers with good drainage, raised benches, and a consistent 'check before you water' irrigation discipline. If you see wilting that doesn't recover overnight and the roots are brown and mushy rather than white and firm, the plant is likely unrecoverable. Discard it, disinfect the bench and container, and review your watering practices before starting the next pot.
Common pests
- Whitefly: the most notorious poinsettia pest; use yellow sticky traps for monitoring; treat with insecticidal soap, spinosad, or neem oil at first sign; greenhouse whitefly populations can explode in warm conditions, so early intervention is critical
- Fungus gnats: larvae damage roots and vector Pythium; allow substrate to dry between irrigations (most effective prevention); yellow sticky traps monitor adult populations; Bacillus thuringiensis israelensis (Bti) drenches target larvae
- Spider mites: more common in hot, dry greenhouse conditions; look for stippling on leaves and fine webbing; increase humidity, improve air circulation, treat with miticide or insecticidal soap
- Mealybugs: waxy white clusters at stem nodes; treat with alcohol-soaked cotton swab for small infestations, or systemic insecticide for larger outbreaks
Nutrient disorders
- Iron/manganese deficiency: interveinal chlorosis on young leaves; caused by high substrate pH (above 6.5) — lower pH with acidifying fertilizer or sulfur and confirm with a pH meter
- Calcium deficiency: distorted, cupped young leaves, sometimes called 'marginal bract necrosis' — ensure good air movement (calcium uptake is transpiration-driven) and use calcium nitrate in your fertilizer program
- Magnesium deficiency: interveinal yellowing on older leaves — supplement with magnesium sulfate (Epsom salts) at 1 tsp/gallon as a soil drench
- Boron deficiency: distorted growing points, stunted new growth — use a complete micronutrient fertilizer; boron is needed in small amounts but deficiency appears quickly in fast-growing crops
Putting it all together
Growing poinsettias in a greenhouse is one of those projects where the biology genuinely rewards careful attention to a few specific details, chiefly darkness, temperature, and moisture management, and is surprisingly forgiving of imperfection everywhere else. My biggest advice after years of growing them is to invest in decent sensors before anything else. Once you can see what's actually happening inside your greenhouse (temperature swings overnight, humidity spikes after watering, light leaks you didn't know existed), the fixes become obvious. Start with a proven red variety, use rooted plugs for your first crop, build your blackout system as robustly as your budget allows, and work backwards from your target bloom date. The plants will do the rest.
FAQ
What definitive photoperiod information must be included for poinsettia forcing schedules?
Daily dark-period requirement (quantified): typical growers impose ~14–14.5 hours uninterrupted darkness and 9.5–10 hours light for 8–11 weeks; cite extension/production guides and primary research. Explicit warnings about light interruptions: state that even short pulses (≤15 minutes) or very low irradiances (~0.1 μmol·m−2·s−1 / ≈0.5 fc or <0.5 lux) can disrupt initiation — cite extension bulletins and photoperiod sensitivity research.
What blackout/photoperiod-control specifications and operational details are needed?
Blackout system specs: retractable roof/side blackout curtains with full overlaps, sealed tails at gutters, motorized/timed deployment. Performance targets: minimize leaks to <0.5 lux (practical target) and treat installations as near‑absolute darkness. Operational notes: nightly automated schedule, door/light‑lock procedures, and testing for light leaks; cite greenhouse curtain trade literature, NRAES/NJ AES guidance and extension how‑to articles.
What precise light‑level guidance should the article provide (propagation and finish)?
Propagation: initial PPFD target ≈150–300 μmol·m−2·s−1 (≈1,000–1,500 fc) first 1–2 weeks, then raise to 400–600 μmol·m−2·s−1 during toning/acclimation before transplant. Finishing: supplemental PPFD typically 70–200 μmol·m−2·s−1 to reach DLI ≈12–16 mol·m−2·d−1 depending on season/market speed. Lighting type note: recommend white LEDs or HPS historically, and emphasize that even very low night photons can act as night breaks; cite Purdue, MDPI, Cornell lighting references.
What temperature setpoints and rationale must be included for propagation, initiation and finishing?
Propagation/rooting: daytime canopy/root‑zone ≈78–82°F (25–28°C), night ≈72–75°F (22–24°C). Photoperiodic initiation: daily canopy temperatures optimal ≈60–70°F (15–21°C) to speed floral/bract initiation; warn that sustained high night temps delay initiation. Finishing/retail: daytime mid‑60s to low‑70s °F (≈18–24°C) with nights several degrees cooler; note effects of DIF on stretch. Cite Purdue, Texas A&M, review articles.
What humidity and VPD targets should be specified by stage?
Propagation: high RH ≈85–90% (VPD ≈0.3–0.4 kPa). After rooting/vegetative: progressively reduce RH to target VPD >0.5 kPa during finishing to promote transpiration and reduce disease risk. Provide numeric VPD/RH equivalents and cite MSU extension and VPD-focused guidance.
What irrigation and substrate management metrics are required?
Sensor and substrate targets: maintain volumetric water content (VWC) roughly 45–60% at container capacity in propagation, avoid dropping below ≈25% VWC during production unless applying deliberate deficit. EC monitoring: check substrate EC or leachate monthly and target crop‑specific ranges (provide example thresholds from cited papers). Leaching fraction: recommend 10–20% leaching per irrigation event to control salts. Reference peer‑reviewed VWC/irrigation studies and MDPI salt management articles.
How to Grow Poinsettia in the Philippines: Holiday Guide
How to grow poinsettia in the Philippines: tropical guide to time holiday bracts, propagation, care and pest control.